
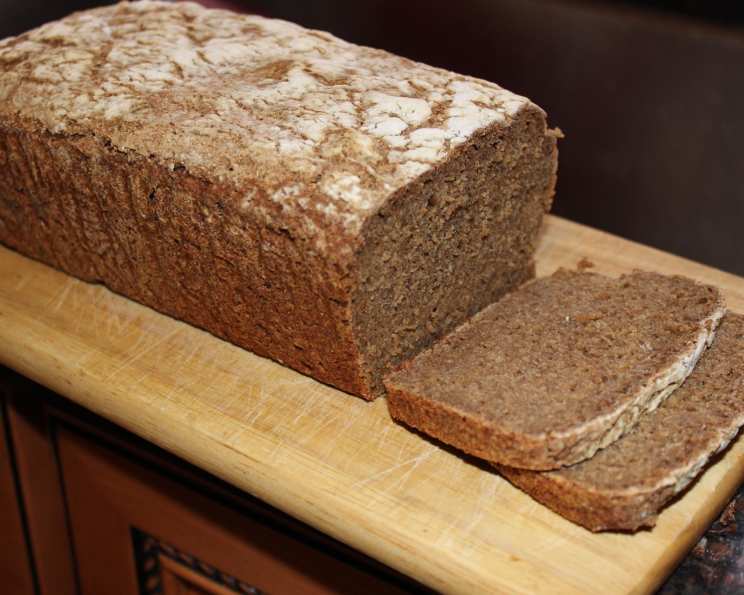
The Soul of Rye: Baking 100% Rye Bread
The scent of rye bread baking always transports me back to my grandmother’s kitchen. I can almost feel the warmth of the wood-burning stove and see her strong hands kneading the dark, sticky dough. It wasn’t just bread; it was a connection to our heritage, a taste of home that filled our hearts as much as our bellies. That dense, tangy flavor is something I’ve been chasing in my own kitchen ever since, and this recipe comes as close as I’ve ever gotten to recreating that memory.
Recipe Overview
- Prep Time: 9 hours 15 minutes
- Cook Time: 45 minutes
- Total Time: 10 hours
- Servings: 32
- Yield: 2 standard loaves
- Dietary Type: Dairy-Free
Ingredients
Sponge:
- 1 cup (250g) sourdough starter (liquid starter made with equal volumes of rye flour and water)
- 4 cups (523g) whole grain rye flour
- 3 cups (684g) lukewarm water
Final Dough:
- 6 tablespoons (75g) sugar
- 2 tablespoons (18g) table salt
- 3 tablespoons (42g) molasses
- 2 tablespoons (12g) caraway seeds
- 4 cups (523g) whole grain rye flour
Equipment Needed
- Large bowl
- Clear, straight-sided container
- Bench scraper
- Two 8″ x 4″ bread pans (standard loaf pans)
- Parchment paper
- Oiled plastic wrap
- Cooling rack
Instructions
-
Begin by refreshing your sourdough starter using equal parts rye flour and water. This step is crucial as it provides you with a robust rye starter, ideal for maintaining a unique rye culture alongside any other starters you might have.
-
Prepare the sponge. In the clear, straight-sided container, combine 1 cup of the refreshed starter, 3 cups of lukewarm water, and 4 cups of whole grain rye flour. Mix well until the flour is fully incorporated.
-
Ferment the sponge. Cover the container and let it ferment in a warm area, ideally between 70°F and 80°F, for approximately 4 hours or until it has doubled in volume. The clear container is especially useful for monitoring the rise.
-
Combine the sponge with the remaining ingredients. Once the sponge has doubled, transfer it to a large bowl. Add 6 tablespoons of sugar, 2 tablespoons of salt, 3 tablespoons of molasses, and 2 tablespoons of caraway seeds.
-
Incorporate the remaining rye flour. Gradually add 4 cups of whole grain rye flour, mixing thoroughly after each addition until everything is well combined.
-
Rest the dough. Cover the bowl and let the dough rest for 20 minutes. This rest period allows the flour to fully hydrate, making the dough easier to handle.
-
Shape the dough. Scrape the dough onto a lightly wetted counter. Note that this dough is quite sticky and cement-like. Keep a bowl of water nearby and frequently dip your spoons, scrapers, and fingers into it to minimize sticking. Kneading in the traditional sense isn’t really feasible with this dough. Instead, use a wetted bench scraper and wet hands to fold and mix the dough for a few minutes, ensuring the ingredients are evenly distributed.
-
Divide and form the loaves. Divide the dough in half and gently form each portion into a ball.
-
Prepare the pans. Spray two 8″ x 4″ bread pans with oil, then line them with parchment paper, leaving an overhang for easy removal. Spray the parchment paper as well to ensure the loaves don’t stick.
-
Place the dough into pans. Gently press each ball of dough into the prepared pans, smoothing the surface with wet hands. At this point, you can sprinkle the tops with additional seeds or dust them with white flour, if desired.
-
Proof the loaves. Cover the pans with oiled plastic wrap and let the loaves rise in a warm environment (70°F to 80°F) until they have increased in volume by about 30%. This proofing process typically takes approximately 2 to 3 hours.
-
Preheat the oven. Preheat your oven to 375°F (190°C).
-
Bake the loaves. Bake the loaves for 45 minutes or longer, until the internal temperature reaches 200°F (93°C). To ensure even baking, rotate the loaves in the oven after 20 minutes.
-
Cool completely. Remove the loaves from the pans and place them on a cooling rack to cool completely before slicing. The flavor of the bread improves over time, and it will stay fresh at room temperature for several days or more.
-
Slice and enjoy! Slice the bread thinly and savor the rich, tangy flavor of your homemade 100% rye bread.
Expert Tips & Tricks
- Temperature is key: Maintaining a consistent temperature during fermentation and proofing is crucial for optimal results. If your kitchen is cold, consider using a proofing box or placing the dough near a warm oven.
- Water is your friend: Don’t be afraid to use plenty of water when handling the dough. Wet hands and a wet bench scraper will prevent the dough from sticking excessively.
- Doneness check: While a thermometer is the most reliable way to check for doneness, you can also tap the bottom of the loaf. A hollow sound indicates that the bread is fully baked.
- Patience is a virtue: Resist the urge to slice into the bread before it has cooled completely. Allowing the bread to cool fully ensures that the crumb sets properly and the flavor develops fully.
Serving & Storage Suggestions
This 100% rye bread is incredibly versatile. Serve it thinly sliced with smoked salmon and cream cheese for a classic Scandinavian-inspired treat. It also pairs beautifully with hearty soups, stews, and strong cheeses. For a simple yet satisfying meal, try it toasted with a smear of butter and a sprinkle of sea salt.
Store the bread at room temperature in a breadbox or wrapped in a clean linen cloth. It will stay fresh for several days. For longer storage, you can freeze the bread, either whole or sliced. Thaw it at room temperature before serving. To refresh slightly stale bread, lightly spritz it with water and warm it in the oven for a few minutes.
Nutritional Information
| Nutrient | Amount per Serving | % Daily Value |
|---|---|---|
| Calories | 105 kcal | – |
| Calories from Fat | 4 g | 4% |
| Total Fat | 0.5 g | 0% |
| Saturated Fat | 0.1 g | 0% |
| Cholesterol | 0 mg | 0% |
| Sodium | 435.9 mg | 18% |
| Total Carbohydrate | 23.2 g | 7% |
| Dietary Fiber | 3.2 g | 12% |
| Sugars | 3.7 g | – |
| Protein | 2.9 g | 5% |
Note: Nutritional information is an estimate and may vary based on specific ingredients and preparation methods.
Variations & Substitutions
- Seed Variations: Experiment with different seeds, such as sunflower seeds, pumpkin seeds, or flax seeds, in addition to or instead of caraway seeds.
- Spice it Up: Add a pinch of ground coriander or fennel to the dough for a more complex flavor profile.
- Sweeten the Deal: For a sweeter bread, increase the amount of molasses slightly.
- Flour Power: While this recipe calls for 100% rye flour, you could substitute a portion of it with another type of flour, such as whole wheat flour, for a slightly lighter texture. Keep in mind that this will alter the flavor and density of the bread.
FAQs (Frequently Asked Questions)
Q: Why is my rye bread so dense?
A: 100% rye bread is naturally dense due to the low gluten content of rye flour. This recipe is designed to produce a dense loaf, but ensuring proper fermentation and proofing can help improve the texture.
Q: Can I use active dry yeast instead of sourdough starter?
A: While you can technically use active dry yeast, the flavor will be significantly different. Sourdough starter provides the characteristic tangy flavor and complex aroma that defines rye bread.
Q: How do I know if my sourdough starter is active enough?
A: An active starter will double in size within a few hours of feeding and have a bubbly, frothy appearance. If your starter is sluggish, continue feeding it regularly until it becomes more active.
Q: What can I do if my dough doesn’t rise properly?
A: Make sure your proofing environment is warm enough (70-80°F). You can also try proofing the dough in a slightly warmer place, such as near a preheating oven.
Q: How long does this bread last?
A: This bread will last for several days at room temperature and can be frozen for longer storage. Its flavor actually improves over a day or two.
Final Thoughts
Baking 100% rye bread might seem intimidating at first, but the rewarding aroma and distinctive flavor are well worth the effort. Don’t be discouraged if your first attempt isn’t perfect; each loaf is a learning experience. Embrace the process, experiment with variations, and most importantly, share your creations with loved ones. Serve alongside a bowl of steaming borscht or topped with your favorite smoked fish, and savor the soul-satisfying taste of homemade rye. Happy baking!