
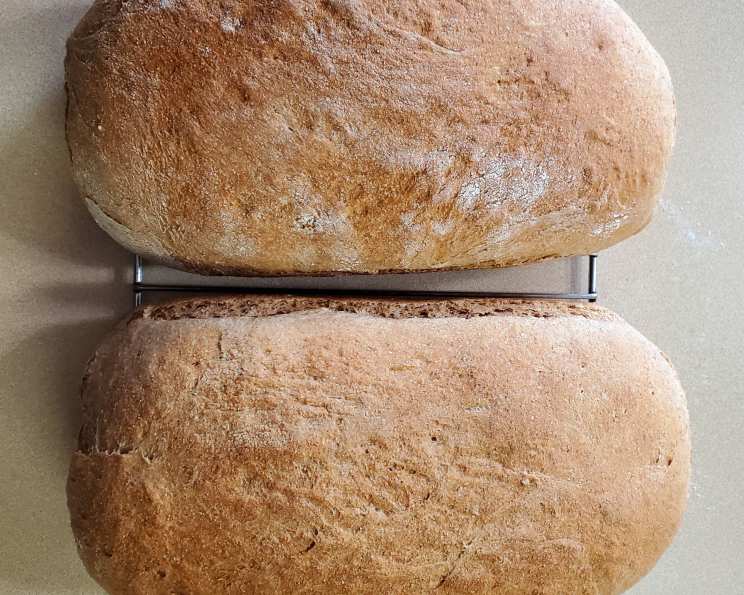
The Soulful Slice: Baking 100% Whole Grain Wheat Bread
My grandmother, bless her heart, wasn’t much of a talker, but she spoke volumes through her bread. Every Sunday, the aroma of freshly milled wheat would fill her tiny kitchen, a fragrant promise of comfort and connection. Her 100% whole wheat loaf wasn’t just bread; it was a symbol of her unwavering love, a warm embrace in every slice. Though she’s gone now, each time I bake this recipe, I’m transported back to her kitchen, kneading memories into the dough.
Recipe Overview
- Prep Time: 2 hours
- Cook Time: 36-41 minutes
- Total Time: 3 hours 15 minutes
- Servings: 24
- Yield: 2 Loaves
- Dietary Type: Vegetarian
Ingredients
- 2 3/4 cups hot water
- 1/3 cup olive oil (any oil is fine)
- 1/3 cup honey
- 2 tablespoons molasses
- 1 tablespoon salt (Sea Salt is good)
- 7 1/2 cups 100% whole grain wheat flour
- 2 tablespoons dry active yeast
Equipment Needed
- Stand mixer (optional, but recommended)
- Large mixing bowl
- Measuring cups and spoons
- Two 9×5 inch bread pans
- Grease (Crisco recommended)
- Cooling rack
- Floured surface
Instructions
-
In a large mixing bowl (or the bowl of your stand mixer), combine the hot water, olive oil, honey, molasses, and salt. Mix well to ensure the honey and molasses are dissolved.
-
Add 2 cups of the 100% whole grain wheat flour to the wet ingredients. This will help cool the water slightly, ensuring it’s at the optimal temperature for the yeast. Mix until combined.
-
Add the dry active yeast. If you’re unsure about the potency of your yeast, it’s always a good idea to proof it first in a little warm water with a pinch of sugar. If it foams up within 5-10 minutes, you’re good to go!
-
Add 4 cups of the 100% whole grain wheat flour to the mixture. Mix until the consistency is somewhat even.
-
Continue to slowly add the remaining flour, about 1/2 cup at a time, until the dough quits sticking to the sides of the bowl. The dough should be tacky to the touch. This is a crucial step! The trick is to use just enough flour to achieve a consistency that will allow the bread to stand up, but not so much that it becomes heavy and dense. The total amount of flour will likely be around 6 1/2 cups, but do not exceed 7 1/2 cups. Remember, you can substitute one cup of wheat flour for one cup of all-purpose white flour if desired for a slightly lighter texture.
-
Do not over mix the dough, as this can lead to a tough bread. Mix just until the ingredients are well combined and the dough is pulling away from the sides of the bowl.
-
Once the dough is finished, leave it in the mixer bowl (or transfer it to a greased bowl), cover it with a clean cloth or plastic wrap, and let it rise in a warm place for about 30-45 minutes. The dough will expand, but it doesn’t necessarily need to double in size.
-
While the dough is rising, grease two bread pans with Crisco (or your preferred shortening). You can also flour the pans after greasing them to further reduce the risk of sticking.
-
After the first rise, gently mix the dough again just enough to knock it down, bringing it back to close to its original size. This helps to redistribute the yeast and creates a more even crumb in the final loaf.
-
Drop the dough onto a lightly floured surface. Working with your hands, gently shape it into a ball, adding enough flour to prevent it from sticking to your hands.
-
Divide the ball in half. Then, shape each half into a loaf. To shape the loaves, gently turn the dough under itself over and over, creating tension on the surface. This will help the loaf hold its shape during baking. When the dough is shaped, the sides and ends will be sealed, and you will have a nice, oblong-shaped loaf with smooth sides and top.
-
Drop the shaped loaves into your prepared bread pans.
-
Let the loaves rise again until almost doubled in size. This second rise is important for achieving a light and airy texture. The rising time will vary depending on the temperature of your kitchen, but it usually takes about 30-60 minutes.
-
Bake in a preheated oven at 350°F (175°C) for 36 minutes. If you forgot to preheat your oven, bake for 41 minutes (especially if using a gas oven).
-
When the bread is done, the crust should be golden brown, and the loaves should sound hollow when tapped on the bottom.
-
Immediately turn the bread out of the pans and onto a cooling rack to cool completely.
-
You can eat it right away – a great time to enjoy it with some real butter! However, don’t wrap it until it’s completely cooled. Condensation will make the crust soggy.
-
To store, wrap the cooled bread in tinfoil and keep it on the counter. Storing it in the refrigerator will cause it to become dry and dense. Enjoy!
Expert Tips & Tricks
- Milling your own flour: For the freshest and most flavorful bread, consider milling your own whole grain wheat flour. A home flour mill can be a worthwhile investment for serious bread bakers.
- Dough Consistency: Pay close attention to the dough consistency. A slightly tacky dough is ideal for a light and fluffy loaf. Avoid adding too much flour, as this will result in a dense, dry bread.
- Oven Temperature: Oven temperatures can vary. If your bread is browning too quickly, you can tent it with aluminum foil during the last 15 minutes of baking.
- Steam: For a crustier crust, you can add a pan of hot water to the bottom rack of the oven during the first 15 minutes of baking. The steam will help create a crispier crust.
Serving & Storage Suggestions
Serve this 100% whole grain wheat bread warm with butter, jam, or a drizzle of honey. It’s also excellent for sandwiches, toast, or alongside a hearty soup or stew. Store the bread in a tinfoil or bread bag at room temperature for up to 3 days. Freezing is not recommended as it tends to dry the loaf out.
Nutritional Information
| Nutrient | Amount per Serving | % Daily Value |
|---|---|---|
| Calories | 176.4 kcal | N/A |
| Calories from Fat | 36 kcal | N/A |
| Total Fat | 4 g | 6% |
| Saturated Fat | 0.6 g | 2% |
| Cholesterol | 0 mg | 0% |
| Sodium | 293.6 mg | 12% |
| Total Carbohydrate | 32.5 g | 10% |
| Dietary Fiber | 4.3 g | 17% |
| Sugars | 4.9 g | N/A |
| Protein | 5.4 g | 10% |
Variations & Substitutions
- Sweetener: Substitute the honey with maple syrup or agave nectar for a different flavor profile.
- Nuts and Seeds: Add 1/2 cup of chopped walnuts, pecans, sunflower seeds, or flax seeds to the dough for added texture and nutrition.
- Spices: Incorporate 1 teaspoon of cinnamon, nutmeg, or cardamom for a warm and aromatic loaf.
- Herbs: Add 2 tablespoons of chopped fresh rosemary, thyme, or oregano for a savory variation.
- Flour: For a slightly less dense loaf, you can substitute one cup of the whole wheat flour with all-purpose flour.
FAQs (Frequently Asked Questions)
Q: Why is my whole wheat bread so dense?
A: Over-mixing the dough or adding too much flour can result in a dense bread. Be careful not to overwork the dough and add flour gradually until it’s just tacky to the touch.
Q: Can I use instant yeast instead of active dry yeast?
A: Yes, you can substitute instant yeast for active dry yeast. Use the same amount and add it directly to the dry ingredients without proofing.
Q: How do I know if my bread is done baking?
A: The bread is done when the crust is golden brown and the loaf sounds hollow when tapped on the bottom. You can also use a thermometer to check the internal temperature, which should be around 200-210°F (93-99°C).
Q: Can I freeze this bread?
A: While freezing is not highly recommended as it may dry out the bread, you can freeze it by wrapping it tightly in plastic wrap and then in foil. Thaw completely before slicing and serving.
Q: Why is my bread not rising properly?
A: Ensure your yeast is fresh and active. Also, provide a warm environment for the dough to rise, away from drafts. The temperature should be around 75-80°F (24-27°C) for optimal yeast activity.
Final Thoughts
Baking this 100% whole grain wheat bread is a journey of love, patience, and sensory delight. From the intoxicating aroma of freshly milled wheat to the satisfying warmth of a slice slathered with butter, this recipe is more than just bread; it’s a connection to our past and a celebration of simple pleasures. I encourage you to try this recipe and experience the joy of baking your own wholesome, delicious bread. Don’t be afraid to experiment with variations and substitutions to make it your own. Share your creations with loved ones, and let the aroma of freshly baked bread fill your home with warmth and happiness. A slice of this bread pairs wonderfully with a bowl of hearty soup or a cup of hot coffee. Happy baking!