
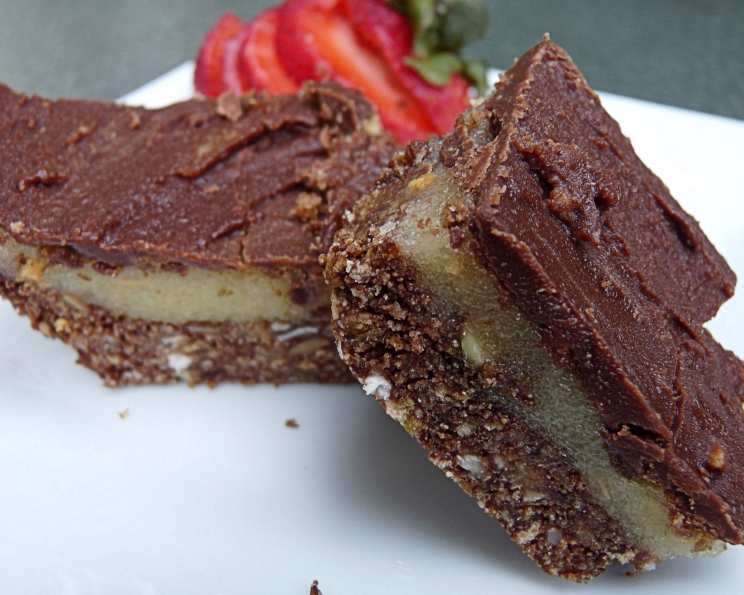
Decadent 3-Layer Dream Bars: A Family Favorite
I can still remember the anticipation, the electric thrill of knowing those magical bars were nestled in the freezer, patiently waiting for Christmas Day. My mom always made them, and the scent of melting chocolate and the distinct layers of crumbly graham cracker, creamy vanilla, and rich chocolate were the essence of the holidays. Those 3-Layer Bars weren’t just a dessert; they were a symbol of warmth, family, and the pure joy of the season. To this day, making them transports me back to those cozy childhood memories, and I’m so happy to share this treasured recipe with you.
Recipe Overview
- Prep Time: 30 minutes
- Cook Time: 0 minutes (baking not required, only melting)
- Total Time: 50 minutes (plus freezing time)
- Servings: 60
- Yield: 1 9×13 inch pan
- Dietary Type: Not Gluten-Free, Not Dairy-Free
Ingredients
First Layer:
- 2 cups graham cracker crumbs
- 1 cup flaked coconut
- 1/2 cup chopped nuts
- 1 large egg, beaten
- 1/2 cup butter, melted
- 1 teaspoon vanilla extract
- 5 tablespoons sugar
- 1/2 cup baking cocoa (not sweetened)
Second Layer:
- 1 lb powdered sugar
- 3 1/2 ounces instant vanilla pudding (1 small box)
- 1/3 cup melted butter
- Milk, as needed
- 1 drop yellow food coloring (optional)
Third Layer:
- 1 (12 ounce) package chocolate chips
- 1 tablespoon butter
Equipment Needed
- 9×13 inch baking pan
- Mixing bowls
- Measuring cups and spoons
- Double boiler or small saucepan
- Spatula
Instructions
-
Prepare the First Layer (Crust): In a large mixing bowl, combine the graham cracker crumbs, flaked coconut, chopped nuts, beaten egg, melted butter, vanilla extract, sugar, and baking cocoa. Mix well until all ingredients are evenly incorporated and the mixture resembles coarse, damp sand.
-
Press the Crust: Press the mixture firmly and evenly into the bottom of a 9×13 inch baking pan. Use the back of a spoon or your fingers to create a compact and solid crust.
-
Chill the Crust: Place the pan in the freezer to set while you prepare the second layer. This will help the crust hold its shape and prevent it from mixing with the filling.
-
Prepare the Second Layer (Filling): In a separate mixing bowl, combine the powdered sugar, instant vanilla pudding mix, and melted butter. Gradually add milk, a little at a time, until you achieve a stiff, frosting-like consistency. Be careful not to add too much milk, as the filling needs to be spreadable but firm.
-
Add Color (Optional): If desired, add one drop of yellow food coloring to the filling and mix well for a subtle hue.
-
Assemble the Second Layer: Remove the pan from the freezer. Scrape the second layer onto the first layer, spreading it as evenly as possible. Use your hands or a spatula to gently press down and smooth the surface.
-
Chill the Filling: Return the pan to the freezer to allow the filling to firm up.
-
Prepare the Third Layer (Chocolate Topping): In a double boiler or a small saucepan over very low heat, melt the chocolate chips and butter together. Stir constantly to prevent burning. Ensure the chocolate is smooth and glossy. If using a saucepan, be extra vigilant and remove from the heat if it begins to scorch.
-
Pour and Spread the Chocolate: Remove the pan from the freezer. Pour the melted chocolate mixture evenly over the second layer.
-
Spread Quickly: Working quickly before the chocolate sets, spread the chocolate layer evenly using a spatula.
-
Chill Briefly: Return the pan to the freezer for no more than a few minutes. You want the chocolate to begin to set but not become rock-hard.
-
Cut into Squares: The point at which the chocolate loses its shine and takes on a dull appearance is the right time to remove the pan from the freezer. Use a sharp knife to cut the bars into small squares.
-
Final Chill: After cutting, return the bars to the freezer to harden completely.
-
Remove and Store: Once the bars are fully frozen, remove them from the pan and store them in an airtight container in the refrigerator.
Expert Tips & Tricks
- Toast the Coconut: For a deeper, richer flavor, lightly toast the flaked coconut in a dry skillet before adding it to the crust. Watch carefully to prevent burning!
- Nut Variations: Experiment with different types of nuts in the crust, such as pecans, walnuts, or almonds.
- Milk Consistency: The consistency of the second layer is crucial. Start with a small amount of milk and add more gradually until you reach the desired stiffness.
- Chocolate Tempering: For a perfectly shiny chocolate topping, temper the chocolate using a double boiler and a candy thermometer.
- Freezing Time: Monitor the chocolate layer closely during the final chilling step. If it becomes too hard, it will be difficult to cut without cracking.
Serving & Storage Suggestions
Serve these 3-Layer Bars chilled, straight from the refrigerator. Their cool, creamy texture is a perfect complement to the rich chocolate and crumbly crust. Store leftover bars in an airtight container in the refrigerator for up to a week. For longer storage, freeze them for up to a month. To thaw, place the bars in the refrigerator overnight. They can also be enjoyed directly from the freezer for a refreshing treat.
Nutritional Information
| Nutrient | Amount per Serving | % Daily Value |
|---|---|---|
| Calories | 119 kcal | N/A |
| Calories from Fat | 53 kcal | N/A |
| Total Fat | 5.9 g | 9% |
| Saturated Fat | 3.3 g | 16% |
| Cholesterol | 10.4 mg | 3% |
| Sodium | 75.2 mg | 3% |
| Total Carbohydrate | 17.4 g | 5% |
| Dietary Fiber | 0.9 g | 3% |
| Sugars | 14.5 g | N/A |
| Protein | 0.9 g | 1% |
Variations & Substitutions
- Gluten-Free: Substitute gluten-free graham crackers for regular graham crackers in the crust.
- Dairy-Free: Use a dairy-free butter substitute and dairy-free chocolate chips. Consider using a coconut milk-based vanilla pudding.
- Nut-Free: Omit the nuts from the crust or substitute with seeds like sunflower or pumpkin seeds.
- Peanut Butter Version: Add a layer of peanut butter between the second and third layers. Melt peanut butter chips and spread evenly before adding the melted chocolate.
- Mint Chocolate: Add a few drops of peppermint extract to the chocolate layer for a festive twist.
FAQs (Frequently Asked Questions)
Q: Why does the chocolate crack when I cut the bars?
A: The chocolate layer is likely too hard. Make sure you only chill the bars briefly after adding the chocolate, just until it begins to set but is still soft enough to cut cleanly.
Q: Can I use a different flavor of pudding mix?
A: Yes! Experiment with different pudding flavors like chocolate, butterscotch, or cheesecake to customize the filling.
Q: How do I prevent the bottom crust from being soggy?
A: Press the crust very firmly into the pan to create a solid base. Chilling the crust in the freezer before adding the filling will also help.
Q: Can I make these ahead of time?
A: Absolutely! These bars are perfect for making ahead. They can be stored in the refrigerator for up to a week or frozen for up to a month.
Q: What is the best way to melt the chocolate without burning it?
A: The best method is using a double boiler or a saucepan over very low heat. Stir constantly and remove from the heat if the chocolate starts to scorch. You can also melt the chocolate in the microwave in 30-second intervals, stirring in between.
Final Thoughts
These 3-Layer Bars are more than just a dessert; they’re a taste of nostalgia, a sweet reminder of cherished moments. I encourage you to try this recipe and create your own memories with this delightful treat. Feel free to experiment with variations and make it your own. And most importantly, don’t forget to share your creations and feedback! Perhaps pair these bars with a warm cup of coffee or a glass of cold milk for the ultimate indulgence. Enjoy!