
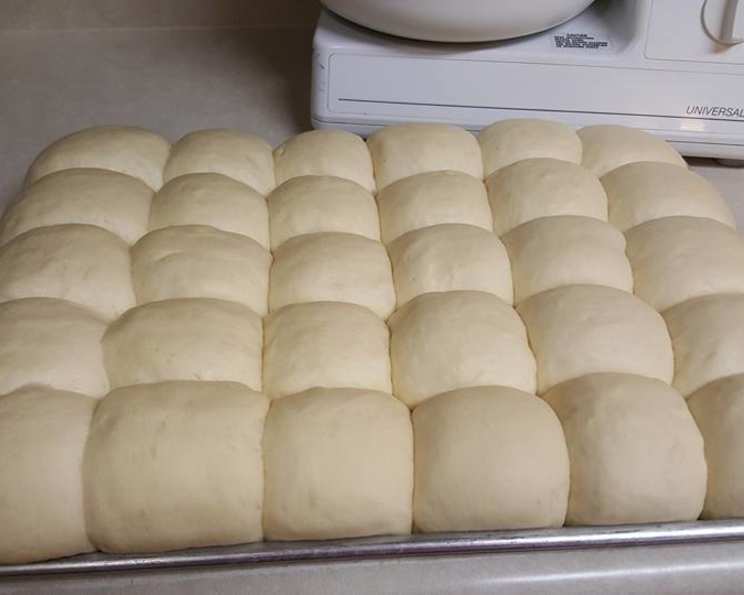
60-Minute Dinner Rolls: Fresh Bread in an Hour!
The aroma of baking bread is, without a doubt, my most potent memory trigger. Even now, years after leaving home, a whiff of yeast and warm dough instantly transports me back to my grandmother’s cozy kitchen. I remember, as a child, watching her effortlessly transform simple ingredients into golden-brown masterpieces. She’d always let me help, my small hands clumsily trying to knead the dough just like hers. Though the process was slow and the results often lopsided, the joy of eating a warm, homemade roll, slathered with butter, was unparalleled. This 60-Minute Dinner Roll recipe captures that same feeling of warmth and home, but without the hours of waiting!
Recipe Overview
- Prep Time: 20 minutes
- Cook Time: 12 minutes
- Total Time: 60 minutes
- Servings: 24 rolls
- Yield: 2 dozen
- Dietary Type: Vegetarian
Ingredients
- 3 1/2 cups unsifted flour
- 1 teaspoon salt
- 1 cup milk
- 1/4 cup margarine or butter
- 3 tablespoons sugar
- 2 (1/4 ounce) packages dry yeast
- 1/2 cup water
Equipment Needed
- Large bowl
- Saucepan
- Mixer (optional, but recommended)
- Measuring cups and spoons
- Greased baking sheet
- Lightly floured board
Instructions
-
Preheat your oven to 425 degrees F (220 degrees C). Ensure your oven rack is positioned in the center for even baking.
-
In a large bowl, thoroughly mix 1 1/2 cups of the unsifted flour, sugar, salt, and the undissolved dry yeast. Make sure the yeast is evenly distributed among the dry ingredients. This step ensures proper activation.
-
In a saucepan, combine milk, water, and margarine or butter. Heat over low heat until the liquids are very warm, ideally between 120 to 130 degrees F (49 to 54 degrees C). The margarine or butter doesn’t need to melt completely; it’s fine if there are a few small pieces. Using a thermometer is highly recommended to avoid overheating, which can kill the yeast.
-
Gradually add the warm milk mixture to the dry ingredients in the large bowl.
-
Beat the mixture at medium speed for 2 minutes, scraping the bowl occasionally to ensure all ingredients are well combined. If using a stand mixer, use the paddle attachment. If mixing by hand, use a sturdy whisk or spoon and mix vigorously.
-
Add 1/2 cup of flour and beat at high speed for another 2 minutes, again scraping the bowl occasionally. This step develops the gluten and creates a smooth batter.
-
Stir in enough additional flour to make a soft dough. The dough should be slightly sticky but manageable. You may not need the entire remaining cup of flour. Add it gradually, a few tablespoons at a time, until the dough reaches the right consistency.
-
Turn the dough out onto a lightly floured board.
-
Knead the dough until smooth and elastic, about 5 minutes. Proper kneading is crucial for developing the gluten, which gives the rolls their structure and texture. If the dough is too sticky, add a little more flour, a teaspoon at a time, while kneading.
-
Place the dough in a greased bowl, turning it to grease the top. This prevents the dough from drying out while rising.
-
Cover the bowl and place it over a pan of water that is about 98 degrees F (37 degrees C). This creates a warm, humid environment that encourages rapid rising. Alternatively, you can place the bowl in a warm oven (turned off) or a microwave with a cup of hot water.
-
Let the dough rise for 15 minutes.
-
Punch the dough down to release the air. Turn it out onto a lightly floured board.
-
Shape the dough into rolls and place them on a well-greased baking sheet. You can make them any size or shape you prefer – round, oblong, or even cloverleaf rolls.
-
Cover the rolls and let them rise in a warm, draft-free place for about 15 minutes, or until almost doubled in bulk. This second rise is essential for light and airy rolls.
-
Bake at 425 degrees F (220 degrees C) for about 12 minutes, or until golden brown. Keep a close eye on them during the last few minutes of baking to prevent burning. The rolls are done when they sound hollow when tapped on the bottom.
Expert Tips & Tricks
- Yeast Activation: Make sure your yeast is fresh! Expired yeast won’t rise properly. You can test your yeast by mixing it with warm water and sugar. If it foams within 5-10 minutes, it’s good to use.
- Dough Consistency: The dough should be soft and slightly sticky. Avoid adding too much flour, as this can make the rolls dense.
- Warm Environment: Creating a warm and humid environment for rising is key to a quick rise.
- Baking Time: Baking times may vary depending on your oven. Start checking the rolls for doneness around 10 minutes.
- Shiny Crust: For a shiny crust, brush the tops of the rolls with melted butter or milk before baking.
- Using a stand mixer makes the process much easier, but these rolls can definitely be made by hand with some good old-fashioned elbow grease!
Serving & Storage Suggestions
These dinner rolls are best served warm, straight from the oven, with a generous pat of butter. They also pair wonderfully with soups, stews, salads, and roasted meats.
- Room Temperature: Store leftover rolls in an airtight container at room temperature for up to 2 days.
- Refrigerator: Store in the refrigerator for up to 5 days.
- Freezer: For longer storage, freeze the rolls in a freezer-safe bag or container for up to 2 months. To reheat, thaw completely and warm in a low oven (around 300 degrees F or 150 degrees C) for 10-15 minutes, or until heated through.
Nutritional Information
| Nutrient | Amount per Serving | % Daily Value |
|---|---|---|
| Calories | 89.3 kcal | N/A |
| Calories from Fat | 13 g | N/A |
| Total Fat | 1.5 g | 2% |
| Saturated Fat | 0.5 g | 2% |
| Cholesterol | 1.4 mg | 0% |
| Sodium | 113.8 mg | 4% |
| Total Carbohydrate | 16.2 g | 5% |
| Dietary Fiber | 0.7 g | 2% |
| Sugars | 1.6 g | N/A |
| Protein | 2.5 g | 4% |
Note: Nutritional information is an estimate and may vary based on specific ingredients and portion sizes.
Variations & Substitutions
- Whole Wheat Rolls: Substitute up to half of the all-purpose flour with whole wheat flour for a nuttier flavor and added fiber.
- Herb Rolls: Add 1-2 tablespoons of dried herbs, such as rosemary, thyme, or oregano, to the dry ingredients.
- Garlic Rolls: Mix minced garlic and melted butter and brush over the rolls before baking.
- Sweet Rolls: Increase the sugar to 1/4 cup and add a teaspoon of vanilla extract for sweeter rolls. You can also brush them with a simple glaze after baking.
- Dairy-Free: Substitute the milk with a plant-based milk alternative, such as almond or soy milk, and use a dairy-free margarine or oil.
FAQs (Frequently Asked Questions)
Q: Can I use instant yeast instead of active dry yeast?
A: Yes, you can! Instant yeast can be added directly to the dry ingredients without proofing. Use the same amount as specified in the recipe.
Q: My dough didn’t rise. What went wrong?
A: Several factors can affect rising. Make sure your yeast is fresh, the liquids aren’t too hot (which can kill the yeast), and the environment is warm and draft-free.
Q: Can I make the dough ahead of time?
A: Yes, you can prepare the dough ahead of time and store it in the refrigerator for up to 24 hours. Let it come to room temperature before shaping and baking.
Q: My rolls are browning too quickly. What should I do?
A: If the rolls are browning too quickly, tent them with foil during the last few minutes of baking.
Q: Can I freeze the baked rolls?
A: Absolutely! Baked rolls freeze well. Make sure they’re completely cooled before wrapping them tightly in plastic wrap and freezing them in a freezer-safe bag or container.
Final Thoughts
There’s truly nothing like the satisfaction of serving warm, homemade bread to your loved ones. These 60-Minute Dinner Rolls are a testament to the fact that you don’t need to spend hours in the kitchen to create something truly special. So, gather your ingredients, preheat your oven, and get ready to experience the joy of baking! I encourage you to try this recipe and put your own spin on it. Don’t hesitate to share your experience and any adaptations you make – I’d love to hear about them! These rolls pair perfectly with a hearty pot roast or a comforting bowl of tomato soup. Enjoy!