
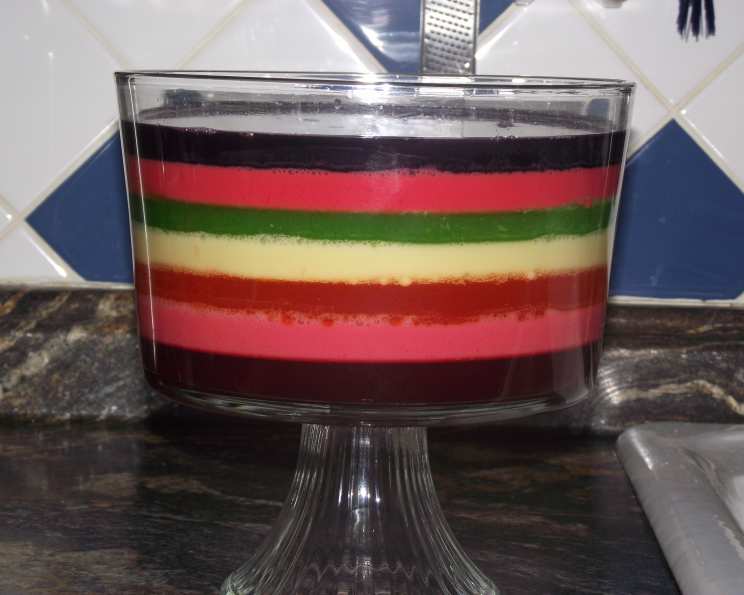
Rainbow Dreams: Mastering the Art of 7-Layer Jello
The first time I saw 7-Layer Jello, it was at my Great Aunt Millie’s Fourth of July picnic. A shimmering, technicolor dream sitting amidst the potato salad and watermelon, it looked like something out of a cartoon. I remember being absolutely mesmerized by the vibrant colors, each layer distinct yet harmoniously stacked. That wiggly, jiggly spectacle became the highlight of the day, and a cherished memory of summer, fireworks, and family.
Recipe Overview
- Prep Time: 45 minutes
- Chill Time: 4 hours
- Total Time: 4 hours 45 minutes
- Servings: 12-15
- Yield: 1 9×13 inch dish
- Dietary Type: Not specified, can be modified (see Variations)
Ingredients
- 1 (3 ounce) package black cherry Jell-O
- 1 (3 ounce) package cherry Jell-O
- 1 (3 ounce) package lime Jell-O gelatin
- 1 (3 ounce) package lemon Jell-O gelatin
- 1 (3 ounce) package orange Jell-O
- 1 (3 ounce) package raspberry Jell-O gelatin
- 1 (3 ounce) package strawberry Jell-O gelatin dessert
- 4 1/2 cups boiling water (divided)
- 4 1/2 cups cold water (divided)
- 1 1/2 cups evaporated milk (divided)
- 8 ounces Cool Whip
- 1/2 cup crushed pecans (optional)
Equipment Needed
- 9×13 inch glass dish
- Measuring cups
- Measuring spoons
- Spatulas or spoons
- Saucepan or microwave-safe bowl
- Whisk or fork
Instructions
- Prepare the First Layer: Bring 3/4 cup of water to a boil, either in a saucepan on the stovetop or in a microwave-safe bowl. Once boiling, carefully pour it into a bowl. Add the black cherry Jell-O to the boiling water and stir continuously until the gelatin is completely dissolved. Ensure no granules remain.
- Cool the First Layer: Remove the Jell-O mixture from the heat and add 3/4 cup of cold water. Stir well to combine and cool the mixture slightly.
- Pour and Chill the First Layer: Gently pour the black cherry Jell-O mixture into the bottom of your 9×13 inch glass dish. Place the dish in the refrigerator and chill for 40 minutes, or until the layer is set but still slightly tacky to the touch. This slight tackiness will help the next layer adhere properly.
- Prepare the Second Layer: Bring 1/2 cup of water to a boil. Add the cherry Jell-O and stir until completely dissolved. Remove from heat and add 1/2 cup of cold water and 1/2 cup of evaporated milk. Stir gently to combine, ensuring the milk is fully incorporated.
- Pour and Chill the Second Layer: Once the first layer has set, gently pour the cherry Jell-O mixture over the top. To prevent disturbing the first layer, spoon the mixture onto it initially, then gradually increase the pour as the layers meld together. Return the dish to the refrigerator and chill for 30 minutes, or until set.
- Prepare the Third Layer: Bring 3/4 cup of water to a boil. Add the lime Jell-O and stir until dissolved. Remove from heat and add 3/4 cup of cold water. Stir to combine.
- Pour and Chill the Third Layer: Carefully pour the lime Jell-O mixture over the second layer, using the spoon-and-pour technique to avoid disrupting the layers. Chill for another 30 minutes, or until set.
- Prepare the Fourth Layer: Bring 1/2 cup of water to a boil. Add the lemon Jell-O and stir until dissolved. Remove from heat and add 1/2 cup of cold water and 1/2 cup of evaporated milk. Stir gently until well combined.
- Pour and Chill the Fourth Layer: Gently pour the lemon Jell-O mixture over the third layer, again using the spoon-and-pour technique. Chill for 30 minutes, or until set.
- Prepare the Fifth Layer: Bring 3/4 cup of water to a boil. Add the orange Jell-O and stir until dissolved. Remove from heat and add 3/4 cup of cold water. Stir well.
- Pour and Chill the Fifth Layer: Carefully pour the orange Jell-O mixture over the fourth layer, ensuring minimal disturbance. Chill for 30 minutes, or until set.
- Prepare the Sixth Layer: Bring 1/2 cup of water to a boil. Add the raspberry Jell-O and stir until dissolved. Remove from heat and add 1/2 cup of cold water and 1/2 cup of evaporated milk. Stir gently until well combined.
- Pour and Chill the Sixth Layer: Gently pour the raspberry Jell-O mixture over the fifth layer. Chill for 30 minutes, or until set.
- Prepare the Seventh Layer: Bring 3/4 cup of water to a boil. Add the strawberry Jell-O and stir until dissolved. Remove from heat and add 3/4 cup of cold water. Stir well to combine.
- Pour and Chill the Seventh Layer: Gently pour the strawberry Jell-O mixture over the sixth layer. Chill for at least one hour, or until the final layer is completely set.
- Final Touches: Once the final layer is set, spread the Cool Whip evenly over the top. Sprinkle with crushed pecans if desired.
Expert Tips & Tricks
- Preventing Layer Mixing: The key to distinct layers is patience and careful pouring. Always start by spooning the Jell-O mixture onto the previous layer before gradually pouring.
- Adjusting Sweetness: If you prefer a less sweet dessert, you can slightly reduce the amount of Jell-O powder used.
- Speeding Up the Process: While patience is crucial, you can slightly speed up the chilling process by placing the dish in the freezer for shorter intervals (around 15-20 minutes), but be extremely careful not to freeze the layers solid.
- Using a Glass Dish: A glass dish is recommended not just for aesthetic appeal but also because it allows you to easily see the individual layers.
Serving & Storage Suggestions
Serve the 7-Layer Jello cold, directly from the refrigerator. Cut into squares to showcase the vibrant layers. This dessert is best served within 2-3 days of making it. Store any leftovers in an airtight container in the refrigerator. The Cool Whip topping may soften over time, but the Jell-O layers will remain stable. While freezing is not recommended due to textural changes, the refrigerated Jell-O will maintain its integrity for a short period.
Nutritional Information
| Nutrient | Amount per Serving | % Daily Value |
|---|---|---|
| Calories | 264 kcal | N/A |
| Total Fat | 7.2g | 11% |
| Saturated Fat | 5.6g | 27% |
| Cholesterol | 9.1mg | 3% |
| Sodium | 241.6mg | 10% |
| Total Carbohydrate | 46g | 15% |
| Dietary Fiber | 0g | 0% |
| Sugars | 41g | N/A |
| Protein | 5.7g | 11% |
Note: Nutritional information is an estimate and may vary based on specific ingredients used.
Variations & Substitutions
- Sugar-Free Option: Use sugar-free Jell-O and lite Cool Whip for a lower-sugar version.
- Vegan Adaptation: Unfortunately, traditional Jell-O contains gelatin, which is animal-derived. There are vegan gelatin alternatives available; however, they may not set up exactly the same. A coconut cream topping can substitute the Cool Whip.
- Seasonal Colors: Adapt the Jell-O flavors and colors to match holidays or special occasions. Use red and green for Christmas, pastel shades for Easter, or team colors for game day.
- Fruit Infusion: Add small pieces of fresh fruit to each layer before chilling for added flavor and texture. Be mindful of fruits like pineapple that contain enzymes that can interfere with the setting of gelatin.
FAQs (Frequently Asked Questions)
Q: Can I use different sized packages of Jell-O?
A: It’s best to stick to the 3-ounce packages for the correct ratios. Using larger packages will throw off the liquid-to-gelatin balance.
Q: How can I prevent the layers from bleeding into each other?
A: Make sure each layer is properly set before adding the next. Also, using the “spoon and pour” technique will minimize disturbance.
Q: Can I add alcohol to this recipe?
A: While it’s possible to add a small amount of alcohol to the gelatin mixture, it can inhibit the setting process. Proceed with caution and use sparingly.
Q: What if I don’t have evaporated milk?
A: You can substitute with whole milk or half-and-half, but the texture might be slightly different. Avoid using skim milk, as it doesn’t provide enough richness.
Q: How long does this Jell-O salad last in the refrigerator?
A: It’s best enjoyed within 2-3 days, as the Cool Whip can start to soften and the Jell-O may become watery over time.
Final Thoughts
The 7-Layer Jello is more than just a dessert; it’s a nostalgic trip, a celebration of color, and a testament to the joy of simple pleasures. So gather your ingredients, unleash your inner artist, and create a dazzling dessert that will captivate both young and old. Don’t be afraid to experiment with flavor combinations and decorations. I hope this recipe brings you as much joy as it has brought my family for generations. Happy jiggling!