
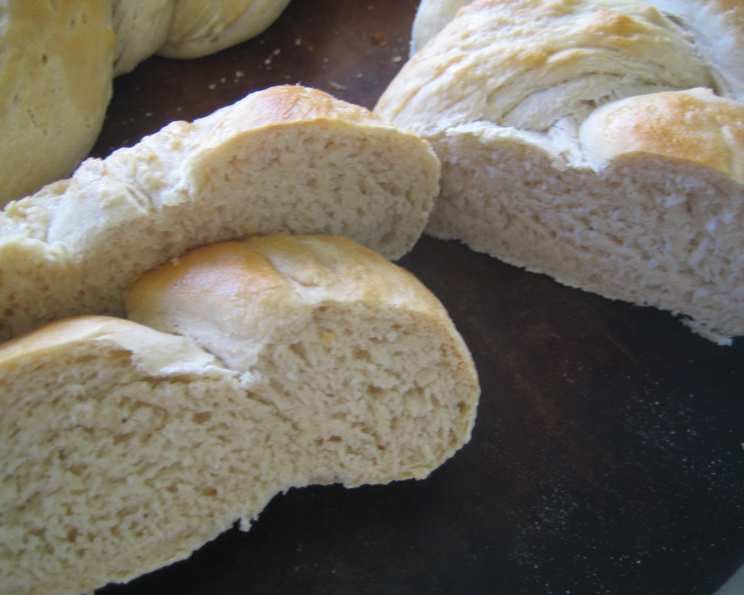
Abby’s French Bread Braids: A Taste of Home
My grandmother, a woman who expressed her love almost exclusively through food, had a repertoire of recipes she leaned on. While her cinnamon rolls were legendary, and her potato salad a summer staple, it was her braided bread that truly captured my heart. I remember standing beside her at the kitchen counter, mesmerized as she transformed simple ingredients into these beautiful, golden loaves. The aroma alone was enough to transport me to a place of comfort and warmth, and the first bite, always still slightly warm from the oven, was pure bliss. These French bread braids evoke that same feeling, a comforting reminder of family, tradition, and the simple joy of baking.
Recipe Overview
- Prep Time: 1 hour 15 minutes
- Cook Time: 25-30 minutes
- Total Time: 1 hour 40-45 minutes (plus rising time)
- Yields: 2 loaves
- Dietary Type: Vegetarian (easily made vegan by substituting the egg wash)
Ingredients
- 4 ¾ – 5 ¾ cups flour, all-purpose
- 1 tablespoon sugar
- 3 teaspoons salt
- 2 (1/4 ounce) packages dry yeast
- 2 cups water
- 2 tablespoons shortening
- 1 tablespoon water
- 1 egg white
Equipment Needed
- Large mixing bowl
- Small saucepan
- Measuring cups and spoons
- Floured surface for kneading
- Greased bowl
- Greased plastic wrap
- Cloth towel
- Large cookie sheet
- Small bowl for egg wash
- Wire racks
Instructions
-
In a large mixing bowl, combine 3 cups of the flour, the sugar, salt, and yeast. Mix these dry ingredients thoroughly.
-
In a small saucepan, heat 2 cups of water and the shortening until the mixture is very warm but not boiling. The shortening should be melted. Aim for a temperature between 120-130°F (49-54°C) for optimal yeast activation.
-
Add the warm water and shortening mixture to the flour mixture in the large bowl. Using an electric mixer, blend on low speed until the ingredients are moistened. Then, increase the speed to medium and mix for 3 minutes. This develops the gluten and creates a smooth batter.
-
By hand, stir in an additional 1 ½ – 2 ¼ cups of flour, adding it gradually, until a stiff dough forms. The amount of flour needed may vary depending on humidity. The dough should be firm enough to hold its shape but not too dry.
-
Turn the dough out onto a lightly floured surface. Knead in ¼ – ½ cup of flour, as needed, until the dough is smooth and elastic. This should take about 8 minutes. Proper kneading is crucial for developing the gluten structure, which gives the bread its characteristic texture. The dough should spring back when gently poked.
-
Place the kneaded dough in a greased bowl, turning to coat. Cover the bowl loosely with greased plastic wrap and a cloth towel. This prevents the dough from drying out and provides a warm environment for rising.
-
Let rise in a warm place until the dough is light and doubled in size. This usually takes about 45-60 minutes, depending on the temperature of your kitchen. A slightly warm oven (turned off!) can provide an ideal rising environment.
-
Grease a large cookie sheet.
-
Punch the dough down several times to remove all air bubbles. This step is important for achieving a consistent texture in the finished bread.
-
Divide the dough in half. Then, divide each half into 3 equal parts.
-
Roll each part into a 14-inch rope. Aim for consistent thickness to ensure even baking.
-
Braid the 3 ropes together, sealing the ends securely to prevent them from unraveling during baking. Place the braided loaf on the greased cookie sheet.
-
Repeat the braiding process with the other half of the dough.
-
In a small bowl, combine 1 tablespoon of water and the egg white. Beat slightly to create an egg wash.
-
Carefully brush the egg wash over the loaves. This will give the bread a beautiful golden-brown color and a slightly glossy finish.
-
Cover the loaves loosely and let rise in a warm place until they are light and doubled in size. This second rise usually takes about 20-30 minutes.
-
Preheat the oven to 375°F (190°C).
-
Uncover the loaves and brush them again with the egg white mixture. This second application ensures an even, rich color.
-
Bake for 25-30 minutes, or until the loaves are golden brown. Check for doneness by tapping the bottom of the loaf; it should sound hollow.
-
Remove from the oven and cool on wire racks. This prevents the bread from becoming soggy.
Expert Tips & Tricks
- Temperature is Key: Water temperature is crucial for yeast activation. Too cold, and the yeast won’t activate. Too hot, and you’ll kill it. Use a thermometer to ensure accuracy.
- Kneading Time: Don’t skimp on the kneading! Proper kneading develops the gluten, resulting in a chewier, more flavorful bread.
- Proofing Environment: A warm, humid environment is ideal for proofing. If your kitchen is cold, try placing the dough in a slightly warmed oven (turned off!) or near a warm stovetop.
- Egg Wash Alternative: For a vegan version, substitute the egg wash with a mixture of plant-based milk and a touch of maple syrup or agave nectar.
- Scoring: For a more artisanal look, score the top of the loaves with a sharp knife or lame just before baking. This also helps to control the expansion of the bread in the oven.
Serving & Storage Suggestions
Serve Abby’s French Bread Braids warm, sliced, with butter, jam, or your favorite spread. They also make excellent sandwiches or accompaniments to soups and salads.
Storage:
- Room Temperature: Store in a breadbox or airtight container for up to 2 days.
- Refrigerator: Store in an airtight container for up to 5 days.
- Freezer: Wrap tightly in plastic wrap and then foil, or place in a freezer bag, for up to 2 months. To reheat, thaw completely and then warm in a 350°F (175°C) oven for 10-15 minutes.
Nutritional Information
| Nutrient | Amount per Serving | % Daily Value |
|---|---|---|
| Calories | 1224 kcal | N/A |
| Calories from Fat | N/A | N/A |
| Total Fat | 17.4 g | 27% |
| Saturated Fat | 3.05 g | 15% |
| Cholesterol | 0 mg | 0% |
| Sodium | 1866.8 mg | 78% |
| Total Carbohydrate | 195.6 g | 65% |
| Dietary Fiber | 47.5 g | 190% |
| Sugars | 3.6 g | N/A |
| Protein | 95.55 g | N/A |
Note: Nutritional information is an estimate and may vary based on specific ingredients and portion sizes.
Variations & Substitutions
- Herb-Infused: Add 1-2 tablespoons of fresh herbs, such as rosemary, thyme, or oregano, to the dough for a savory twist.
- Cheese Bread: Incorporate 1 cup of shredded cheese, such as cheddar, mozzarella, or Parmesan, into the dough.
- Sweet Bread: Add ¼ cup of sugar and ½ teaspoon of cinnamon to the dough for a slightly sweet bread. You can also add raisins or other dried fruits.
- Whole Wheat: Substitute up to half of the all-purpose flour with whole wheat flour for a nuttier flavor and increased fiber content.
- Gluten-Free: Use a gluten-free flour blend specifically designed for bread making. You may need to adjust the amount of liquid and rising time.
FAQs (Frequently Asked Questions)
Q: Why is my dough not rising?
A: Several factors can inhibit rising, including expired yeast, water that’s too hot or too cold, or a cold room. Ensure your yeast is fresh, your water is between 120-130°F (49-54°C), and the dough is placed in a warm environment.
Q: How do I prevent the bread from browning too quickly?
A: If the bread is browning too quickly, tent it loosely with aluminum foil during the last 10-15 minutes of baking.
Q: Can I make the dough ahead of time?
A: Yes, you can make the dough ahead of time and refrigerate it for up to 24 hours. Punch it down before refrigerating and let it come to room temperature before shaping and baking.
Q: What is the best way to slice the bread?
A: Use a serrated bread knife to slice the bread. This will prevent it from tearing.
Q: How can I tell if the bread is done?
A: The bread is done when it is golden brown and the bottom sounds hollow when tapped. An internal temperature of 200-210°F (93-99°C) indicates doneness.
Final Thoughts
Abby’s French Bread Braids are more than just a recipe; they’re an invitation to create something beautiful and delicious from scratch. Whether you’re an experienced baker or just starting out, I encourage you to give this recipe a try. Embrace the process, enjoy the aroma, and share the warmth of freshly baked bread with those you love. Don’t be afraid to experiment with variations and make it your own. And if you do, please share your creations and feedback! Nothing brings me more joy than seeing others find happiness in the simple act of baking.