
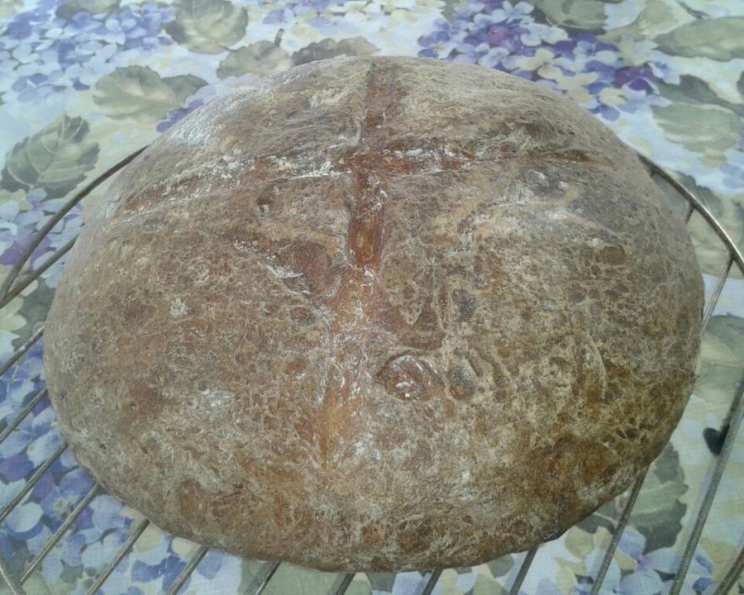
Alice’s Rustic Country Bread: A Journey Back to Simple Flavors
The aroma still lingers in my mind – a deep, almost primal scent of toasted wheat and a hint of sweetness. It takes me back to my grandmother’s kitchen, a place perpetually warmed by the wood-burning stove and filled with the comforting sounds of kneading dough. She wasn’t a fancy baker, but her bread, especially this rustic country loaf inspired by her friend Alice, possessed a soulfulness that no patisserie could ever replicate. Each slice was an edible memory, a reminder of simpler times and the joy of sharing good food with loved ones. The crust, crackling under the slightest pressure, gave way to a chewy, flavorful interior that begged to be slathered with butter or dipped in olive oil.
Recipe Overview
- Prep Time: 30 minutes (plus 5 hours resting time for the sponge)
- Cook Time: 35-40 minutes
- Total Time: 6 hours 45 minutes
- Servings: 12-16 (depending on slice thickness)
- Yield: 1 large loaf
- Dietary Type: Vegetarian (can be made vegan by substituting honey with maple syrup or agave)
Ingredients
For the Sponge:
- ½ teaspoon yeast
- 1 cup whole wheat flour
- 1 cup bread flour
- 1 cup water (room temperature)
For the Bread:
- 4 cups bread flour
- 1 ⅓ cups water (room temperature)
- 2 tablespoons honey
- 2 teaspoons salt
- Cornmeal, for dusting (optional)
Equipment Needed
- Large mixing bowl
- Dough hook (for stand mixer, optional)
- Plastic wrap
- Oiled bowl
- Dampened kitchen towel
- Baking tiles or baking stone
- Parchment paper
- Cookie sheet
- Sharp knife or razor blade
- Spray bottle
Instructions
-
Prepare the Sponge: In a large mixing bowl, stir together the yeast, whole wheat flour, bread flour, and water. The mixture will form a stiff dough. Cover the bowl tightly with plastic wrap and let it rest at room temperature for at least 5 hours, or even overnight. This process allows the yeast to develop, creating a richer flavor and a more airy texture.
-
Combine Remaining Ingredients: In a mixing bowl (preferably using a stand mixer with a dough hook), add the 4 cups of bread flour, 1 ⅓ cups of water, 2 tablespoons of honey, and 2 teaspoons of salt to the sponge.
-
Knead the Dough: Knead the dough with the dough hook until it becomes smooth and elastic. This may take around 5-7 minutes on medium speed. If kneading by hand, turn the dough out onto a lightly floured surface and knead for 10-12 minutes until it develops a similar texture. The dough will be quite soft and sticky, which is perfectly normal.
-
First Rise: Cover the bowl with plastic wrap and let the dough rise in a warm place for 2 hours. This allows the yeast to work its magic, doubling the dough in size.
-
Shape the Dough: After the first rise, gently fold the dough into itself to deflate it slightly. Because the dough is soft, using a rubber spatula can be helpful. Transfer the dough to a tall, oiled bowl with the smooth side up.
-
Second Rise: Cover the bowl with a dampened kitchen towel and let the dough rise for another 45 minutes.
-
Preheat the Oven: While the dough is rising for the second time, preheat your oven to 450 degrees F (232 degrees C). If you are using baking tiles or a baking stone, be sure to preheat them in the oven as well. This will ensure a crispy crust.
-
Prepare for Baking: After the 45-minute second rise, gently dump the dough out of the oiled bowl onto a piece of parchment paper that has been generously dusted with cornmeal. The cornmeal will prevent the dough from sticking. Place the parchment paper and dough onto a cookie sheet for easy transfer to the oven.
-
Score the Dough: Using a sharp knife or razor blade, make a criss-cross cut or a single long slash across the top of the dough. This will allow the bread to expand properly in the oven and create an attractive appearance.
-
Bake the Bread: Carefully slide the parchment paper with the dough onto the preheated baking tiles (or baking stone) in the oven. Spritz a little water into the oven using a spray bottle to create steam. This will help create a crispy crust. Quickly close the oven door to trap the steam.
-
Bake: Bake the bread for approximately 35 to 40 minutes, or until the internal temperature of the bread reaches 210 degrees F (99 degrees C). You can use an instant-read thermometer to check the temperature. The crust should be a deep golden brown.
-
Cooling: Once baked, remove the bread from the oven and let it cool completely on a wire rack before slicing and serving. This allows the internal structure of the bread to set properly.
Expert Tips & Tricks
- Hydration is Key: The high hydration level of this dough (meaning the high water content) contributes to its characteristic open crumb and chewy texture. Don’t be tempted to add more flour, even if the dough seems very sticky.
- Sponge Development: The longer the sponge ferments, the more complex the flavor of the bread will be. You can even refrigerate the sponge overnight for an even deeper flavor. Let it come to room temperature before proceeding with the recipe.
- Steam Power: Creating steam in the oven is crucial for achieving a crispy crust. If you don’t have a spray bottle, you can place a cast-iron skillet on the bottom rack of the oven and pour a cup of hot water into it when you put the bread in. Be careful to avoid getting burned by the steam.
- Tile Alternative: If you don’t have baking tiles or a stone, you can still bake the bread directly on a cookie sheet lined with parchment paper. While the crust may not be quite as crispy, the bread will still be delicious.
- Doneness Test: If you don’t have a thermometer, you can tell if the bread is done by tapping on the bottom of the loaf. It should sound hollow.
Serving & Storage Suggestions
Alice’s Rustic Country Bread is best enjoyed fresh, still slightly warm from the oven. Slice it thickly and serve it with butter, olive oil, or your favorite spreads. It’s also excellent for making sandwiches, toast, or croutons.
To store, wrap the bread tightly in plastic wrap or place it in a bread bag at room temperature. It will stay fresh for 2-3 days. For longer storage, you can freeze the bread for up to 2 months. Wrap it tightly in plastic wrap and then in foil to prevent freezer burn. To reheat, thaw the bread completely and then bake it in a preheated oven at 350 degrees F (175 degrees C) for about 10-15 minutes, or until warmed through.
Nutritional Information
| Nutrient | Amount per Serving | % Daily Value |
|---|---|---|
| Calories | 235 kcal | 12% |
| Total Fat | 1.0g | 1% |
| Saturated Fat | 0.2g | 1% |
| Cholesterol | 0mg | 0% |
| Sodium | 210mg | 9% |
| Total Carbohydrate | 49g | 16% |
| Dietary Fiber | 2.5g | 10% |
| Sugars | 2g | – |
| Protein | 6.5g | 13% |
Nutritional information is an estimate and may vary based on specific ingredients and portion sizes.
Variations & Substitutions
- Whole Wheat Variation: For a nuttier flavor and denser texture, substitute up to half of the bread flour with whole wheat flour.
- Honey Alternative: If you prefer not to use honey, you can substitute it with maple syrup, agave nectar, or even molasses.
- Seeded Bread: Add a handful of seeds, such as sesame, poppy, or sunflower seeds, to the dough during the kneading process for added flavor and texture.
- Herb-Infused: Incorporate fresh herbs, such as rosemary, thyme, or oregano, into the dough for a savory twist.
- Garlic Bread: Before baking, brush the top of the loaf with garlic-infused olive oil for a flavorful garlic bread.
FAQs (Frequently Asked Questions)
Q: Why is my dough so sticky?
A: This recipe is designed to have a high hydration level, which results in a sticky dough. Resist the urge to add more flour, as this will make the bread dense.
Q: Can I use active dry yeast instead of instant yeast?
A: Yes, you can use active dry yeast. However, you will need to proof it first by dissolving it in warm water with a pinch of sugar for about 5-10 minutes until it becomes foamy. Then, add it to the other ingredients.
Q: How do I know when the bread is fully baked?
A: The best way to check for doneness is to use an instant-read thermometer. The internal temperature should reach 210 degrees F (99 degrees C). If you don’t have a thermometer, you can tap on the bottom of the loaf. It should sound hollow.
Q: Can I make this bread without a stand mixer?
A: Absolutely! You can knead the dough by hand on a lightly floured surface. It will take a bit longer, but the results will be just as delicious.
Q: What if I don’t have baking tiles or a baking stone?
A: You can bake the bread directly on a cookie sheet lined with parchment paper. While the crust may not be quite as crispy, the bread will still be delicious.
Final Thoughts
Alice’s Rustic Country Bread is more than just a recipe; it’s an invitation to slow down, connect with the simple pleasures of life, and create something truly special with your own hands. I urge you to try this recipe, to feel the soft, yielding dough between your fingers, and to experience the joy of pulling a warm, fragrant loaf from the oven. Share it with your loved ones, and let the comforting aroma and delicious flavor transport you to a simpler, more soulful place. Serve it alongside a hearty soup, a simple salad, or a glass of your favorite wine. And, most importantly, don’t be afraid to experiment and make it your own. After all, that’s what cooking is all about. Happy Baking!