
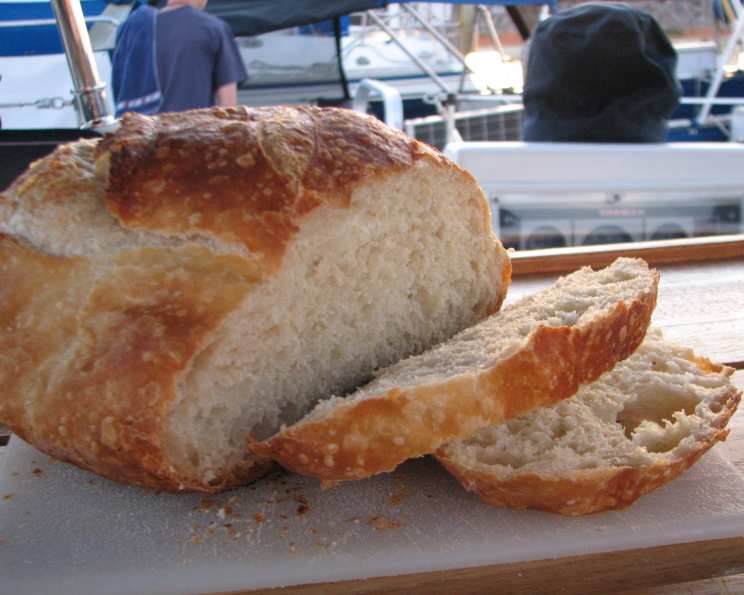
Almost No-Knead Bread 2.0: The Easiest Path to Bakery-Quality Loaves
The memory is etched in my mind: a crisp autumn day, the aroma of yeast and malt swirling in the air, and the triumphant moment when I pulled my first ever no-knead loaf from the Dutch oven. Its crust crackled like autumn leaves underfoot, and the interior was a wonderland of airy pockets and chewy texture. It felt like magic, a transformation of humble ingredients into something truly extraordinary, and it sparked a lifelong love affair with baking.
Recipe Overview
- Prep Time: 15 minutes
- Rise Time: 18 hours
- Cook Time: 50-60 minutes
- Cool Time: 2 hours
- Yields: 1 Large Round Loaf
- Dietary Type: Vegetarian
Ingredients
- 3 cups unbleached all-purpose flour, plus additional for dusting work surface (15 ounces)
- Alternatively, for whole wheat bread, use 2 cups unbleached all-purpose flour and 1 cup whole wheat flour.
- 1/4 teaspoon fast rise yeast
- 1 1/2 teaspoons sea salt
- 7 ounces room temperature water
- 3 ounces beer (lager or ale work well)
- 1 tablespoon white vinegar
- For Whole Wheat Only: 2 tablespoons honey
Equipment Needed
- Large mixing bowl
- Rubber spatula
- Plastic wrap
- 10-inch skillet
- Parchment paper
- Nonstick cooking spray
- Lightly floured work surface
- 6- to 8-quart heavy-bottomed Dutch oven with lid
- Razor blade or sharp knife
- Wire rack
- Instant-read thermometer
Instructions
- In a large bowl, whisk together the flour, yeast, and salt. If making whole wheat bread, add the honey to the dry ingredients at this stage.
- Add the water, beer, and vinegar to the dry ingredients.
- Using a rubber spatula, fold the mixture together, carefully scraping up any dry flour from the bottom of the bowl, until a shaggy ball forms. The dough will be quite sticky – this is perfectly normal!
- Cover the bowl tightly with plastic wrap and let it sit at room temperature for 8 to 18 hours. This long fermentation is crucial for developing the bread’s flavor and texture. The longer it sits, the more complex the flavor will be.
- After the rising period, prepare a 10-inch skillet by laying a 12- by 18-inch sheet of parchment paper inside and spraying it generously with nonstick cooking spray. This prevents the dough from sticking and makes transferring it to the hot Dutch oven much easier.
- Turn the dough out onto a lightly floured work surface. Knead it gently 10 to 15 times. This brief kneading helps to develop the gluten structure slightly, resulting in a better rise and crumb.
- Shape the dough into a ball by pulling the edges into the middle, creating surface tension. This step is important for giving the bread its round shape and preventing it from spreading too much during baking.
- Transfer the dough, seam-side down, to the parchment-lined skillet. Spray the surface of the dough lightly with nonstick cooking spray.
- Cover the skillet loosely with plastic wrap and let the dough rise at room temperature until it has doubled in size and does not readily spring back when poked gently with a finger, about 2 hours. The rising time will vary depending on the temperature of your kitchen.
- About 30 minutes before baking, adjust the oven rack to the lowest position. Place a 6- to 8-quart heavy-bottomed Dutch oven (with the lid on) on the rack and preheat the oven to 500 degrees Fahrenheit. The Dutch oven acts like a miniature oven, trapping steam and creating the perfect environment for a crispy crust and a soft, airy interior.
- Once the oven is fully preheated, lightly flour the top of the dough. Using a razor blade or a very sharp knife, make one 6-inch-long, 1/2-inch-deep slit along the top of the dough. This “slash” allows the bread to expand properly during baking, preventing it from cracking unevenly.
- Carefully remove the pot from the oven and remove the lid. Be extremely careful, as the Dutch oven will be incredibly hot. Use oven mitts to protect your hands.
- Pick up the dough by lifting the parchment overhang and lower it gently into the hot pot (let any excess parchment hang over the pot edge). The parchment makes this transfer incredibly easy and safe.
- Cover the pot with the lid and place it back in the oven.
- Reduce the oven temperature to 425 degrees Fahrenheit and bake the bread covered for 30 minutes.
- Remove the lid and continue to bake until the loaf is a deep golden brown and an instant-read thermometer inserted into the center registers 200 degrees Fahrenheit, 20 to 30 minutes longer. This is the crucial step for achieving that perfect crust. Keep a close eye on the bread during this stage, as ovens can vary.
- Carefully remove the bread from the pot using the parchment paper as handles. Transfer it to a wire rack and let it cool completely to room temperature, about 2 hours, before slicing and serving. This cooling period is essential for the bread to fully develop its flavor and texture.
Expert Tips & Tricks
- For a more tangy flavor: Extend the initial fermentation time up to 24 hours.
- Don’t skip the Dutch oven! While you might be tempted to bake it directly on a baking sheet, the Dutch oven truly creates a superior loaf.
- Slash depth matters: A shallow slash will result in minimal expansion, while a deep slash can cause the bread to deflate slightly. Aim for about ½ inch.
- Listen to your bread: If you hear a hollow sound when you tap the bottom of the loaf, it’s a good indication that it’s done.
- If your loaf is browning too quickly: Reduce the oven temperature slightly or tent the loaf loosely with foil during the final 10-15 minutes of baking.
- Adding a tablespoon of vital wheat gluten to the flour mixture, especially when using whole wheat flour, can improve the bread’s rise and texture.
Serving & Storage Suggestions
This Almost No-Knead Bread 2.0 is fantastic served warm with butter, olive oil, or your favorite jam. It also makes incredible sandwiches, toast, or croutons.
- Storage: Store the cooled bread in a paper bag at room temperature for up to 2 days. For longer storage, wrap it tightly in plastic wrap or a freezer bag and freeze for up to 2 months.
- Reheating: To reheat frozen bread, thaw it completely at room temperature. Then, wrap it in foil and warm it in a 350-degree Fahrenheit oven for 10-15 minutes, or until heated through. Alternatively, slice the bread and toast it.
Nutritional Information
| Nutrient | Amount per Serving | % Daily Value |
|---|---|---|
| Calories | 1537 kcal | N/A |
| Calories from Fat | 33g | 2% |
| Total Fat | 3.7g | 5% |
| Saturated Fat | 0.6g | 2% |
| Cholesterol | 0mg | 0% |
| Sodium | 3506mg | 146% |
| Total Carbohydrate | 324g | 108% |
| Dietary Fiber | 10g | 41% |
| Sugars | 35g | N/A |
| Protein | 39g | 79% |
Note: Nutritional information is an estimate and may vary based on specific ingredients and portion sizes.
Variations & Substitutions
- Herb & Garlic Bread: Add 2 tablespoons of chopped fresh herbs (such as rosemary, thyme, or oregano) and 2 cloves of minced garlic to the flour mixture.
- Olive Bread: Add 1/2 cup of chopped Kalamata olives to the dough after the initial fermentation.
- Cheese Bread: Add 1 cup of shredded cheese (such as cheddar, Parmesan, or Gruyere) to the dough after the initial fermentation.
- Spicy Bread: Add 1 teaspoon of red pepper flakes to the flour mixture for a little heat.
- Sourdough Version: Substitute 1/2 cup of the all-purpose flour with 1/2 cup of active sourdough starter. You may need to adjust the amount of water slightly to achieve the desired dough consistency.
- Gluten-Free Bread: While this recipe is designed for wheat flour, you can experiment with gluten-free flour blends. Be aware that the texture and rise will likely be different, and you may need to add a binding agent like xanthan gum.
FAQs (Frequently Asked Questions)
Q: Can I use active dry yeast instead of fast-rise yeast?
A: Yes, but you will need to proof the active dry yeast first. Dissolve it in a little warm water with a pinch of sugar and let it sit for 5-10 minutes until foamy before adding it to the flour.
Q: My dough didn’t rise much. What went wrong?
A: Several factors can affect the rise. Make sure your yeast is fresh. Also, a cold kitchen can slow down the rising process. Try placing the dough in a slightly warmer spot.
Q: Can I skip the beer?
A: While the beer adds a subtle flavor, you can substitute it with an equal amount of water.
Q: My crust is too hard. How can I prevent this?
A: Try reducing the oven temperature slightly or tenting the loaf loosely with foil during the final stages of baking.
Q: Can I make this dough in advance and bake it the next day?
A: Yes, after the initial fermentation, you can refrigerate the dough for up to 24 hours. Let it come to room temperature for about an hour before shaping and baking.
Final Thoughts
This Almost No-Knead Bread 2.0 is a testament to the fact that you don’t need years of experience or fancy equipment to bake incredible bread at home. It’s a forgiving, adaptable recipe that’s perfect for beginners and seasoned bakers alike. So, gather your ingredients, embrace the process, and prepare to be amazed by the aroma and taste of freshly baked bread. Don’t be afraid to experiment with variations and substitutions to make it your own. And most importantly, share your creations with friends and family – because nothing brings people together quite like a warm, crusty loaf of homemade bread.