
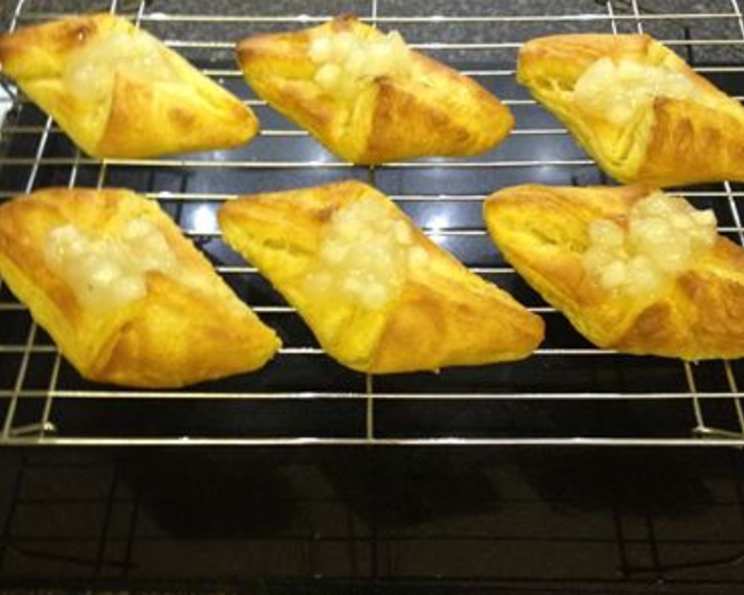
Apple Danish Pastries: A Taste of Home
The scent of warm apples and cinnamon, intertwined with the delicate aroma of butter and yeast, always transports me back to my grandmother’s kitchen. She would spend hours crafting these perfect pastries, her hands moving with a practiced grace that only years of baking can bestow. Each bite was a symphony of textures – the flaky, buttery crust giving way to a soft, spiced apple filling. These Apple Danish Pastries aren’t just a recipe; they’re a cherished memory, a warm hug in pastry form, ready to be shared and enjoyed.
Recipe Overview
- Prep Time: 2-3 hours (including chilling)
- Cook Time: 12 minutes
- Total Time: 2-3 hours (plus overnight chilling)
- Servings: 24
- Yield: 24 pastries
- Dietary Type: Not specified, contains dairy and eggs
Ingredients
- 2 packages active dry yeast or 2 compressed yeast cakes
- 1/4 cup water (see note below)
- 3/4 cup milk, scalded
- Sugar
- 2 teaspoons salt
- 1 1/3 cups butter or 1 1/3 cups margarine, divided
- 1/2 teaspoon lemon extract
- 3 eggs, beaten
- 4 1/2 cups all-purpose flour
- 1 (20 ounce) can sliced apples
- 3 teaspoons cinnamon
Note: The water temperature is crucial for activating the yeast. Ensure the water is very warm (105°F to 115°F) for dry yeast and lukewarm (80°F to 90°F) for compressed yeast.
Equipment Needed
- 9x13x2-inch baking pan
- Large mixing bowl
- Rolling pin
- Measuring cups and spoons
- Small bowls for yeast and cinnamon-sugar mixture
- Pastry brush (optional, for spreading butter)
Instructions
- Activate the yeast: In a small bowl, sprinkle the dry yeast or crumbled compressed yeast cake into the water. Let stand for a few minutes until softened, then stir until dissolved.
- Prepare the milk mixture: In a saucepan, scald the milk. Remove from heat and stir in 1/3 cup of the sugar, the salt, and 1/3 cup of the butter or margarine. Cool to lukewarm – this is a critical step; too hot and you’ll kill the yeast, too cold and the yeast won’t activate properly.
- Combine the wet ingredients: Add the yeast mixture to the cooled milk mixture. Stir well to combine.
- Add flavor and eggs: Stir in the lemon extract and the beaten eggs.
- Incorporate the flour: Gradually add the flour, mixing until a dough forms. The dough will be slightly sticky, but avoid adding too much flour, as this will make the pastries tough.
- First rise: Place the dough in a greased 9x13x2-inch pan. Chill in the refrigerator for 1 to 2 hours. This chilling process is essential for developing the dough’s flavor and workability.
- Lamination (Butter Incorporation): Turn the chilled dough out onto a lightly floured surface. Roll it into a rectangle approximately 16×12 inches.
- First Fold: Spread 1/3 cup of the butter or margarine over 2/3 of the dough. Fold the unspread portion of the dough over half of the covered portion. Then, fold the remaining third section over the first two layers, creating a three-layered dough.
- Repeat Folding and Rolling: Roll the dough back to its original 16×12 inch size. Repeat the butter spreading and folding process twice more, using the remaining butter or margarine. This lamination process creates the characteristic flaky layers of a Danish pastry.
- Second Rise (Overnight Chill): Return the dough to the refrigerator, wrap well, and chill overnight. This long, slow chilling allows the gluten to relax and the butter to firm up, resulting in a lighter, flakier pastry.
- Shape the Pastries: The next day, divide the dough in half. Roll each half into a rectangle approximately 14×9 inches.
- Cut and Twist: Cut each rectangle into strips that are 14 inches long and 3/4 inch wide. Twist each strip and form it into a spiral roll. Gently pinch the end to secure the roll.
- Add the Filling: Place a few drained apple slices in the center of each spiral roll. Drain the apples well to prevent the pastries from becoming soggy.
- Cinnamon-Sugar Topping: In a small bowl, mix the cinnamon with 1/2 cup of sugar. Sprinkle this mixture over the apples.
- Final Proof: Cover the pastries loosely with plastic wrap or a clean kitchen towel. Let them rise in a warm place, free from drafts, until doubled in bulk. This final proof is crucial for achieving a light and airy texture.
- Bake: Preheat your oven to 375°F (190°C). Bake the pastries in the preheated oven for about 12 minutes, or until they are golden brown and the apples are tender.
- Cool: Remove the pastries from the oven and let them cool slightly on a wire rack before serving.
Expert Tips & Tricks
- Keep everything cold: Cold butter is key to creating flaky layers. If the butter starts to melt during the lamination process, return the dough to the refrigerator for a few minutes to firm it up.
- Don’t overwork the dough: Overworking the dough will develop the gluten too much, resulting in a tough pastry. Handle the dough gently and avoid excessive kneading.
- Use high-quality butter: The flavor of the butter will shine through in the final product, so use the best quality butter you can find.
- Egg Wash for Extra Shine (Optional): For a glossy finish, brush the pastries with a beaten egg mixed with a tablespoon of milk before baking.
- Make Ahead: The dough can be made up to 2 days in advance and stored in the refrigerator.
Serving & Storage Suggestions
Serve the Apple Danish Pastries warm, straight from the oven, for the best flavor and texture. They are delicious on their own or served with a dollop of whipped cream or a scoop of vanilla ice cream.
Leftovers can be stored in an airtight container at room temperature for up to 2 days or in the refrigerator for up to 4 days. To reheat, warm them gently in a preheated oven at 350°F (175°C) for a few minutes, or microwave them briefly. For longer storage, freeze the baked pastries in an airtight container for up to 2 months. Thaw overnight in the refrigerator before reheating.
Nutritional Information
| Nutrient | Amount per Serving | % Daily Value |
|---|---|---|
| Calories | 204.8 kcal | N/A |
| Calories from Fat | 102 g | 50% |
| Total Fat | 11.4 g | 17% |
| Saturated Fat | 6.9 g | 34% |
| Cholesterol | 54.6 mg | 18% |
| Sodium | 280 mg | 11% |
| Total Carbohydrate | 22 g | 7% |
| Dietary Fiber | 1.5 g | 5% |
| Sugars | 2.6 g | 10% |
| Protein | 3.9 g | 7% |
Note: Nutritional information is an estimate and may vary based on specific ingredients and portion sizes.
Variations & Substitutions
- Other Fruit Fillings: Substitute the apples with other fruits such as berries, peaches, or pears.
- Cream Cheese Filling: Add a layer of cream cheese filling (made with cream cheese, sugar, and vanilla extract) underneath the apple slices.
- Nut Filling: Sprinkle chopped nuts (such as almonds, pecans, or walnuts) over the cinnamon-sugar topping.
- Spices: Experiment with different spices, such as nutmeg, cardamom, or ginger, in addition to or instead of the cinnamon.
- Gluten-Free Option: While challenging, you can try a gluten-free all-purpose flour blend. Be aware the texture may differ.
FAQs (Frequently Asked Questions):
Q: Why is it important to scald the milk?
A: Scalding the milk helps to denature the proteins, which can interfere with gluten development. It also helps to dissolve the sugar and salt more easily.
Q: Can I use shortening instead of butter?
A: While shortening can be used, it will not provide the same rich flavor and flaky texture as butter. Butter is highly recommended for the best results.
Q: How do I know if the yeast is active?
A: If the yeast is active, it will foam or bubble after being mixed with warm water and sugar. If it doesn’t, the yeast may be old or inactive, and you’ll need to use fresh yeast.
Q: Can I freeze the unbaked pastries?
A: Yes, you can freeze the unbaked pastries after they have been shaped and filled. Place them on a baking sheet lined with parchment paper and freeze until solid. Then, transfer them to an airtight container or freezer bag. When ready to bake, thaw them overnight in the refrigerator and let them rise before baking as directed.
Q: Why are my pastries not flaky?
A: The most common reason for pastries not being flaky is that the butter melted during the lamination process. Make sure to keep the butter cold and work quickly. You can also chill the dough in the refrigerator for a few minutes if the butter starts to melt.
Final Thoughts
There’s something truly magical about baking – transforming simple ingredients into something extraordinary. These Apple Danish Pastries, with their layers of flaky goodness and the comforting aroma of apples and cinnamon, are a testament to the joy of baking. Don’t be intimidated by the process; take your time, follow the steps, and enjoy the journey. I encourage you to try this recipe, share it with loved ones, and create your own warm memories around these delightful pastries. Perhaps enjoy them with a cup of hot coffee or a glass of cold milk. I’d love to hear about your experience and any variations you try!