
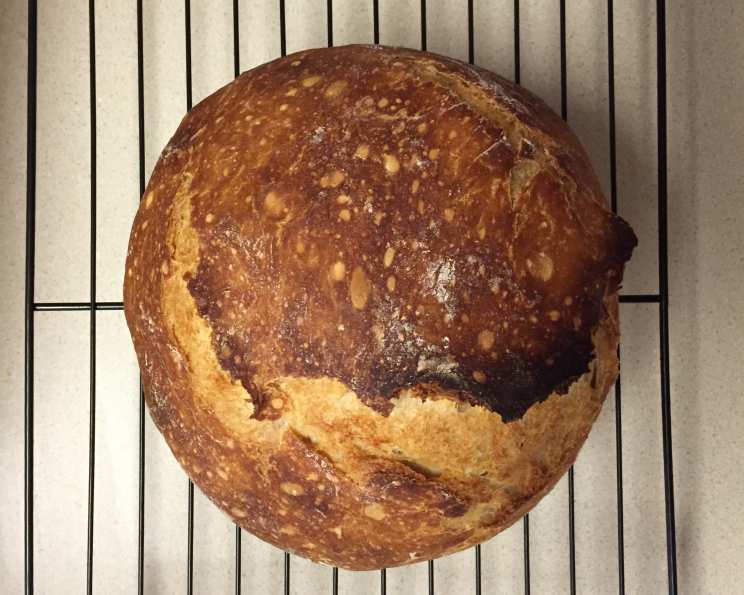
Artisan White Bread: The Simple Joy of Homemade
The scent of baking bread is, for me, the very essence of home. I remember, as a child, standing on a stool, mesmerized as my grandmother coaxed life from a simple mixture of flour, water, and yeast. The warmth radiating from the oven, the gentle crackling of the crust as it cooled – these are sensory memories etched into my soul. This recipe, born from similar roots, captures that same magic, delivering a crusty, chewy loaf that’s utterly irresistible.
Recipe Overview
- Prep Time: 15 minutes
- Cook Time: 1 hour
- Total Time: 9 hours 15 minutes (includes overnight rise)
- Servings: 8
- Yield: 1 Round Loaf
- Dietary Type: Vegetarian
Ingredients
- 3 cups all-purpose flour
- 2 teaspoons kosher salt
- 1/4 teaspoon instant yeast
- 1 1/2 cups slightly warmer than lukewarm water
Equipment Needed
- Medium-large mixing bowl
- Wet kitchen towel
- Oven-proof covered pot (Dutch oven or similar)
- Parchment paper
- Spatula
- Cooling rack
Instructions
-
In a medium-large bowl, combine the flour, salt, and instant yeast. It’s important to distribute the yeast evenly for a consistent rise.
-
Pour the slightly warmer than lukewarm water over the dry ingredients. The water temperature is crucial; too cold and the yeast won’t activate properly, too hot and you risk killing it. A good rule of thumb is to aim for around 100-110°F (38-43°C).
-
Mix with a spoon until the flour is fully absorbed and the mixture forms a wet, sticky dough. Don’t overmix at this stage; just ensure everything is well combined. The dough will be shaggy and loose – that’s perfectly normal.
-
Cover the bowl with a wet kitchen towel to prevent the dough from drying out. The moisture helps create a humid environment ideal for rising.
-
Place the covered bowl in a warm place and allow the dough to rise overnight, or for at least 8 hours. A slightly warm environment encourages the yeast to work its magic. Don’t be tempted to rush this process; the long, slow fermentation develops complex flavors and a wonderful texture.
-
Prepare an oven-proof covered pot (such as a Dutch oven) by lining it with a piece of parchment paper. Trim the parchment paper to be slightly smaller than the base of the pot for easy removal later. This prevents the bread from sticking and makes transferring the loaf a breeze.
-
Sprinkle flour generously on top of the dough. This will make it easier to handle and prevent it from sticking to your hands.
-
Use a floured spatula to gently release the dough from the bowl and transfer it onto the floured parchment surface on your counter. Be gentle to avoid deflating the dough too much.
-
Sprinkle the dough again with flour.
-
Start shaping the dough by bringing each edge into the center, forming a large ball. This technique creates surface tension, which helps the loaf hold its shape during baking. Flour as needed to prevent the dough from sticking to your hands and the counter.
-
Carefully place the dough ball in the center of the prepared pot, on top of the parchment paper.
-
Place the oven-safe lid on top of the pot and place the entire pot in the cold oven. This gradual heating process helps create a beautifully even crust.
-
Turn the oven on to 400 degrees F (200 degrees C) and set a kitchen timer for 30 minutes. Baking the bread in a covered pot traps steam, which contributes to a moist interior and a crisp, golden-brown crust.
-
After 30 minutes, carefully remove the lid from the pot and bake for an additional 30 minutes. Removing the lid allows the crust to brown and crisp up further. Keep an eye on the loaf during this stage to prevent it from burning.
-
Remove the pot from the oven and carefully lift the loaf out of the pot using the parchment paper as handles. Place the loaf on a cooling rack.
-
Allow the bread to rest for at least 5 minutes, but preferably closer to 30 minutes, before cutting into slices. This allows the internal structure to set properly, preventing a gummy texture.
Expert Tips & Tricks
- Don’t be afraid of a sticky dough: This recipe is designed to be wet. Adding more flour will result in a denser, drier loaf.
- Proofing location matters: Choose a genuinely warm spot for proofing. In colder months, try placing the bowl near a slightly warm (not hot!) oven, or in a turned-off oven with the light on.
- Scoring the loaf: For a more artisanal look (and to control where the bread expands), score the top of the loaf with a sharp knife or lame just before baking. Make a single deep slash or a shallow decorative pattern.
- Adjusting for altitude: If you live at a high altitude, you may need to reduce the amount of yeast slightly.
- Achieving a darker crust: For a deeper, richer color, brush the loaf with an egg wash or milk before baking.
Serving & Storage Suggestions
This artisan white bread is incredibly versatile. Serve it warm with a pat of butter, use it to make gourmet sandwiches, or toast it for breakfast. It’s also perfect for dipping in soups or enjoying alongside a cheese board.
To store, keep the bread in a paper bag at room temperature for up to 2 days. For longer storage, slice the bread and freeze it in an airtight container for up to 2 months. To reheat frozen slices, toast them directly from frozen.
Nutritional Information
| Nutrient | Amount per Serving | % Daily Value |
|---|---|---|
| Calories | 171 kcal | N/A |
| Calories from Fat | 4 g | 2% |
| Total Fat | 0.5 g | 0% |
| Saturated Fat | 0.1 g | 0% |
| Cholesterol | 0 mg | 0% |
| Sodium | 583.7 mg | 24% |
| Total Carbohydrate | 35.8 g | 11% |
| Dietary Fiber | 1.3 g | 5% |
| Sugars | 0.1 g | 0% |
| Protein | 4.9 g | 9% |
Variations & Substitutions
- Whole Wheat Version: Substitute up to half of the all-purpose flour with whole wheat flour for a nuttier flavor and denser texture.
- Herb Infusion: Add 1-2 tablespoons of dried herbs, such as rosemary, thyme, or oregano, to the flour mixture for a savory twist.
- Cheese Bread: Incorporate 1/2 cup of shredded cheese, such as cheddar or parmesan, into the dough during the shaping process.
- Garlic Bread: Mix minced garlic with softened butter and spread over sliced bread before toasting.
- Sourdough: While this recipe uses instant yeast, experiment with adding a sourdough starter for a tangier flavor profile. You may need to adjust the hydration and proofing times.
FAQs (Frequently Asked Questions)
Q: Why do I need to let the dough rise overnight?
A: The long, slow fermentation process allows the yeast to develop complex flavors and creates a more open, airy crumb structure.
Q: Can I use active dry yeast instead of instant yeast?
A: Yes, but you will need to proof the active dry yeast in warm water for 5-10 minutes before adding it to the flour mixture. Use the same amount as specified for instant yeast.
Q: My dough is too sticky to handle. What should I do?
A: This dough is meant to be sticky. Resist the urge to add more flour; instead, use a generous amount of flour on your hands and counter to prevent sticking.
Q: My bread is burning on the bottom. What can I do?
A: Place a baking sheet on the rack below the Dutch oven to deflect some of the heat.
Q: How do I know when the bread is done?
A: The bread is done when it is golden brown and sounds hollow when tapped on the bottom. An internal temperature of 200-210°F (93-99°C) is also a good indicator.
Final Thoughts
This artisan white bread recipe is a testament to the beauty of simplicity. With just a handful of ingredients and a little patience, you can create a loaf that rivals anything you’d find in a bakery. I encourage you to give it a try and experience the profound satisfaction of baking your own bread. Don’t hesitate to experiment with variations and make it your own. Share your creations with friends and family, and savor the simple joy of homemade bread. I would suggest pairing this delightful bread with a homemade tomato soup or a hearty stew.