
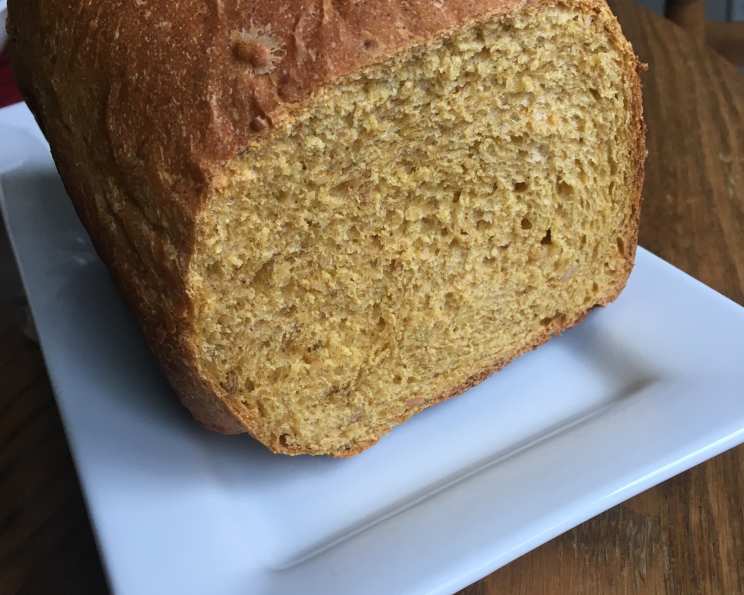
Autumn Pumpkin Seed Bread (Bread Machine)
The scent of autumn has always been synonymous with freshly baked bread in my family. I remember crisp October afternoons spent in my grandmother’s kitchen, the air thick with the aroma of cinnamon, nutmeg, and, of course, pumpkin. Her pumpkin bread was legendary, a moist, slightly sweet loaf studded with toasted pumpkin seeds that added a delightful crunch. While she always made hers by hand, this bread machine version captures that same warm, comforting essence with much less effort, leaving you more time to enjoy the season’s simple pleasures.
Recipe Overview
- Prep Time: 15 minutes
- Cook Time: 3 hours 5 minutes (including cycle time)
- Total Time: 3 hours 20 minutes
- Servings: 8
- Yield: 1 (1 1/2 pound) loaf
- Dietary Type: Vegetarian
Ingredients
- 1/3 cup water
- 2/3 cup canned pumpkin puree (make sure this is at room temperature)
- 1 egg
- 1/4 cup nonfat dry milk
- 1 teaspoon salt
- 1/4 cup packed brown sugar
- 2 tablespoons vegetable oil
- 3/4 cup whole wheat flour
- 2 cups bread flour
- 1/3 cup pumpkin seeds, toasted
- 1/2 teaspoon ground allspice
- 1/4 teaspoon ground ginger
- 1/4 teaspoon ground nutmeg
- 1 3/4 teaspoons bread machine yeast or 1 3/4 teaspoons instant yeast
Equipment Needed
- Bread Machine
- Measuring cups and spoons
- Wire rack
Instructions
-
Carefully measure the ingredients into your bread machine pan. It’s crucial to follow the order recommended by your bread machine’s manufacturer. Generally, this means liquids first, followed by dry ingredients, and finally the yeast. This order helps ensure the yeast doesn’t come into direct contact with the salt or liquid before mixing begins, which can inhibit its activity.
-
Once all the ingredients are in the pan, securely insert the pan into the bread machine chamber. Make sure it clicks into place properly.
-
Select the Whole Wheat Cycle on your bread machine. This cycle is specifically designed for breads with a higher percentage of whole wheat flour, providing the appropriate kneading, rising, and baking times. If your machine doesn’t have a dedicated whole wheat setting, you can typically use the basic or rapid rise cycle and adjust the crust color as needed.
-
Let the bread machine work its magic! The cycle will include kneading, rising, and baking. The specific duration varies depending on your bread machine model, but generally, the whole wheat cycle takes around 3 hours.
-
Once the baking cycle is complete, carefully remove the bread pan from the bread machine. Use oven mitts, as the pan will be hot.
-
Immediately turn the bread out onto a wire rack. This allows air to circulate around the loaf, preventing the bottom from becoming soggy. If the loaf seems stuck, gently loosen the sides with a spatula.
-
Allow the bread to cool completely on the wire rack before slicing. This is essential! Cutting into the bread while it’s still warm will result in a gummy texture and make it difficult to slice neatly. Patience is key here.
Expert Tips & Tricks
- Room Temperature Pumpkin Puree: Ensure your pumpkin puree is at room temperature. Cold puree can lower the overall dough temperature, inhibiting yeast activity and resulting in a short, dense loaf. If using fresh pumpkin puree, ensure it’s strained and has the same consistency as canned pumpkin. Too much moisture will affect the bread’s texture.
- Toast the Pumpkin Seeds: Toasting the pumpkin seeds before adding them to the dough enhances their nutty flavor and adds a satisfying crunch to the finished bread. To toast them, spread them in a single layer on a baking sheet and bake at 350°F (175°C) for 5-7 minutes, or until lightly golden and fragrant. Watch them carefully, as they can burn easily.
- Measure Accurately: Baking is a science, and accurate measurements are crucial for success. Use measuring cups and spoons specifically designed for baking. Spoon flour into the measuring cup and level off with a knife, rather than scooping directly from the bag, which can pack the flour and result in too much being used.
- Yeast Quality: Make sure your yeast is fresh. Expired yeast will not rise properly, resulting in a flat, dense bread. To test your yeast, mix a teaspoon of yeast with a teaspoon of sugar in 1/4 cup of warm water. If it foams up within 5-10 minutes, it’s active and ready to use.
- Adjust Liquid: Depending on your climate and the humidity level, you may need to adjust the amount of liquid slightly. If the dough looks too dry and crumbly, add a tablespoon of water at a time until it forms a smooth, elastic ball. If the dough looks too wet and sticky, add a tablespoon of flour at a time until it reaches the desired consistency.
- Kneading Check: Observe the dough during the kneading process. It should form a smooth, elastic ball that pulls away from the sides of the bread machine pan. If it doesn’t, the dough may need a little more kneading time. Some bread machines allow you to add extra kneading cycles.
Serving & Storage Suggestions
This Autumn Pumpkin Seed Bread is delicious served warm with a pat of butter or a drizzle of honey. It also makes a fantastic base for toast, sandwiches, or even croutons. For a truly autumnal treat, try it with a spread of cream cheese and a sprinkle of cinnamon.
To store, let the bread cool completely before wrapping it tightly in plastic wrap or placing it in an airtight container. At room temperature, it will last for 2-3 days. In the refrigerator, it will last for up to a week. For longer storage, you can freeze the bread for up to 2-3 months. Slice the bread before freezing for easier thawing. To reheat, wrap the bread in foil and bake at 350°F (175°C) for 10-15 minutes, or until warmed through. You can also toast individual slices.
Nutritional Information
Note: Nutritional information is an estimate and may vary based on specific ingredients and portion sizes.
| Nutrient | Amount per Serving | % Daily Value |
|---|---|---|
| Calories | 278.4 kcal | N/A |
| Calories from Fat | N/A | N/A |
| Total Fat | 8.4 g | 12% |
| Saturated Fat | 1.9 g | 9% |
| Cholesterol | 30.3 mg | 10% |
| Sodium | 369.2 mg | 15% |
| Total Carbohydrate | 43.5 g | 14% |
| Dietary Fiber | 3.3 g | 13% |
| Sugars | 9.1 g | N/A |
| Protein | 8.6 g | 17% |
Variations & Substitutions
- Gluten-Free: Substitute the bread flour and whole wheat flour with a gluten-free bread flour blend. You may need to add a binder like xanthan gum to help with the texture.
- Dairy-Free: Use a dairy-free milk substitute instead of nonfat dry milk. Ensure the substitute is unsweetened and unflavored for the best results.
- Spiced Up: Add a pinch of ground cloves or cardamom to the spice mixture for a warmer, more complex flavor.
- Sweetened: Substitute honey or maple syrup for the brown sugar. Adjust the amount to your liking.
- Nutty: Add chopped walnuts or pecans along with the pumpkin seeds for extra crunch and flavor.
FAQs (Frequently Asked Questions)
Q: Why is my pumpkin bread dense and heavy?
A: This can be caused by several factors, including using cold pumpkin puree, using expired yeast, or over-measuring the flour. Ensure your pumpkin puree is at room temperature, your yeast is fresh, and you’re accurately measuring your ingredients.
Q: Can I use fresh pumpkin puree instead of canned?
A: Yes, you can! Just make sure the fresh puree has a similar consistency to canned pumpkin. You may need to strain it to remove excess moisture.
Q: My bread machine doesn’t have a Whole Wheat Cycle. What should I do?
A: Use the basic or rapid rise cycle and monitor the dough closely. Adjust the crust color setting as needed to achieve your desired level of browning.
Q: Can I add chocolate chips to this recipe?
A: Absolutely! Chocolate chips would be a delicious addition. Add about 1/2 cup of chocolate chips along with the pumpkin seeds.
Q: How do I prevent the pumpkin seeds from sinking to the bottom of the bread?
A: Toss the toasted pumpkin seeds with a tablespoon of flour before adding them to the dough. This helps them stay suspended throughout the loaf.
Final Thoughts
Baking this Autumn Pumpkin Seed Bread is more than just following a recipe; it’s about creating a comforting experience that fills your home with the warm, inviting aromas of fall. Don’t be afraid to experiment with variations and substitutions to make it your own. Share your creations with loved ones and enjoy the simple pleasure of freshly baked bread. And most importantly, don’t forget to savor each and every bite! This loaf is perfect on its own, or as a base for your favorite toppings. Happy baking!