
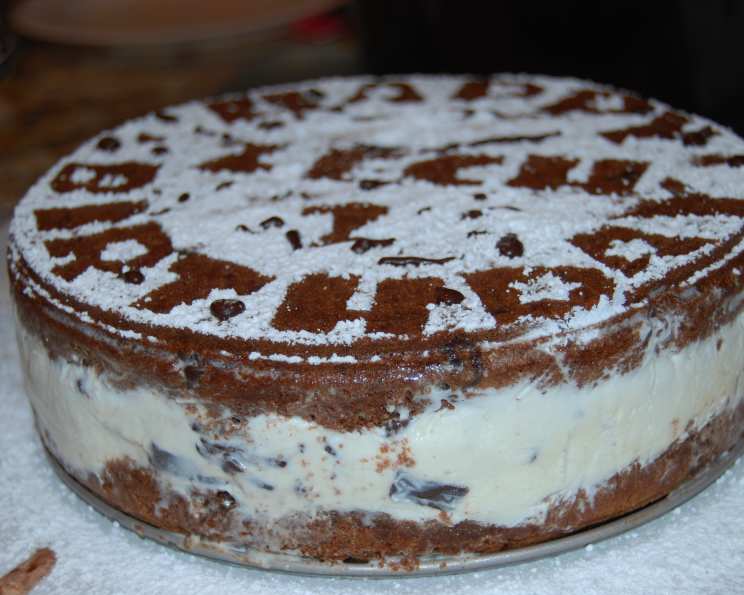
Awesome Ice Cream Sandwich “Cake”
I remember one particularly sweltering summer, my family gathered for a barbecue. The adults were sweating, the kids were restless, and everyone was yearning for something cool and refreshing. The usual ice cream was met with groans – it was too predictable. That’s when I decided to get creative, whipping up a giant ice cream sandwich “cake” using ingredients I already had on hand. The gasps of delight as I presented it were priceless, and the way everyone devoured it solidified its place as a family favorite. It’s more than just a dessert; it’s a guaranteed memory-maker.
Recipe Overview
- Prep Time: 30 minutes
- Cook Time: 25-30 minutes per cookie
- Total Time: 1 hour 20 minutes (plus freezing time)
- Servings: 8-10
- Yield: 1 cake
- Dietary Type: Vegetarian (can be adapted to dairy-free with substitutions)
Ingredients
For the Cookies:
- ¼ cup butter, room temperature
- ⅓ cup organic yogurt (vanilla or banana flavored works best)
- 3-4 semi-sweet chocolate baking squares, melted (milk or dark chocolate are great alternatives)
- 1 cup organic sugar
- 1 cup organic brown sugar
- 2 eggs
- ½ – ¾ teaspoon salt
- 1 teaspoon baking soda
- 1 tablespoon pure vanilla extract
- 2 cups whole wheat flour
- 1 ½ cups chocolate chips
For the Ice Cream Filling:
- 1 pint mint chocolate chip ice cream (super premium is recommended)
Equipment Needed
- Large mixing bowl
- Measuring cups and spoons
- 8-inch spring-form pan
- Parchment paper
- Plastic wrap
Instructions
-
Preheat your oven to 350 degrees Fahrenheit (175 degrees Celsius). Make sure your oven rack is in the center position for even baking.
-
In a large mixing bowl, combine the softened butter, yogurt, melted chocolate, organic sugar, and organic brown sugar. Use an electric mixer or a sturdy whisk to cream the ingredients together until light and fluffy. This will ensure the cookies are tender and not too dense.
-
Add the eggs, one at a time, to the wet ingredients. Mix until everything is well blended. Scrape down the sides of the bowl to ensure all ingredients are fully incorporated.
-
Add the salt and baking soda to the wet mixture. Stir gently until combined. This step activates the baking soda, which will help the cookies rise.
-
Gradually add the whole wheat flour, one cup at a time, to the wet ingredients. Mix on low speed or with a spatula until each cup is fully incorporated. Be careful not to overmix the dough, as this can result in tough cookies.
-
Pour in the chocolate chips and stir until evenly distributed throughout the dough.
-
Prepare your 8-inch spring-form pan by lining the bottom with parchment paper. To do this, place the pan on top of a sheet of parchment paper, trace a circle around the outer base, and cut out the circle to fit exactly. This will prevent the cookie from sticking and make it easy to remove from the pan.
-
Drop approximately half of the cookie dough into the prepared spring-form pan, using spoon-fulls. With your hands (or a spatula), press down to create an even layer at the bottom of the pan. Aim for a uniform thickness to ensure the cookie bakes evenly.
-
Bake in the preheated oven for 25-30 minutes, or until the edges are golden brown and the center is set. The exact baking time will depend on your oven, so keep a close eye on it. To check for doneness, insert a toothpick into the center of the cookie. If it comes out clean or with just a few moist crumbs, the cookie is ready.
-
Once baked, remove the giant cookie from the oven and let it cool completely in the pan. Once cooled, carefully remove the giant cookie from the spring-form pan and wrap it tightly in plastic wrap to prevent it from drying out.
-
Repeat steps 7-10 to make the second giant cookie.
-
While the second cookie is baking (or after it has been baked and is cooling), place the mint chocolate chip ice cream on the counter to soften slightly. You want it to be soft enough to spread easily, but not completely melted.
-
Leaving the first cooled cookie in the spring-form pan, empty the entire pint of softened ice cream into the pan on top of the cookie.
-
Spread the ice cream evenly over the cookie. Use a spatula or the back of a spoon to create a smooth, uniform layer.
-
Unwrap the second cooled cookie and place it on top of the ice cream layer. I find it best to place the second cookie face down, so the top surface is very flat and even, making decorating easier.
-
Gently push the top cookie down until everything is compacted and firm. Cover the entire cake with plastic wrap and place it back in the freezer for at least 2-3 hours, or until the ice cream is frozen solid.
-
Now for the fun part – decorating! The possibilities are endless. You can use powdered sugar to dust the top and then drizzle melted chocolate over it. Alternatively, you could create a frosting (cream cheese frosting works very well!) and add shaved chocolate to the sides for a more sophisticated look. I often leave mine plain for simplicity.
Expert Tips & Tricks
- To prevent the cookies from sticking, grease the spring-form pan in addition to lining it with parchment paper.
- If you don’t have a spring-form pan, you can use a regular cake pan lined with parchment paper, but it may be more difficult to remove the cake.
- For a richer flavor, try using brown butter in the cookie dough. To make brown butter, melt the butter in a saucepan over medium heat, and cook until it turns a golden brown color and has a nutty aroma. Let it cool slightly before adding it to the dough.
- If your ice cream is too hard to spread, try microwaving it in 15-second intervals until it softens slightly. Be careful not to melt it completely.
- For a cleaner cut, run a sharp knife under hot water and dry it before each slice.
Serving & Storage Suggestions
To serve, remove the ice cream sandwich “cake” from the freezer about 10-15 minutes before cutting. This will allow it to soften slightly and make it easier to slice. Use a sharp knife to cut into slices and serve immediately.
Leftovers should be stored in an airtight container in the freezer. It will last for up to a week, but it’s best enjoyed within a few days to prevent freezer burn. Do not store at room temperature, as the ice cream will melt. There is no reheating necessary – it’s ready to enjoy straight from the freezer!
Nutritional Information
| Nutrient | Amount per Serving | % Daily Value |
|---|---|---|
| Calories | 584 kcal | N/A |
| Calories from Fat | 184 g | 32% |
| Total Fat | 20.5 g | 31% |
| Saturated Fat | 11.8 g | 59% |
| Cholesterol | 69.5 mg | 23% |
| Sodium | 382.7 mg | 15% |
| Total Carbohydrate | 100.9 g | 33% |
| Dietary Fiber | 6.2 g | 24% |
| Sugars | 75.3 g | 301% |
| Protein | 7.9 g | 15% |
Note: Nutritional information is an estimate and may vary based on specific ingredients and serving sizes.
Variations & Substitutions
- Dairy-Free: Substitute the butter with a vegan butter alternative and the yogurt with a non-dairy yogurt alternative like coconut yogurt. Use a dairy-free ice cream for the filling.
- Gluten-Free: Use a gluten-free flour blend in place of the whole wheat flour.
- Different Flavors: Experiment with different flavors of ice cream. Peanut butter cup, cookies and cream, or strawberry would all be delicious options.
- Add-ins: Mix in chopped nuts, dried fruit, or sprinkles into the cookie dough for added texture and flavor.
- Seasonal: For a festive holiday dessert, add peppermint extract to the cookie dough and use peppermint ice cream for the filling.
FAQs (Frequently Asked Questions)
Q: Can I use store-bought cookies instead of making my own?
A: Absolutely! While homemade cookies add a special touch, using store-bought cookies can save time. Look for large, thick cookies that will hold up well with the ice cream.
Q: How do I prevent the ice cream from melting while I’m assembling the cake?
A: Work quickly and have all your ingredients prepared before you start assembling. If the ice cream starts to melt too much, put it back in the freezer for a few minutes to firm up.
Q: Can I make this cake ahead of time?
A: Yes, you can make this cake several days in advance. Just make sure to wrap it tightly in plastic wrap to prevent freezer burn.
Q: What’s the best way to cut the cake without the ice cream squishing out?
A: Run a sharp knife under hot water and dry it before each slice. This will help to create a clean cut.
Q: Can I use different types of flour instead of whole wheat flour?
A: Yes, you can substitute with all-purpose flour or even a blend of different flours. Just keep in mind that the texture of the cookies may vary depending on the type of flour you use.
Final Thoughts
I sincerely hope you give this Awesome Ice Cream Sandwich “Cake” a try. It’s a truly delightful treat that brings smiles and creates lasting memories. Feel free to adapt the recipe to your liking – experiment with different flavors, decorations, and add-ins. Share your creations and feedback, and remember, the best desserts are the ones made with love! This “cake” pairs perfectly with a tall glass of ice-cold milk or a scoop of fresh berries on the side. Enjoy!