
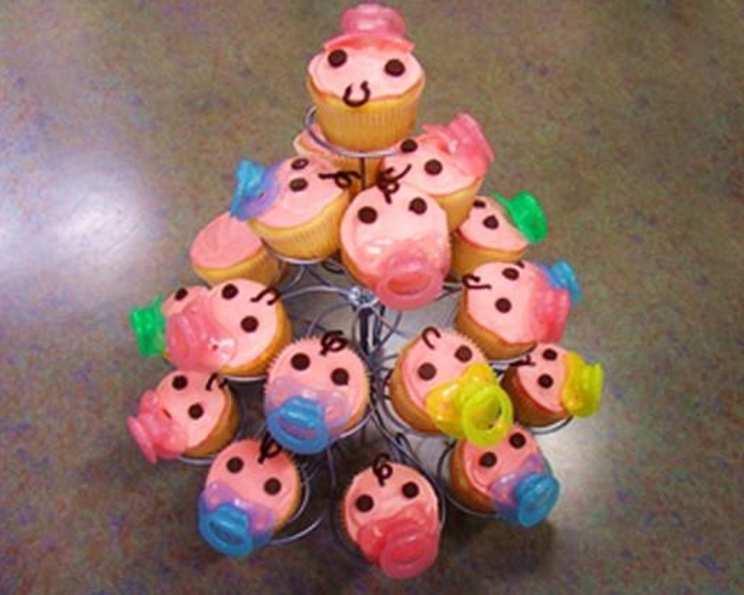
Baby Face Cupcakes: A Sweet Celebration of New Life
I remember the first baby shower I ever attended. The air was thick with anticipation and excitement, a symphony of soft coos and gentle laughter. The decorations were adorable, but what truly stole the show were these tiny, delicate cupcakes, each adorned with a sweet baby face. They were almost too cute to eat, but of course, we all succumbed to their irresistible charm! The combination of soft, tender cake, sweet pink frosting, and those precious little chocolate curls…it was pure magic. These Baby Face Cupcakes aren’t just a dessert; they’re a heartwarming tribute to new beginnings and the joy of welcoming a little one into the world.
Recipe Overview
- Prep Time: 30 minutes
- Cook Time: 20-25 minutes
- Total Time: 50-55 minutes
- Yields: 24 cupcakes
- Dietary Type: Not specified (contains dairy, eggs, and gluten)
Ingredients
For Cupcakes:
- 2 cups all-purpose flour
- 1 1/2 cups sugar
- 3 teaspoons baking powder
- 1/2 teaspoon salt
- 4 egg whites
- 1/2 cup shortening
- 1 cup milk
- 2 large eggs
- 1 1/2 teaspoons vanilla
For Frosting:
- 1 cup butter, softened (not melted)
- 6-8 cups confectioners’ sugar
- 1/2 cup milk
- 2 teaspoons vanilla extract
- 2-4 drops red food coloring (or flesh-colored gel food coloring)
For Decorating:
- 1 cup semi-sweet chocolate chips
- 48 chocolate chips (additional)
- 24 small plastic baby pacifiers
Equipment Needed
- Cupcake pans
- Paper liners
- Large mixing bowl
- Electric mixer
- Wire racks
- Zip-top bag
- Microwave
- Wax paper
Instructions
-
Preheat your oven to 350 degrees F (175 degrees C). Line your cupcake pans with paper liners. This will prevent the cupcakes from sticking and make them easy to remove.
-
In a large mixing bowl, combine the flour, sugar, baking powder, salt, shortening, milk, and vanilla. Use an electric mixer to mix at low speed for 2 minutes. Make sure all the ingredients are well incorporated.
-
Scrape down the sides of the bowl with a spatula. This ensures that everything is evenly mixed.
-
Add the egg whites to the batter. Mix at high speed until the batter is fluffy and smooth, approximately 2 minutes. The egg whites will give the cupcakes a light and airy texture.
-
Fill the cupcake liners about 1/2 full with batter. Be careful not to overfill them, as they will rise in the oven.
-
Bake for 20 to 25 minutes, or until a toothpick inserted into the center comes out clean. Keep a close eye on them to prevent burning. The baking time may vary depending on your oven.
-
Cool the cupcakes in the pans for 10 minutes, then remove them from the pan and place them on wire racks to cool completely. Make sure they are completely cool before frosting them, or the frosting will melt.
-
Prepare the frosting: Place the softened butter in a large mixing bowl. Add 4 cups of the confectioners’ sugar, then the milk and vanilla. On the medium speed of an electric mixer, beat until smooth and creamy, about 3-5 minutes.
-
Gradually add the remaining sugar, 1 cup at a time, beating well after each addition (about 2 minutes), until the icing is thick enough to be of good spreading consistency. You may not need to add all of the sugar, so adjust to your liking.
-
Add a few drops of red food coloring and mix thoroughly, adding one drop at a time until you get a good skin color. Flesh-colored gel food coloring may be used as well. Remember, you can always add more, but you can’t take it away.
-
For the chocolate curls: Put the 1 cup of chocolate chips in a zip-top bag. Heat in the microwave until melted, squeezing between your fingers until smooth. This might take about 30 seconds, but microwave in small increments to prevent burning.
-
Cut a very, very small piece of one bottom corner of the bag. On a piece of wax paper, draw 24 curls for the top of the babies’ heads. Put in the refrigerator to set. The smaller the hole you cut, the more controlled you will be with the chocolate.
-
Frost the cooled cupcakes.
-
Decorate: Use two chocolate chips for the eyes, put a chocolate curl on top of the face, and stick a pacifier where the mouth would be.
Expert Tips & Tricks
- For a more intense vanilla flavor, try using vanilla bean paste instead of vanilla extract.
- If your frosting is too thick, add a little more milk, one teaspoon at a time, until you reach the desired consistency.
- If your frosting is too thin, add a little more confectioners’ sugar, one tablespoon at a time, until you reach the desired consistency.
- To prevent the chocolate curls from melting in your hands while you’re decorating, keep them in the refrigerator until you’re ready to use them.
- You can use different colors of food coloring to create different skin tones for the baby faces.
- If you want to make the cupcakes ahead of time, you can bake them and freeze them (unfrosted) for up to 2 months. Thaw them completely before frosting.
Serving & Storage Suggestions
Serve these adorable Baby Face Cupcakes at room temperature for the best flavor and texture. Store any leftover cupcakes in an airtight container at room temperature for up to 3 days. If you need to store them for longer, you can refrigerate them for up to a week, but the frosting may become slightly harder. The undecorated cupcakes can also be frozen for up to 2 months. Let them thaw completely at room temperature before frosting and decorating.
Nutritional Information
| Nutrient | Amount per Serving | % Daily Value |
|---|---|---|
| Calories | 362.9 kcal | N/A |
| Calories from Fat | 136 g | 38% |
| Total Fat | 15.2 g | 23% |
| Saturated Fat | 7.7 g | 38% |
| Cholesterol | 40.1 mg | 13% |
| Sodium | 172.1 mg | 7% |
| Total Carbohydrate | 55.8 g | 18% |
| Dietary Fiber | 0.7 g | 2% |
| Sugars | 45.9 g | N/A |
| Protein | 3.1 g | 6% |
Note: % Daily Value not available for all nutrients
Variations & Substitutions
- Gluten-Free: Use a gluten-free all-purpose flour blend in place of the regular all-purpose flour. You may need to add a binder like xanthan gum for best results.
- Dairy-Free: Substitute the milk with a dairy-free alternative like almond milk, soy milk, or oat milk. Use a dairy-free butter substitute for the frosting.
- Vegan: In addition to the dairy-free substitutions above, replace the eggs with a vegan egg replacer. You may need to experiment with different brands to find one that works well for you.
- Chocolate Cupcakes: Add 1/4 cup of cocoa powder to the dry ingredients for chocolate cupcakes.
- Lemon Cupcakes: Add the zest of one lemon to the batter for a bright, citrusy flavor.
FAQs (Frequently Asked Questions)
Q: Can I use a box cake mix instead of making the cupcakes from scratch?
A: Yes, you can use a box cake mix if you’re short on time. Just follow the instructions on the box and then proceed with the frosting and decorating steps.
Q: Can I make the frosting ahead of time?
A: Yes, you can make the frosting a day or two in advance. Store it in an airtight container in the refrigerator and let it come to room temperature before using. You may need to re-whip it to restore its smooth and creamy texture.
Q: Can I use gel food coloring instead of liquid food coloring?
A: Yes, gel food coloring is a great option because it’s more concentrated, so you won’t need to use as much to achieve the desired color.
Q: How do I prevent the chocolate curls from melting while I’m decorating?
A: Keep the chocolate curls in the refrigerator until you’re ready to use them. You can also wear thin gloves to prevent the heat from your hands from melting the chocolate.
Q: Where can I find the small plastic baby pacifiers?
A: You can usually find them at party supply stores, dollar stores, or online retailers. Look for ones that are small enough to fit on top of the cupcakes.
Final Thoughts
These Baby Face Cupcakes are a delightful way to celebrate the arrival of a new baby. They’re not only delicious but also incredibly adorable, making them the perfect addition to any baby shower or celebration. Don’t be intimidated by the decorating – it’s easier than it looks, and the results are so rewarding. Gather your ingredients, put on your apron, and get ready to create some sweet memories. I encourage you to try this recipe and share your creations with friends and family. And if you’re feeling adventurous, experiment with different flavors and decorations to make these cupcakes your own!