
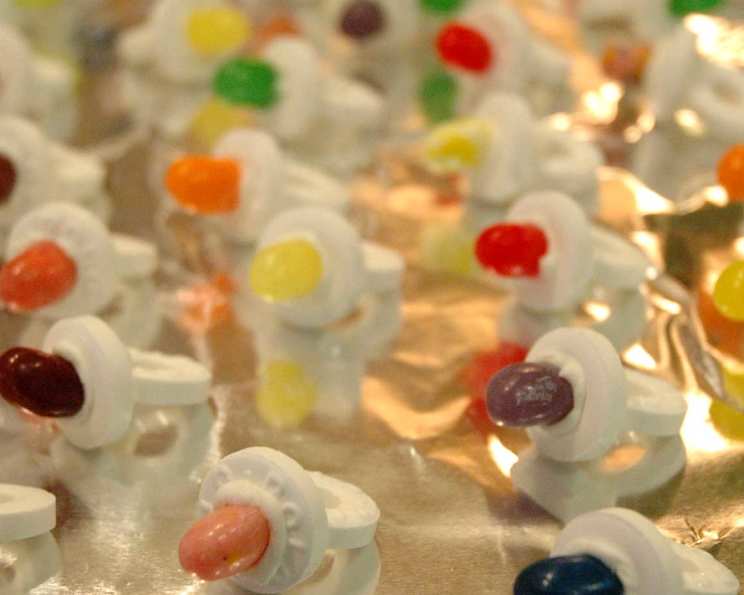
Sweet Shower Favors: Crafting Adorable Baby Pacifiers from Candy
I remember the flurry of excitement and anticipation surrounding my best friend’s baby shower. It felt like a privilege to shower her with love and support as she prepared to welcome her little one. But beyond the practical gifts, I wanted to contribute something truly special, something that would add a touch of whimsy and joy to the celebration. And that’s when I stumbled upon these adorable candy pacifiers – a delightful combination of sweets and creativity that instantly brought a smile to my face.
Recipe Overview
- Prep Time: 20 minutes
- Servings: 24
Ingredients
- 2 (13 ounce) bags of white individually wrapped Lifesavers candies (wintergreen, peppermint, or your choice)
- 2 dozen jelly belly jelly beans, about 1/2 cup. Colors will vary depending on whether you know the sex of the baby or not.
- 6 ounces tube white cake icing, not the gel (that doesn’t dry completely), with a thin attachment for application
- 24 lengths of thin curling ribbon, can coordinate with your jellybean colors if you’d like. Length to your liking, long enough to fit around the pacifier (approx. 24″)
Equipment Needed
- Flat surface for drying
- Scissors
Instructions
-
Begin by unwrapping all of the Lifesavers candies. This may seem tedious, but it’s the foundation of your adorable creations! Consider putting on some music or enlisting a helper to make it more enjoyable.
-
Take one Lifesaver and carefully apply a thin layer of frosting around the inner hole. The key here is a thin layer. Too much frosting and it will take longer to dry and may become messy. The frosting acts as the glue, so even coverage is what you’re aiming for.
-
Grab a jellybean and place one of the short, ROUND ends into the frosted hole, so the length of the jellybean is protruding from the hole. Gently press it into the frosting to secure it. Think of the jellybean as the “nipple” of the pacifier.
-
Flip the Lifesaver over.
-
On the other side, using the frosting, make a slightly thicker (yet still on the thin side) layer of frosting around the inner hole/center. This layer needs a touch more frosting because it is attaching to another Lifesaver.
-
Place another Lifesaver perpendicular to the first, attaching the edge of the second Lifesaver to the center of the first Lifesaver with the jellybean attached. The two Lifesavers should form a cross shape, with the jellybean sticking out.
-
Place the assembled pacifiers on a flat surface and allow them to dry for at least 3-4 hours, or preferably overnight, to ensure the frosting is completely set. Avoid any disturbances during this time, allowing the “glue” (aka the icing) to do its job.
-
After the pacifiers are fully dry, thread a length of curling ribbon through the hole of the second Lifesaver and tie it in a knot. You can leave the ends long for a decorative touch or trim them to your desired length. Curl the ribbon for extra flair!
Expert Tips & Tricks
- Candy Selection: Opt for Lifesavers with smooth edges for a cleaner, more polished look. Avoid cracked or broken candies, as they will be more difficult to work with.
- Frosting Consistency: Ensure the cake icing is smooth and easily spreadable. If it’s too thick, you can slightly warm the tube by placing it in a bowl of warm water for a few minutes.
- Color Coordination: If you know the baby’s gender, use jellybeans and ribbon in coordinating colors (pink for a girl, blue for a boy). For a gender-neutral shower, choose a variety of pastel shades or bright, cheerful colors.
- Drying Time: Resist the urge to move the pacifiers before the frosting is completely dry, as this can cause them to fall apart.
- Consider using a piping bag to apply the frosting evenly and precisely.
Serving & Storage Suggestions
These candy pacifiers are best served fresh and displayed attractively on guest tables, as part of a dessert buffet, or even tied to shower favors. Due to the nature of the ingredients (primarily candy and frosting), they are not ideal for long-term storage.
- Room Temperature: Store the finished pacifiers at room temperature in a cool, dry place for up to 2 days.
- Avoid Refrigeration: Refrigeration can cause the Lifesavers to become sticky and the frosting to soften.
Nutritional Information
Here’s an approximate breakdown of the nutritional content per candy pacifier. Please note this is an estimate and can vary based on specific brands and quantities.
| Nutrient | Amount per Serving | % Daily Value |
|---|---|---|
| Calories | 132 kcal | 7% |
| Total Fat | 0.1g | 0% |
| Saturated Fat | 0g | 0% |
| Cholesterol | 0mg | 0% |
| Sodium | 13mg | 1% |
| Carbohydrates | 33g | 12% |
| Fiber | 0g | 0% |
| Sugars | 21g | 42% |
| Protein | 0g | 0% |
Variations & Substitutions
- Sugar-Free Option: If you’re catering to guests with dietary restrictions, consider using sugar-free Lifesavers and jellybeans. Look for sugar-free cake icing as well.
- Alternative Candies: Get creative with other candies! Small round candies like M&Ms can be used in place of jellybeans, but be aware of potential choking hazards for young children if the pacifiers are intended as decorations around little ones.
- Flavor Combinations: Experiment with different Lifesaver flavors to create unique flavor combinations. For instance, you could use a mix of fruit flavors for a bright and colorful pacifier.
- Icing Flavors: Use different flavorings of icing. For example, try butter cream, vanilla, lemon, or even chocolate!
FAQs (Frequently Asked Questions)
Q: How long does it take for the frosting to dry completely?
A: The drying time can vary depending on the humidity and the amount of frosting used, but it typically takes 3-4 hours, or preferably overnight.
Q: Can I make these pacifiers ahead of time?
A: Yes, you can make these pacifiers up to 2 days in advance. Just make sure to store them in a cool, dry place away from direct sunlight.
Q: What if the Lifesavers keep sliding off before the frosting dries?
A: Use a bit more frosting and ensure the surface is completely flat and undisturbed during the drying process. You can also use a small piece of parchment paper to prop up the candies if needed.
Q: Can I use a glue gun instead of frosting?
A: While a glue gun might seem like a faster option, it’s not recommended as it’s not food-safe. Frosting is the safest and most edible adhesive for this project.
Q: Are these pacifiers safe for babies to actually use?
A: No, these candy pacifiers are intended for decorative purposes only and are not safe for babies to suck on or play with. They contain small parts that could be a choking hazard.
Final Thoughts
Crafting these candy pacifiers is not just about making a sweet treat; it’s about creating a memorable and heartwarming detail for a special occasion. The joy of seeing these adorable little creations adorning the baby shower, the smiles they bring to guests’ faces – that’s the true reward. So, gather your ingredients, unleash your creativity, and embark on this sweet adventure. Share your creations with friends and family, and let the love and sweetness spread!