
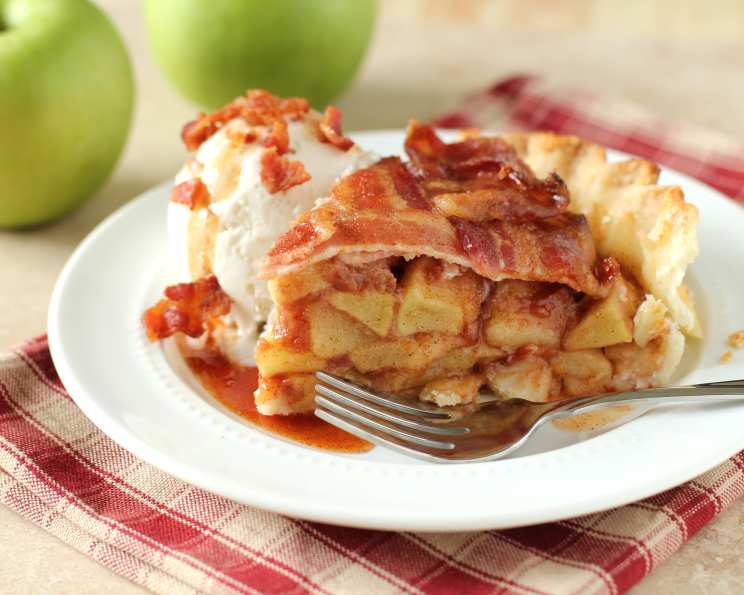
Bacon Apple Pie: A Sweet and Savory Delight
The aroma still lingers in my memory – a crisp autumn day, the wood-burning stove radiating warmth, and the unmistakable scent of baking apples mingling with smoky bacon. My grandmother, a woman who believed everything tasted better with bacon, first introduced me to this unconventional masterpiece. Skeptical at first, I took a bite and was instantly converted. The sweet-tart apple filling, perfectly balanced by the salty, crispy bacon lattice, was a revelation. It was a taste of home, a celebration of simple ingredients transformed into something extraordinary.
Recipe Overview
- Prep Time: 20 minutes
- Cook Time: 45-60 minutes
- Total Time: 65-80 minutes
- Servings: 8
- Yield: 1 pie
- Dietary Type: Not Gluten-Free
Ingredients
- 2 cups apple pie filling (approximately)
- 1 pie crust (store-bought or homemade)
- ⅛ cup sugar
- 1 teaspoon cinnamon
- ¼ teaspoon nutmeg
- 1 teaspoon lemon juice
- 10-12 slices bacon (uncooked)
Equipment Needed
- Pie dish (9-inch)
- Large mixing bowl
- Spatula
- Baking sheet
Instructions
-
Preheat your oven to 400°F (200°C). This higher temperature will help the bacon crisp up nicely.
-
In a large mixing bowl, combine the apple pie filling, sugar, cinnamon, nutmeg, and lemon juice. The lemon juice brightens the flavors and prevents the apples from browning too much. Gently stir the ingredients together until well combined.
-
Place the pie crust into your pie dish. If using a store-bought crust, ensure it is properly thawed according to the package directions. Pour the apple filling into the crust and smooth the top with a spatula, ensuring an even distribution.
-
Now comes the fun part: creating the bacon weave. This is where the magic happens! Start by laying two strips of bacon across the pie, intersecting in the middle at right angles. The center point of intersection should ideally be the center of the pie.
-
Turn the pie so that the lower bacon strip points towards you. This makes the weaving process easier. Continue adding more bacon strips to the left and right of the center strips, creating an alternating over-under pattern with the single strip that runs side-to-side.
-
At this point, you should have five or six strips of bacon pointing towards you and one strip running horizontally, weaving over and under the vertical strips.
-
Begin laying another bacon strip next to the horizontal one. Start at one end and create an over-under pattern opposite the first one. Lift up alternating vertical strips, lay this bacon piece down, and replace the strips you lifted. This creates the interwoven effect.
-
Continue this weaving process on both sides until the pie is completely covered in a bacon lattice with an alternating over-under weave. Take your time and make sure the bacon is evenly spaced for optimal crispness.
-
Carefully trim the ends of the bacon strips that hang over the sides of the pie dish. Save these trimmings! They are incredibly versatile and can be used in omelets, salads, or as a topping for baked potatoes. You can freeze them for later use.
-
Bake the pie for 45-60 minutes, or until the bacon is crispy and completely cooked. Keep a close eye on it during the last 15 minutes to prevent the bacon from burning. The apple filling should be bubbling and the crust golden brown. You might want to place a baking sheet underneath the pie dish, just in case any apple or bacon grease oozes over the sides. This will save you from cleaning up a mess in your oven!
-
Once baked, cool the pie for at least 10 minutes before serving. This allows the filling to set slightly and prevents burning your mouth.
Expert Tips & Tricks
- Par-bake the crust: For an extra crispy bottom crust, par-bake it for 10-15 minutes before adding the filling.
- Pre-cook the bacon slightly: If you’re concerned about the bacon not cooking through, partially cook it in a pan before weaving it onto the pie. This ensures it gets nice and crispy. However, be careful not to overcook it, as it will continue to cook in the oven.
- Egg wash for shine: Brush the bacon lattice with a light egg wash before baking for a beautiful golden sheen.
- Brown sugar boost: Sprinkle a tablespoon or two of brown sugar over the apple filling before adding the bacon lattice for a deeper, caramel-like flavor.
- Prevent burning: If the bacon starts to brown too quickly, loosely tent the pie with aluminum foil during the last 15-20 minutes of baking.
Serving & Storage Suggestions
Serve your Bacon Apple Pie warm, ideally with a scoop of vanilla ice cream or a dollop of whipped cream. The contrast of warm pie and cold ice cream is simply divine. For an extra touch of indulgence, drizzle with caramel sauce or maple syrup.
Leftovers can be stored in the refrigerator for up to 3 days. Cover the pie tightly with plastic wrap or aluminum foil to prevent it from drying out. Reheat individual slices in the microwave or oven. To reheat in the oven, preheat to 350°F (175°C) and bake for 10-15 minutes, or until warmed through.
For longer storage, you can freeze the baked pie. Wrap it tightly in plastic wrap, then in aluminum foil, and freeze for up to 2 months. Thaw overnight in the refrigerator before reheating.
Nutritional Information
| Nutrient | Amount per Serving | % Daily Value |
|---|---|---|
| Calories | 350 kcal | 18% |
| Total Fat | 18g | 28% |
| Saturated Fat | 7g | 35% |
| Cholesterol | 20mg | 7% |
| Sodium | 300mg | 13% |
| Total Carbohydrate | 40g | 13% |
| Dietary Fiber | 2g | 8% |
| Sugars | 20g | – |
| Protein | 4g | 8% |
Note: Nutritional information is an estimate and may vary depending on specific ingredients and preparation methods.
Variations & Substitutions
- Gluten-Free: Use a gluten-free pie crust to make this recipe suitable for those with gluten sensitivities.
- Spiced Apples: Add a pinch of ground cloves or ginger to the apple filling for a warmer, more complex flavor.
- Different Fruits: Experiment with other fruits, such as pears or peaches, in place of the apples.
- Maple Bacon: Use maple-flavored bacon for an extra layer of sweetness.
- Smoked Bacon: For a deeper, smokier flavor, use smoked bacon.
FAQs (Frequently Asked Questions)
Q: Can I use homemade apple pie filling instead of canned?
A: Absolutely! Homemade apple pie filling will enhance the flavor of the pie. Just ensure it’s cooked down enough to avoid a soggy crust.
Q: Can I prepare the pie ahead of time?
A: You can assemble the pie ahead of time and keep it refrigerated for up to 24 hours before baking. However, it’s best to bake it fresh for the best results.
Q: How do I prevent the bacon from shrinking too much during baking?
A: Use thick-cut bacon and avoid over-weaving it too tightly. This will allow for some shrinkage without distorting the lattice.
Q: What if my pie crust starts to brown too quickly?
A: Loosely tent the pie with aluminum foil to protect the crust from burning while the filling continues to cook.
Q: Can I add nuts to the filling?
A: Yes! Chopped walnuts or pecans would be a delicious addition to the apple filling.
Final Thoughts
Bacon Apple Pie may sound like an unusual combination, but trust me, it’s a flavor explosion you won’t soon forget. The salty, savory bacon perfectly complements the sweet and tart apple filling, creating a truly unique and satisfying dessert. Don’t be afraid to try this recipe and put your own spin on it. Share your creations and feedback – I’d love to hear how it turns out for you! This pie pairs wonderfully with a strong cup of coffee or a glass of chilled hard cider. Enjoy!