
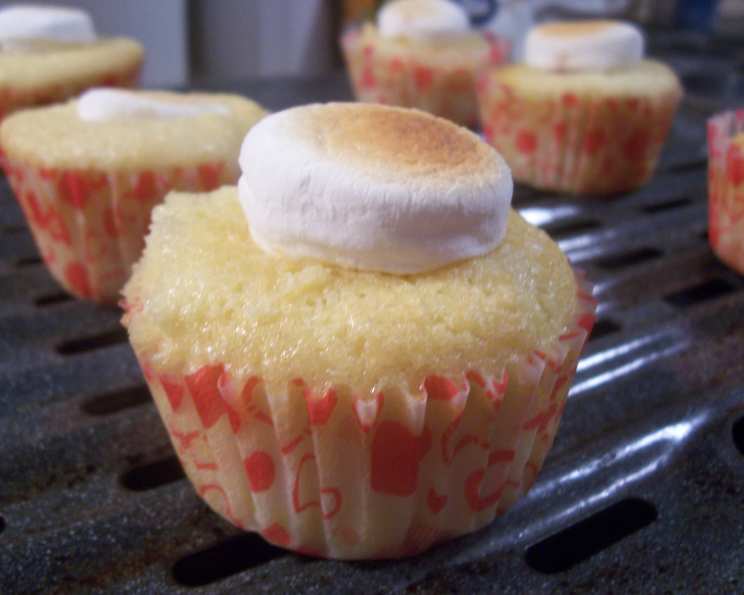
Baked Alaska-Ettes: A Retro Treat Reimagined
The first time I encountered Baked Alaska, it wasn’t the towering, flambéed spectacle I’d always imagined. It was a miniature, a tiny cloud of toasted marshmallow clinging to a cupcake cradling a scoop of melting strawberry ice cream at a church potluck. Mrs. Henderson, known for her spectacular confections, winked as she handed it to me, “A little bite of heaven, dear!” That simple, somewhat messy, utterly delightful bite sparked a lifelong love for this unusual dessert – a love I’m excited to share with you today.
Recipe Overview
- Prep Time: 20 minutes
- Cook Time: 20 minutes
- Broil Time: 30 seconds
- Total Time: 40 minutes
- Servings: 9
- Dietary Type: Not specified
Ingredients
- 1 cup flour
- 1 cup sugar
- 1 teaspoon baking powder
- ¼ teaspoon salt
- 1 egg, unbeaten
- ¾ cup light cream
- 1 teaspoon vanilla
- 1 pint ice cream (your favorite flavor)
- 9 marshmallows, cut in half crosswise
Equipment Needed
- Muffin pan
- Mixing bowls
- Sifter
- Cooling rack
- Spoon
- Broiler
Instructions
-
Begin by preheating your oven to 375°F (190°C). Thoroughly grease a standard muffin pan. This ensures your cupcakes release easily after baking.
-
In a medium bowl, sift together the flour, sugar, baking powder, and salt. Sifting is crucial for a light and airy cupcake texture, eliminating any lumps in the dry ingredients.
-
In a separate bowl, beat together the unbeaten egg and light cream. Add the vanilla extract. The vanilla enhances the overall flavor profile of the cupcakes.
-
Pour the wet ingredients into the bowl of dry ingredients, and beat thoroughly until a smooth batter forms. Avoid overmixing, as this can lead to tough cupcakes.
-
Pour the batter into the prepared muffin pan, filling each cup about two-thirds full. This allows room for the cupcakes to rise without overflowing.
-
Bake in the preheated oven for approximately 20 minutes, or until the cupcakes test done. To check for doneness, insert a toothpick into the center of a cupcake. If it comes out clean or with just a few moist crumbs, they are ready.
-
Remove the baked cupcakes from the oven and transfer them to a cooling rack to cool completely. Cooling them on a rack prevents them from becoming soggy.
-
Once the cupcakes are completely cool, use a spoon or small knife to carefully hollow out the center of each cupcake, creating a small well. Be careful not to pierce the bottom of the cupcake.
-
Fill each hollowed-out cupcake with a scoop of your favorite ice cream. Level off the ice cream with the back of a spoon so it’s flush with the top of the cupcake. Work quickly to prevent the ice cream from melting excessively.
-
Completely blanket the top of the ice cream-filled cupcake with the halved marshmallows, placing them snugly together. Ensure the entire surface is covered to provide insulation during the broiling process.
-
Preheat your broiler. Position an oven rack about 6-8 inches from the broiler element. Watch carefully, as broilers can vary in intensity.
-
Place the marshmallow-topped cupcakes under the hot broiler for approximately 30 seconds, or until the marshmallows are puffed and golden brown. Keep a close eye on them during broiling to prevent burning. The marshmallows should be toasted but not charred.
-
Serve the Baked Alaska-Ettes immediately. These are best enjoyed right away while the ice cream is still frozen and the marshmallows are warm and toasted.
Expert Tips & Tricks
- For a more stable cupcake base, consider using a denser cupcake recipe like a pound cake variation.
- To prevent the ice cream from melting too quickly during assembly, pre-chill the muffin pan and use very cold ice cream straight from the freezer.
- If you find your marshmallows are browning unevenly under the broiler, try rotating the muffin pan halfway through the broiling time.
- You can use a piping bag fitted with a star tip to create a more decorative marshmallow topping.
- For an extra layer of flavor, brush the cupcakes with a simple syrup (equal parts sugar and water, simmered until dissolved) after baking but before filling with ice cream.
- If you don’t have a broiler, you can use a kitchen torch to toast the marshmallows.
Serving & Storage Suggestions
Baked Alaska-Ettes are best served immediately after broiling to enjoy the contrast of the warm, toasted marshmallows and the cold ice cream. Serving them on small plates or dessert stands adds a touch of elegance.
Due to the ice cream component, these are not ideal for long-term storage. If you have leftovers, you can try wrapping them individually in plastic wrap and freezing them, but the texture of the marshmallows may change slightly. It’s best to consume them within a day or two. They should be stored in the freezer. They should not be left at room temperature for more than 15 minutes, or the ice cream will melt.
Nutritional Information
| Nutrient | Amount per Serving | % Daily Value |
|---|---|---|
| Calories | 301.6 kcal | N/A |
| Calories from Fat | 78 g | 26% |
| Total Fat | 8.7 g | 13% |
| Saturated Fat | 5.2 g | 25% |
| Cholesterol | 52.6 mg | 17% |
| Sodium | 169.2 mg | 7% |
| Total Carbohydrate | 52.2 g | 17% |
| Dietary Fiber | 0.7 g | 2% |
| Sugars | 36.6 g | N/A |
| Protein | 4.3 g | 8% |
Note: Nutritional information is an estimate and may vary based on specific ingredients and preparation methods.
Variations & Substitutions
- Gluten-Free: Use a gluten-free flour blend in place of the regular flour. Ensure the blend contains xanthan gum for binding.
- Dairy-Free: Substitute the light cream with coconut cream or another non-dairy cream alternative. Use a dairy-free ice cream.
- Flavor Variations: Experiment with different ice cream flavors, such as chocolate, coffee, or pistachio. You can also add mix-ins to the ice cream, such as chopped nuts, chocolate chips, or fruit.
- Marshmallow Alternatives: If you don’t have marshmallows, you can use meringue. Whip egg whites with sugar until stiff peaks form, then pipe onto the cupcakes and broil.
- Seasonal Adaptation: During the holidays, use peppermint ice cream and crushed candy canes for a festive twist. In the summer, try a fruit-flavored ice cream like raspberry or mango.
FAQs (Frequently Asked Questions)
Q: Can I make the cupcakes ahead of time?
A: Yes, you can bake the cupcakes a day or two in advance. Store them in an airtight container at room temperature. Wait until you’re ready to assemble the Baked Alaska-Ettes to hollow them out and add the ice cream.
Q: How do I prevent the ice cream from melting too quickly?
A: Work quickly when assembling the Baked Alaska-Ettes, and make sure your ice cream is very cold. Consider pre-chilling the muffin pan and your serving dishes as well.
Q: Can I use different types of marshmallows?
A: Yes, you can use flavored marshmallows or mini marshmallows if you prefer. Just make sure they completely cover the top of the cupcake.
Q: Is it safe to eat the ice cream after it’s been under the broiler?
A: Yes, the marshmallows act as an insulator, protecting the ice cream from the heat. The ice cream will soften slightly, but it should still be mostly frozen.
Q: My marshmallows burned too quickly. What did I do wrong?
A: Broilers can vary in intensity. Move the oven rack further away from the broiler element or reduce the broiling time. Keep a close eye on the cupcakes while they are under the broiler.
Final Thoughts
These Baked Alaska-Ettes are more than just a dessert; they’re a delightful trip down memory lane with a modern twist. They’re perfect for parties, celebrations, or simply a sweet treat on a special occasion. Don’t be intimidated by the broiling step; it’s quick and easy, and the results are well worth the effort. So go ahead, give this recipe a try and experience the magic of warm marshmallows and cold ice cream in a single, perfect bite. I can’t wait to hear about your creations!