
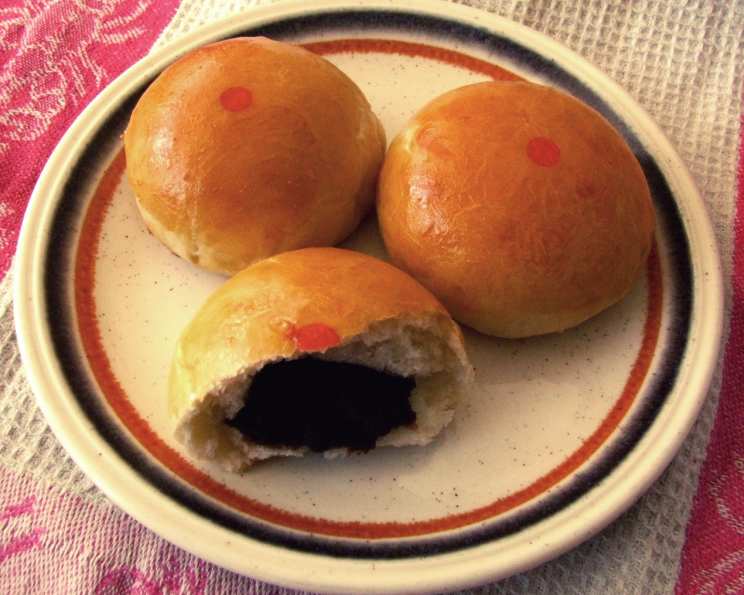
Baked Bao With Black Bean Paste: A Sweet & Savory Delight
The scent of freshly baked bread, subtly sweet and yeasty, instantly transports me back to my grandmother’s bustling kitchen. I remember watching, mesmerized, as she expertly pinched and folded dough around a spoonful of fragrant black bean paste, transforming simple ingredients into pillowy clouds of flavor. These baked bao, or buns, were a staple at every family gathering, and their warmth and deliciousness always brought a sense of comfort and joy. Today, I’m excited to share this cherished recipe with you, so you too can experience the magic of homemade baked bao.
Recipe Overview
- Prep Time: 45 minutes
- Rise Time: 2 hours 30 minutes
- Cook Time: 20-25 minutes
- Total Time: 3 hours 40 minutes
- Yields: Approximately 35 buns
- Serves: 5-10
- Dietary Type: Vegetarian (can be made vegan by substituting milk with plant-based milk and egg wash with plant-based milk)
Ingredients
- 3 1/2 cups all-purpose flour
- 1/2 teaspoon salt
- 1/4 cup sugar
- 1/4 cup vegetable shortening
- 1/4 cup lukewarm water
- 1 1/2 teaspoons active dry yeast
- 1 cup milk (can substitute with plant-based milk)
- 1/3 cup water
- 1 (14 ounce) can sweet black bean paste
- 1 small egg, beaten (can substitute with plant-based milk for egg wash)
- 2 drops red food coloring (optional)
- 2 teaspoons water (optional)
Equipment Needed
- Large bowl
- Small bowl or cup
- Microwave-safe bowl or small saucepan
- Electric mixer with dough hooks (or hands for kneading)
- Measuring cups and spoons
- Pastry blender or two knives
- Greased bowl
- Clean towel or plastic wrap
- Well-floured surface
- Rolling pin or hands
- Knife
- Baking sheet
- Parchment paper (optional)
- Pastry brush
- Wire rack
- Chopstick (optional, for red dot decoration)
Instructions
- Activate the Yeast: In a small bowl or cup, combine 1/4 cup lukewarm water with the 1 1/2 teaspoons of active dry yeast. Let this mixture stand for five minutes, allowing the yeast to activate. You’ll notice it becomes foamy.
- Combine Dry Ingredients: In a large bowl, sift or stir together 2 cups of the all-purpose flour, 1/2 teaspoon salt, and 1/4 cup sugar.
- Incorporate Shortening: Add the 1/4 cup vegetable shortening to the dry ingredients. Using a pastry blender or two knives, cut in the shortening until the mixture resembles coarse meal. This creates a tender crumb in the finished bao.
- Warm the Milk Mixture: In a microwave-safe bowl or a small saucepan, combine 1 cup of milk and 1/3 cup of water. Heat the mixture until it is warm, but not hot. You should be able to comfortably hold your finger in it for a few seconds. This temperature is ideal for yeast activity.
- Combine Yeast and Milk: Add the activated yeast mixture to the warm milk mixture.
- Mix the Dough: Add the milk and yeast mixture to the dry ingredients in the large bowl, mixing well. Gradually add the remaining flour, little by little, until the mixture forms a shaggy dough. You may not need the full amount of flour; add only enough until the dough comes together.
- Knead the Dough: Using an electric mixer fitted with dough hooks, mix the dough until it is smooth and elastic. This will take several minutes. Add more flour if necessary to prevent sticking. Alternatively, you can knead the dough by hand on a well-floured surface for 5-10 minutes. The dough is ready when it is smooth, slightly tacky, and springs back when pressed.
- First Rise: Grease a large clean bowl with a bit of oil, butter, or shortening. Transfer the dough to this bowl, turning it so that the grease coats the entire surface. This will prevent the dough from drying out during the rise. Cover the bowl with a towel or plastic wrap and leave the dough to rise in a warm place for two hours, or until doubled in size. This step is crucial for developing the light and airy texture of the bao.
- Punch Down and Divide: After the first rise, punch down the dough to release the air. Transfer it to a well-floured surface. Using your hands or a rolling pin, flatten the dough to just over a 1/2 inch thickness. Using a knife, divide the dough into pieces roughly 2 1/2 by 2 1/2 inches. The exact shape isn’t critical.
- Fill the Buns: On the floured surface or in the palm of your hand, flatten the dough slightly around the edges. Place a rounded teaspoon of sweet black bean paste in the center of each piece.
- Shape the Buns: Gather up the edges of the dough and pinch them firmly together, making certain that the filling is completely sealed inside. This is important to prevent the filling from leaking out during baking.
- Second Rise: Place the buns on a baking sheet that is well greased or lined with parchment paper, pinched side down. This prevents them from sticking. Place the buns about 2 inches apart, to give them room to rise. Cover them with a clean towel and let them rise for half an hour. This second rise allows the buns to become even more light and fluffy.
- Preheat the Oven: Preheat the oven to 350 degrees Fahrenheit (175 degrees Celsius).
- Egg Wash (Optional): With a pastry brush or your fingers, brush the tops of the buns with the beaten egg. This gives them a golden-brown color and a slight sheen. For a vegan option, use plant-based milk.
- Bake: Put the buns in the preheated oven and bake for 20-25 minutes, or until the buns are golden brown. The bread should look airy and cooked through when a bun is torn open.
- Optional Red Dot: If you want to mark the tops of the buns with a red dot (a traditional touch), mix the 2 drops of red food coloring and 2 teaspoons of water in a small bowl. Use the end of a chopstick to put a drop of the red water on the top of each hot bun immediately after removing them from the oven.
- Cool and Serve: Transfer the buns to a wire rack and let them cool a little. Buns can be served warm.
Expert Tips & Tricks
- Dough Consistency: Don’t be afraid to adjust the amount of flour slightly to achieve the right dough consistency. You want it to be smooth and elastic but not sticky.
- Warm Environment for Rising: A warm environment is crucial for proper rising. If your kitchen is cold, try placing the bowl of dough in a slightly warmed oven (turned off) or near a warm appliance.
- Preventing Filling Leakage: Make sure to pinch the dough tightly closed around the filling to prevent it from leaking out during baking.
- Even Baking: For even baking, rotate the baking sheet halfway through the baking time.
- Freezing for Later: Baked bao freeze exceptionally well. Let them cool completely before wrapping them individually in plastic wrap and placing them in a freezer bag.
Serving & Storage Suggestions
Serve the baked bao warm as a delightful snack, appetizer, or as part of a larger meal. They are delicious on their own or paired with a dipping sauce like soy sauce or chili oil.
- Room Temperature: Baked bao can be stored at room temperature in an airtight container for up to 2 days.
- Refrigerator: For longer storage, refrigerate the buns in an airtight container for up to 5 days.
- Freezer: Baked bao can be frozen for up to 2 months. To reheat, thaw the buns in the refrigerator or at room temperature, then reheat them in the microwave for 10-20 seconds or in the oven at 300°F (150°C) for a few minutes until warmed through.
Nutritional Information
(Note: Values are approximate and may vary based on specific ingredients used.)
| Nutrient | Amount per Serving | % Daily Value |
|---|---|---|
| Calories | 493.5 kcal | N/A |
| Total Fat | 13.7 g | 21% |
| Saturated Fat | 4.4 g | 22% |
| Cholesterol | 38.1 mg | 12% |
| Sodium | 269.7 mg | 11% |
| Total Carbohydrate | 79.5 g | 26% |
| Dietary Fiber | 2.6 g | 10% |
| Sugars | 10.3 g | N/A |
| Protein | 12 g | 24% |
Variations & Substitutions
- Red Bean Paste: Instead of black bean paste, you can use red bean paste for a different flavor profile.
- Vegan Bao: Substitute the milk with plant-based milk (almond, soy, or oat milk work well) and omit the egg wash, or replace the egg wash with a brush of plant-based milk.
- Savory Filling: For a savory twist, try filling the bao with seasoned ground pork, shredded vegetables, or even barbecue tofu.
- Gluten-Free Bao: Substitute the all-purpose flour with a gluten-free all-purpose flour blend. You may need to adjust the liquid slightly to achieve the right dough consistency.
FAQs (Frequently Asked Questions)
Q: Can I make the dough ahead of time?
A: Yes! After the first rise, you can punch down the dough, wrap it tightly in plastic wrap, and refrigerate it for up to 24 hours. Allow it to come to room temperature before proceeding with the recipe.
Q: My dough isn’t rising. What could be the problem?
A: The most common reason for dough not rising is inactive yeast. Make sure your yeast is fresh and that the water you use to activate it is lukewarm, not hot. Too cold, and the yeast won’t activate; too hot, and it will kill the yeast.
Q: How do I prevent the filling from leaking out?
A: Ensure you pinch the dough tightly closed around the filling, creating a complete seal. Also, avoid overfilling the buns.
Q: Can I bake these in an air fryer?
A: While it’s possible, the results may vary. If using an air fryer, reduce the baking time and keep a close eye on the buns to prevent burning.
Q: How do I reheat frozen bao?
A: Thaw the buns in the refrigerator or at room temperature. Reheat them in the microwave for 10-20 seconds or in the oven at 300°F (150°C) for a few minutes until warmed through.
Final Thoughts
These baked bao with black bean paste are more than just a recipe; they’re a taste of tradition, a celebration of flavors, and a warm embrace in every bite. I encourage you to try this recipe and experience the joy of creating something truly special. Don’t hesitate to experiment with different fillings or variations to make it your own. And most importantly, share your delicious creations with friends and family – because food is best enjoyed when shared!