
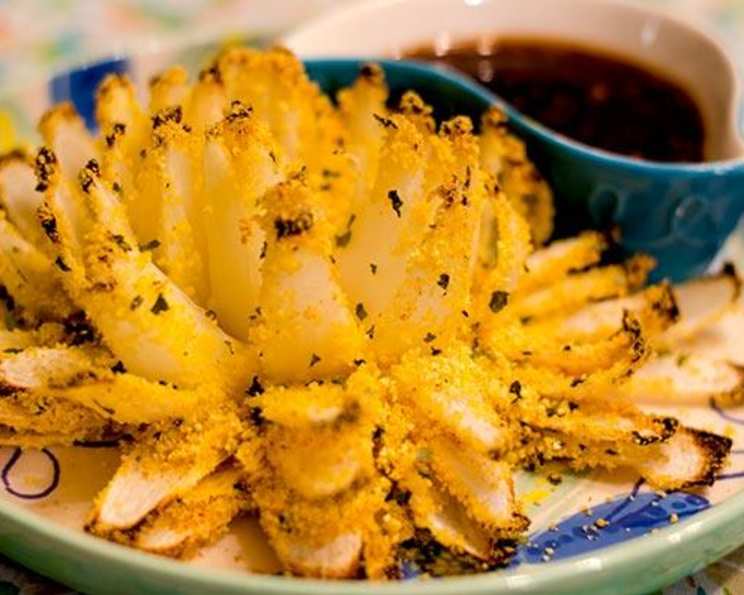
Baked Blooming Onion With Thai Sweet Chili Sauce (Gluten-Free)
I’ll never forget the first time I saw a blooming onion. It was at a county fair, and the sheer audacity of transforming a humble onion into a fried, blossoming spectacle captivated me. The aroma alone was intoxicating, a savory symphony of spices and caramelized goodness. Of course, the traditional version always felt like a guilty pleasure, a caloric splurge best enjoyed in moderation. But what if you could capture that same wow factor, that same explosion of flavor, in a healthier, gluten-free format? This recipe is my answer, bringing the blooming onion experience home without the deep-fried regret.
Recipe Overview
- Prep Time: 15 minutes
- Cook Time: 30-40 minutes
- Total Time: 45-55 minutes
- Servings: 4
- Yield: 1 onion
- Dietary Type: Gluten-Free
Ingredients
- 1 large onion
- 2 tablespoons coconut oil
- ½ cup gluten-free panko breadcrumbs (or use a piece of dry gluten-free bread and process in a food processor)
- ¼ teaspoon salt
- Black pepper to taste
- Cayenne pepper to taste
- 1 teaspoon dried cilantro (or fresh cilantro, minced)
For the Sauce:
- 4 tablespoons rice vinegar (I used brown rice vinegar)
- 4 tablespoons coconut sugar crystals (or other natural sugar)
- 2 tablespoons water
- 1 ½ tablespoons fish sauce
- 1 tablespoon sake or 1 tablespoon sherry wine
- 1 large garlic clove, grated
- 1 teaspoon crushed chili pepper
- 1 teaspoon potato starch
Equipment Needed
- Baking sheet
- Small pan
- Small bowl
- Pastry brush (optional)
Instructions
-
Preheat your oven to 400°F (200°C).
-
Prepare the onion: First, peel the onion and cut off the top ¼ inch. This creates a flat surface for stability.
-
Cutting the “petals”: Place the onion cut-side down on a cutting board. Starting approximately ½ inch from the root end, make a downward cut all the way through to the board. It’s crucial to leave the root intact, as this will hold the onion together.
-
Divide the onion: Repeat the previous step to make four evenly spaced cuts around the onion, essentially quartering it.
-
Create more “petals”: Continue slicing between each section until you have approximately 16 evenly spaced cuts. The more slices, the more delicate and blooming your onion will appear.
-
Gently separate the layers: Carefully turn the onion over and use your fingers to gently separate the outer pieces, creating the blooming effect. Be gentle to avoid tearing the petals.
-
Prepare for baking: Melt the coconut oil. Use a pastry brush (or your fingers) to brush the melted coconut oil generously on both sides of the onion petals. This will help them crisp up beautifully in the oven.
-
Seasoning: In a bowl, combine the gluten-free panko breadcrumbs, salt, pepper, cayenne pepper, and dried cilantro.
-
Coat the onion: Sprinkle the panko mixture evenly over the onion, ensuring that it coats all the petals. Press gently so the crumbs adhere.
-
Baking: Bake in the preheated oven for approximately 30-40 minutes, or until the onion is tender and the petals are golden brown and crispy. The exact baking time may vary depending on the size of your onion and your oven’s calibration.
-
Prepare the sauce: While the onion is baking, prepare the Thai sweet chili sauce. Place all the sauce ingredients, except the potato starch, in a small pan.
-
Simmer: Bring the sauce to a boil over medium-high heat. Then, reduce the heat to medium and let it boil gently for 3-5 minutes, allowing the flavors to meld and intensify.
-
Thicken the sauce: In a small bowl, dissolve the potato starch in 1 tablespoon of water. This creates a slurry that will thicken the sauce.
-
Final touches: Reduce the heat to low and add the potato starch mixture to the pan. Stir constantly for a minute or so, until the sauce thickens to your desired consistency.
-
Adjust and serve: Taste the sauce and adjust the amount of sugar or chili according to your preference. Remember, the goal is a balance of sweet, spicy, sour, and savory.
-
Infuse love and serve the baked blooming onion immediately with the Thai sweet chili sauce on the side.
Expert Tips & Tricks
- Onion Selection: Choose a large, firm onion for the best results. Yellow or Vidalia onions work well.
- Cutting Technique: A sharp knife is essential for clean cuts. If you find the onion slipping, try placing it on a damp paper towel for better grip.
- Even Cooking: To ensure even cooking, rotate the baking sheet halfway through the baking time.
- Crispy Petals: For extra crispy petals, broil the onion for the last few minutes of cooking, keeping a close watch to prevent burning.
- Sauce Consistency: If you prefer a thinner sauce, use less potato starch. For a thicker sauce, use a bit more.
Serving & Storage Suggestions
Serve the baked blooming onion immediately while it’s hot and crispy. The Thai sweet chili sauce should be served on the side for dipping. This dish is best enjoyed fresh, but if you have leftovers, store them in an airtight container in the refrigerator for up to 2 days. Reheat in a preheated oven or air fryer to re-crisp the petals. The sauce can be stored separately in the refrigerator for up to a week.
Nutritional Information
| Nutrient | Amount per Serving | % Daily Value |
|---|---|---|
| Calories | 210 kcal | 11% |
| Total Fat | 12g | 18% |
| Saturated Fat | 9g | 45% |
| Cholesterol | 0mg | 0% |
| Sodium | 450mg | 19% |
| Total Carbohydrate | 22g | 8% |
| Dietary Fiber | 2g | 7% |
| Sugars | 10g | – |
| Protein | 3g | 6% |
Note: Nutritional information is an estimate and may vary based on specific ingredients and portion sizes.
Variations & Substitutions
- Vegan Option: Substitute agave or maple syrup for the coconut sugar and tamari for the fish sauce in the sauce.
- Spice Level: Adjust the amount of crushed chili pepper to your desired spice level. You can also add a pinch of red pepper flakes to the panko mixture for extra heat.
- Herb Variations: Experiment with different herbs in the panko mixture, such as dried thyme, oregano, or rosemary.
- Cheese Addition: For a cheesy twist, sprinkle grated Parmesan cheese over the onion during the last 10 minutes of baking (not gluten-free).
- Air Fryer Method: You can also cook this in an air fryer! Preheat the air fryer to 375°F (190°C) and cook for 20-25 minutes, or until golden brown and crispy.
FAQs (Frequently Asked Questions)
Q: Why is it important to leave the root end of the onion intact?
A: Leaving the root end intact helps hold the onion together during cutting and baking, preventing the petals from falling apart.
Q: Can I use regular breadcrumbs instead of gluten-free panko?
A: Yes, you can use regular breadcrumbs if you don’t need the recipe to be gluten-free. Panko breadcrumbs provide a lighter and crispier texture.
Q: How do I prevent the onion from burning while baking?
A: Keep a close eye on the onion while it’s baking, and tent it with foil if it starts to brown too quickly. Rotating the baking sheet halfway through also helps ensure even cooking.
Q: Can I make the Thai sweet chili sauce ahead of time?
A: Yes, the sauce can be made ahead of time and stored in the refrigerator for up to a week. Reheat gently before serving.
Q: What if I don’t have sake or sherry wine?
A: If you don’t have sake or sherry wine, you can substitute with a little extra rice vinegar or even a splash of chicken or vegetable broth.
Final Thoughts
This baked blooming onion with Thai sweet chili sauce is a fun, flavorful, and healthier alternative to the deep-fried classic. It’s perfect as an appetizer for a party or a special treat for your family. Don’t be intimidated by the cutting technique – with a little practice, you’ll be creating stunning blooming onions in no time. I encourage you to try this recipe and share your creations with me! Pair it with a refreshing Thai iced tea for a complete and satisfying experience. Happy cooking!