
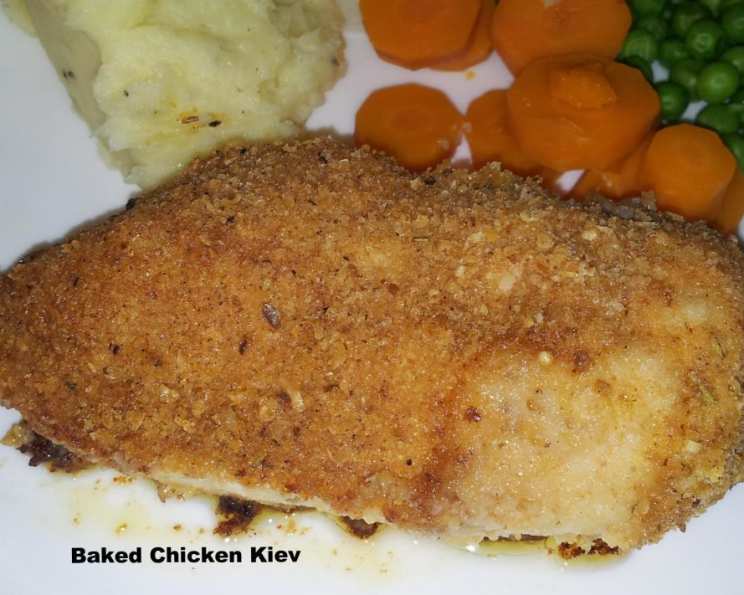
Baked Chicken Kiev: A Taste of Nostalgia, Reimagined
The first time I tasted Chicken Kiev, I was probably seven or eight, sitting in a dimly lit restaurant with my family. The waiter, with a flourish, pierced the golden-brown crust of the chicken with his serving spoon, and a fragrant river of herbed butter flowed out. It felt like pure magic, a culinary treasure unveiled right before my eyes. That memory, the aroma, the crispy breading, and the rush of buttery flavor, has stayed with me. While traditionally fried, this baked version captures all the comforting deliciousness of the classic, with a slightly healthier twist.
Recipe Overview
- Prep Time: 30 minutes
- Cook Time: 35 minutes
- Total Time: 1 hour 5 minutes
- Servings: 4
- Yield: 4 Chicken Kievs
- Dietary Type: Not Gluten-Free
Ingredients
For the Chicken:
- 4 boneless, skinless chicken breasts
- 4 tablespoons olive oil
For the Herbed Butter:
- 1/3 cup butter or 1/3 cup margarine, softened
- 1 tablespoon dried oregano
- 2 teaspoons dried parsley
- 1/2 tablespoon fresh garlic, minced
- 1/2 tablespoon fresh ginger, minced
- Salt and pepper, to taste
For the Breadcrumb Mix:
- 3/4 cup Italian breadcrumbs
- 1/4 cup flour
- 1/2 cup Parmesan cheese, grated
- Salt and pepper, to taste
- 1-2 teaspoons cayenne pepper
- 1-2 teaspoons Old Bay Seasoning
- 1-2 teaspoons Italian seasoning
- 1-2 teaspoons garlic powder
Equipment Needed
- Meat tenderizer or rolling pin
- Wax paper or plastic wrap
- Small mixing bowl
- Shallow dishes for breading
- 9″ x 9″ baking pan
- Wooden toothpicks
Instructions
- Prepare the Herbed Butter: In a small mixing bowl, combine the softened butter or margarine, dried oregano, dried parsley, minced garlic, and minced ginger. Season with salt and pepper to taste. Mix well until all ingredients are evenly distributed.
- Shape and Freeze the Butter: Place the herbed butter mixture onto a sheet of wax paper. Shape it into a log approximately 4 inches long. Wrap the wax paper tightly around the butter log, twisting the ends to seal. Place the wrapped butter log in the freezer for at least 30 minutes, or until firm enough to slice. This ensures the butter stays contained while cooking.
- Preheat the Oven: Preheat your oven to 425°F (220°C). Ensure your oven rack is positioned in the center of the oven for even cooking.
- Prepare the Chicken Breasts: One at a time, place a chicken breast between two sheets of wax paper or plastic wrap. Using a meat tenderizer or rolling pin, pound the chicken breast until it is approximately 1/4 inch thick. Be careful not to tear the chicken; gentle, even pressure is key. Flattening the chicken ensures even cooking and creates a pocket for the herbed butter.
- Assemble the Chicken Kiev: Once the herbed butter is frozen, remove it from the freezer and unwrap it. Cut the butter log into four equal pieces. Place one piece of the frozen herbed butter in the center of each flattened chicken breast.
- Seal the Chicken: Carefully fold the long sides of the chicken breast over the herbed butter, then fold the ends up to completely enclose the butter. Secure the folded chicken with a wooden toothpick to prevent the butter from leaking out during baking. Ensuring a tight seal is critical to keep the butter inside.
- Prepare the Breadcrumb Mix: In a shallow dish, combine the Italian breadcrumbs, flour, Parmesan cheese, salt, pepper, cayenne pepper, Old Bay Seasoning, Italian seasoning, and garlic powder. Mix well to combine all the dry ingredients.
- Bread the Chicken: Dip each prepared chicken breast into the olive oil, ensuring all sides are lightly coated. Then, dredge the oiled chicken in the breadcrumb mix, pressing gently to ensure the breadcrumbs adhere evenly to the chicken. A thorough coating of breadcrumbs is important for achieving a crispy crust.
- Bake the Chicken Kiev: Place the breaded chicken pieces in a prepared 9″ x 9″ baking pan, seam side down. This helps the chicken maintain its shape during baking.
- Bake: Bake uncovered for approximately 35 minutes, or until the juices run clear when the chicken is pierced with a fork. Internal temperature should reach 165°F (74°C). Baking time may vary depending on the thickness of the chicken and your oven.
- Rest and Serve: Remove the toothpicks from the chicken Kiev before serving. Let the chicken rest for a few minutes before serving. This allows the juices to redistribute, resulting in a more tender and flavorful dish.
Expert Tips & Tricks
- Freezing the butter: Freezing the herbed butter completely is essential to prevent it from melting too quickly during cooking and leaking out. If you’re short on time, you can even freeze the butter overnight.
- Pounding the chicken: Be careful not to pound the chicken too thin, or it will tear easily. Use gentle, even pressure. Aim for a consistent 1/4-inch thickness.
- Breadcrumb adhesion: To help the breadcrumbs adhere better, you can lightly brush the chicken with beaten egg before dredging in the breadcrumb mixture.
- Oven variations: Every oven is different. If your chicken is browning too quickly, you can loosely tent it with foil during the last 10-15 minutes of baking.
- Doneness: Use a meat thermometer to ensure the chicken reaches an internal temperature of 165°F (74°C). This is the safest way to ensure the chicken is fully cooked.
Serving & Storage Suggestions
Serve the Baked Chicken Kiev immediately after baking for the best flavor and texture. It pairs beautifully with mashed potatoes, roasted vegetables (such as asparagus or broccoli), or a fresh green salad. For a more elegant presentation, garnish with a sprig of fresh parsley or a lemon wedge.
Storage: Leftover Chicken Kiev can be stored in an airtight container in the refrigerator for up to 3 days.
Reheating: To reheat, preheat the oven to 350°F (175°C). Place the Chicken Kiev on a baking sheet and bake for 10-15 minutes, or until heated through. You can also reheat it in the microwave, but the breading may become slightly soggy. Do not leave at room temperature for more than 2 hours.
Nutritional Information
| Nutrient | Amount per Serving | % Daily Value |
|---|---|---|
| Calories | 563.6 kcal | N/A |
| Calories from Fat | 318 g | 57% |
| Total Fat | 35.4 g | 54% |
| Saturated Fat | 14.5 g | 72% |
| Cholesterol | 120.3 mg | 40% |
| Sodium | 774.4 mg | 32% |
| Total Carbohydrate | 24.1 g | 8% |
| Dietary Fiber | 2 g | 7% |
| Sugars | 1.7 g | 6% |
| Protein | 36.6 g | 73% |
Variations & Substitutions
- Gluten-Free: Use gluten-free breadcrumbs and a gluten-free flour blend in the breadcrumb mixture.
- Dairy-Free: Substitute the butter with a dairy-free butter alternative and omit the Parmesan cheese or replace it with a dairy-free Parmesan alternative.
- Spice Level: Adjust the amount of cayenne pepper to control the spice level. Omit it entirely for a milder flavor.
- Herb Variations: Experiment with different herbs in the herbed butter. Fresh herbs like chives, tarragon, or dill would also be delicious. Just be sure to finely mince them.
- Cheese Variations: Try using different types of cheese in the breadcrumb mixture, such as Pecorino Romano or Asiago.
FAQs (Frequently Asked Questions)
Q: Can I prepare the Chicken Kiev ahead of time?
A: Yes, you can assemble the Chicken Kievs up to the point of baking, then refrigerate them for up to 24 hours. Add a few minutes to the baking time to ensure the chicken is cooked through.
Q: What if the butter leaks out during baking?
A: This can happen if the seal isn’t tight enough or if the oven temperature is too high. Ensure a tight seal when folding the chicken, and double-check your oven temperature.
Q: Can I use bone-in chicken breasts?
A: While possible, it’s not recommended. Bone-in chicken breasts will take longer to cook and may not cook evenly. Boneless, skinless breasts are ideal for this recipe.
Q: What’s the best way to check for doneness?
A: Use a meat thermometer to ensure the internal temperature reaches 165°F (74°C). Insert the thermometer into the thickest part of the chicken breast.
Q: Can I freeze the cooked Chicken Kiev?
A: Yes, you can freeze cooked Chicken Kiev. Wrap each piece individually in plastic wrap, then place them in a freezer-safe bag or container. They can be stored in the freezer for up to 2 months. Reheat in the oven for best results.
Final Thoughts
Baked Chicken Kiev is a comforting and flavorful dish that’s perfect for a special occasion or a weeknight dinner. The combination of tender chicken, herbed butter, and crispy breadcrumbs is simply irresistible. Don’t be intimidated by the steps—with a little patience and attention to detail, you can easily recreate this classic dish in your own kitchen. I encourage you to give it a try and share your feedback. Serve it with a crisp white wine and enjoy!