
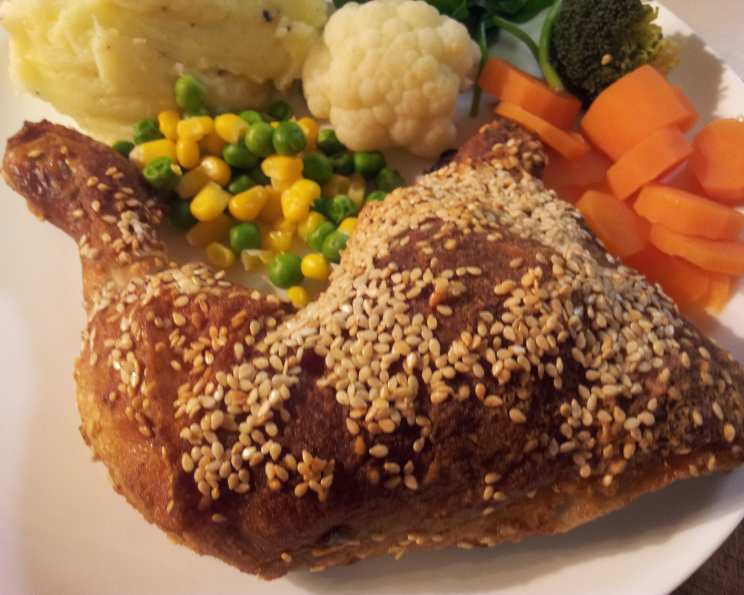
Baked Crumbed Chicken: A Family Favorite with a Kick
The scent of baked chicken has always been synonymous with home for me. I remember, as a child, my grandmother making her version of crumbed chicken every Sunday. The kitchen would be filled with the warm, savory aroma, and the anticipation was almost unbearable. What made it special was the slight kick of spice and the satisfying crunch that gave way to juicy, tender chicken inside. Now, I’ve adapted that beloved recipe to create my own version, incorporating the unique addition of sesame seeds for a nutty flavor and delightful texture. This isn’t just food; it’s a memory, a tradition, and a taste of home.
Recipe Overview
- Prep Time: 20 minutes
- Cook Time: 40 minutes – 1 hour
- Total Time: 1 hour – 1 hour 20 minutes
- Servings: 4-6
- Yield: About 6 pieces of chicken
- Dietary Type: Not Gluten-Free
Ingredients
- 1 ½ kg chicken pieces (with bone and skin on)
- 125 ml flour
- 30 ml sesame seeds
- 7 ml paprika
- 5 ml cayenne pepper or chili powder
- 15 ml baking powder
- 1 egg, lightly beaten
- 125 ml milk
- 5 garlic cloves
- 5 ml salt
- 125 ml butter or margarine, melted
Equipment Needed
- Large mixing bowl
- Clear plastic bag
- Pestle and mortar
- Oven-proof baking dish
- Oven
Instructions
-
Preheat your oven to 220 degrees Celsius (425 degrees Fahrenheit). This high heat is crucial for achieving that golden-brown, crispy crust.
-
Thoroughly wash the chicken pieces under cold running water. Use paper towels to pat them dry completely. This step is essential for ensuring the flour mixture adheres properly. Excess moisture can lead to a soggy crust.
-
In a clear plastic bag (a gallon-sized zip-top bag works perfectly), combine the flour, sesame seeds, paprika, cayenne pepper (or chili powder), and baking powder. Seal the bag and shake vigorously to ensure all the ingredients are well combined. This creates your flavorful breading mixture.
-
In a mixing bowl, beat the egg lightly with the milk until well combined. This egg wash will help the flour mixture adhere to the chicken.
-
Using a pestle and mortar, pound the garlic cloves and salt together until you form a fine paste. This method releases the garlic’s oils, maximizing its flavor. Alternatively, you can mince the garlic very finely and mix it with the salt.
-
Rub the garlic-salt mixture all over the chicken pieces, ensuring every piece is evenly coated. This is where the flavor infusion begins, so don’t skimp on this step.
-
Dip each chicken piece into the egg mixture, ensuring it is fully coated. Then, immediately place the chicken into the plastic bag with the flour mixture.
-
Seal the bag and shake well to coat the chicken pieces evenly with the flour mixture. Make sure every nook and cranny is covered for maximum crispiness.
-
Arrange the chicken pieces in an oven-proof baking dish, placing them skin side up. This allows the skin to render its fat and become wonderfully crispy during baking. Ensure the pieces aren’t overcrowded in the dish, as this can steam the chicken instead of baking it.
-
Melt the butter (or margarine) completely. Pour the melted butter evenly over the chicken pieces. This adds richness and helps the crust turn golden brown.
-
Bake in the preheated oven for 40 minutes to 1 hour, or until the chicken is evenly browned and cooked through. The internal temperature of the chicken should reach 74 degrees Celsius (165 degrees Fahrenheit). Use a meat thermometer to check for doneness. If the chicken starts to brown too quickly, you can loosely tent the baking dish with foil to prevent burning.
Expert Tips & Tricks
-
Spice Level Adjustment: Adjust the amount of cayenne pepper or chili powder to suit your preference for spice. A pinch more can add significant heat, while reducing it makes the dish milder.
-
Crispier Crust: For an extra crispy crust, consider using panko breadcrumbs in addition to or instead of some of the flour. Panko provides a lighter, airier texture.
-
Even Cooking: If your oven tends to cook unevenly, rotate the baking dish halfway through the cooking time to ensure even browning.
-
Marinating: For a deeper flavor, marinate the chicken in the garlic-salt mixture for at least 30 minutes (or even overnight in the refrigerator) before coating it with the flour mixture.
-
Preventing Soggy Skin: Ensure the chicken is thoroughly dried after washing. This helps the coating adhere better and prevents a soggy crust. Do not overcrowd the baking dish, allow air to circulate.
Serving & Storage Suggestions
This baked crumbed chicken is fantastic served hot, straight from the oven. Pair it with classic sides like homemade fries, a fresh green salad, creamy mashed potatoes, or coleslaw.
-
Leftovers: Store leftover chicken in an airtight container in the refrigerator for up to 3-4 days.
-
Reheating: Reheat the chicken in the oven at 175 degrees Celsius (350 degrees Fahrenheit) until warmed through. This will help maintain the crispy texture. You can also use a microwave, but the crust will soften.
-
Freezing: For longer storage, you can freeze the cooked chicken. Wrap it tightly in plastic wrap and then in foil, or store it in a freezer-safe container. It can be stored in the freezer for up to 2-3 months. Thaw it overnight in the refrigerator before reheating.
Nutritional Information
Note: Nutritional information is an estimate and may vary based on specific ingredients and portion sizes.
| Nutrient | Amount per Serving | % Daily Value |
|---|---|---|
| Calories | 450 kcal | 23% |
| Total Fat | 30g | 46% |
| Saturated Fat | 15g | 75% |
| Cholesterol | 150mg | 50% |
| Sodium | 400mg | 17% |
| Carbohydrates | 20g | 7% |
| Fiber | 2g | 8% |
| Sugar | 1g | 2% |
| Protein | 30g | 60% |
Variations & Substitutions
- Gluten-Free Version: Substitute the all-purpose flour with a gluten-free flour blend and use gluten-free baking powder to create a gluten-free version of this dish. Ensure all other ingredients are also gluten-free.
- Dairy-Free Version: Use a dairy-free butter alternative for melting over the chicken.
- Herb Infusion: Add dried herbs like thyme, rosemary, or oregano to the flour mixture for a more complex flavor profile.
- Spicy Kick: For even more heat, add a pinch of red pepper flakes to the flour mixture.
- Lemon Zest: Add lemon zest to the garlic mixture before rubbing it onto the chicken for a bright, citrusy flavor.
- Buttermilk Soak: Soak the chicken in buttermilk for an hour or two before coating it. This will tenderize the chicken and add a tangy flavor.
FAQs (Frequently Asked Questions)
Q: Can I use boneless, skinless chicken breasts for this recipe?
A: Yes, you can, but be aware that they will cook faster and may be drier than bone-in, skin-on pieces. Reduce the cooking time accordingly and consider pounding them to an even thickness for even cooking.
Q: What if I don’t have a pestle and mortar?
A: You can finely mince the garlic and mix it with the salt. Make sure the garlic is minced very finely to release its flavor.
Q: Can I make this ahead of time?
A: You can prepare the chicken up to the point of baking and store it in the refrigerator for up to 24 hours. Add the melted butter just before baking.
Q: How do I know when the chicken is done?
A: The best way is to use a meat thermometer. Insert it into the thickest part of the chicken, avoiding the bone. It should reach 74 degrees Celsius (165 degrees Fahrenheit). The juices should also run clear when pierced with a fork.
Q: Can I use olive oil instead of butter?
A: Yes, you can use olive oil, but the flavor will be different. Butter provides a richer, more savory flavor.
Final Thoughts
This Baked Crumbed Chicken is more than just a recipe; it’s an invitation to create your own kitchen memories. The blend of spice, crunch, and juicy tenderness is guaranteed to be a crowd-pleaser. Don’t be afraid to experiment with different variations to make it your own. Whether you’re serving it to guests or enjoying a family dinner, I hope this recipe brings a little bit of joy to your table. So, gather your ingredients, preheat your oven, and get ready to create a delicious and memorable meal. Happy cooking!