
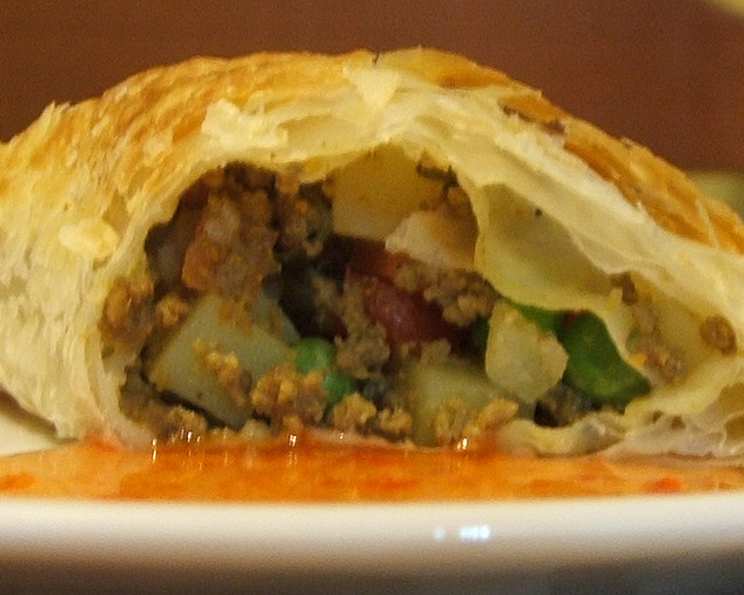
Golden Baked Curry Puffs: A Taste of Nostalgia
I can still picture my grandmother in her bustling kitchen, the air thick with the warm, inviting aroma of spices. Every festive occasion, without fail, she would present a platter piled high with golden, flaky curry puffs. As a child, I was mesmerized by the intricate crimped edges and the burst of savory filling that followed each bite. These weren’t just snacks; they were edible hugs, steeped in love and tradition, and this recipe is my attempt to recreate those treasured memories.
Recipe Overview
- Prep Time: 25 minutes
- Cook Time: 10 minutes
- Total Time: 35 minutes
- Servings: 30-40
- Yield: 30-40 puffs
- Dietary Type: Varies (can be adapted to be dairy-free)
Ingredients
- 4-5 sheets frozen puff pastry, thawed
- 1 tablespoon oil
- 2 garlic cloves, chopped finely
- 1 large onion, diced finely
- 1 1/2 teaspoons finely grated gingerroot
- 1 cup minced beef
- 3 large potatoes, peeled and cut into very small cubes
- 3 tablespoons curry powder
- 1 cup water
- 1 teaspoon sugar
- Salt and pepper to taste
- 1 cup mixed vegetables, diced very small (carrots, peas, corn are great)
- 1/2 cup finely chopped fresh coriander
- 1 egg, beaten
Equipment Needed
- Wok or large pan
- Cutting board
- Knife
- Measuring cups and spoons
- Fork
- Baking sheet
- Parchment paper (optional)
Instructions
-
Begin by preparing the aromatic base for the filling. In a wok or large pan, heat the oil over medium heat. Add the finely chopped garlic and fry until golden, releasing its fragrant oils.
-
Add the diced onion and finely grated gingerroot to the pan. Sauté until the onions are softened and translucent, about 3-5 minutes, allowing the flavors to meld together beautifully.
-
Introduce the protein. Add the minced beef to the pan and fry for 2 minutes, breaking it up into small pieces with a spatula or spoon. Alternatively, you can fry the meat in a separate pan to drain off any excess fat before adding it to the onion mixture. This can help prevent a greasy filling.
-
Incorporate the diced potatoes and cook for a further 2-4 minutes, stirring occasionally to ensure they are coated in the flavorful mixture.
-
Now for the heart of the curry flavor: Add the curry powder to the pan, stirring to coat the meat and vegetables. Pour in the water, add the sugar, and season with salt and pepper to taste.
-
Bring the mixture to a simmer over medium-low heat, stirring occasionally to prevent burning, until the potatoes are almost soft. This should take approximately 10-15 minutes. If the sauce becomes too dry, you may need to add a little extra water to maintain a saucy consistency. You want the potatoes cooked through but not falling apart.
-
Add the mixed vegetables and fresh coriander to the pan. Cook for a further 2-3 minutes, just until the vegetables are starting to soften. Be careful not to overcook the vegetables, as they will continue to cook in the oven.
-
Remove the pan from the heat and allow the filling to cool completely. This is crucial to prevent the puff pastry from becoming soggy.
-
While the filling cools, preheat your oven to 185°C (365°F).
-
On a lightly floured surface, unfold the thawed puff pastry. Cut each sheet into 4-inch by 4-inch squares.
-
Place a spoonful of the cooled curry filling onto one half of each square of puff pastry. Be careful not to overfill, as this can make the puffs difficult to seal.
-
Brush the edges of the pastry squares with a little water. This acts as a glue to help seal the edges.
-
Fold the pastry over to form a rectangle or triangle shape, enclosing the filling.
-
Use a fork to press the sides together firmly to seal the edges of the puff pastry. The fork also creates a decorative pattern.
-
Brush the tops of the puffs with the beaten egg. This will give them a beautiful golden-brown color when baked.
-
Arrange the curry puffs on a baking sheet. If you’d like, line the baking sheet with parchment paper to prevent sticking.
-
Bake in the preheated oven for about 10 minutes, or until the puffs are a nice golden color and the pastry is puffed and flaky. Keep a close eye on them to prevent burning.
-
Remove from the oven and arrange the curry puffs on a serving platter. Serve warm with your favorite dipping sauce.
Expert Tips & Tricks
- Spice it up! For an extra kick, add a pinch of chili powder or finely chopped chili to the filling.
- Make ahead: The filling can be made a day or two in advance and stored in the refrigerator. This will save time on the day you want to bake the puffs.
- Ensure even baking: Make sure your oven is properly preheated for even cooking. Rotate the baking sheet halfway through baking to ensure the puffs brown evenly.
- Pastry Perfection: Do not overwork the puff pastry, as this can make it tough. Keep it cold while working with it.
- Vegan Variation: For a vegan version, substitute the minced beef with a plant-based ground and use a plant-based milk wash instead of egg.
Serving & Storage Suggestions
Serve the baked curry puffs warm as an appetizer, snack, or light meal. They are delicious on their own, or with a dipping sauce such as sweet chili sauce, raita, or a spicy mayo.
Leftover curry puffs can be stored in an airtight container in the refrigerator for up to 3 days. To reheat, bake in a preheated oven at 175°C (350°F) for about 5-7 minutes, or until heated through. You can also reheat them in a microwave, but they may lose some of their crispness.
For longer storage, you can freeze the unbaked curry puffs. Arrange them on a baking sheet and freeze until solid, then transfer to a freezer bag or container. Bake from frozen, adding a few extra minutes to the baking time.
Nutritional Information
(Please note that these values are estimates and may vary based on specific ingredients and portion sizes.)
| Nutrient | Amount per Serving | % Daily Value |
|---|---|---|
| Calories | 220 kcal | 11% |
| Total Fat | 13 g | 20% |
| Saturated Fat | 3 g | 16% |
| Cholesterol | 7 mg | 2% |
| Sodium | 87 mg | 4% |
| Total Carbohydrate | 22 g | 7% |
| Dietary Fiber | 2 g | 6% |
| Sugars | 1 g | 2% |
| Protein | 4 g | 7% |
Variations & Substitutions
- Vegetarian Delight: Omit the minced beef and add more vegetables, such as mushrooms, bell peppers, or spinach.
- Seafood Sensation: Replace the minced beef with cooked shrimp or crab meat for a seafood twist.
- Spicy Kick: Add a finely chopped chili or a dash of hot sauce to the filling for a spicy curry puff.
- Cheese Please: Add a handful of shredded cheddar or mozzarella cheese to the filling for a cheesy curry puff.
- Sweet Potato Swirl: Substitute some of the potatoes with sweet potatoes for a slightly sweeter and more nutritious filling.
FAQs (Frequently Asked Questions)
Q: Can I use pre-made curry paste instead of curry powder?
A: Yes, you can substitute curry powder with curry paste. Start with a tablespoon and adjust to taste, as curry pastes vary in strength.
Q: My puff pastry is cracking. What am I doing wrong?
A: Puff pastry cracks when it’s too warm. Make sure to keep it chilled and work quickly. If it starts to crack, place it back in the refrigerator for a few minutes to firm up.
Q: Can I make these in an air fryer?
A: Yes, you can air fry them! Preheat your air fryer to 180°C (350°F) and cook for about 8-10 minutes, or until golden brown.
Q: The filling is too wet. How can I fix it?
A: If the filling is too wet, simmer it for a few more minutes without the lid to allow some of the excess moisture to evaporate.
Q: Can I freeze the baked curry puffs?
A: Yes, you can freeze the baked curry puffs. Let them cool completely, then wrap them individually in plastic wrap or foil before placing them in a freezer bag. Reheat in the oven for best results.
Final Thoughts
These baked curry puffs are more than just a recipe; they’re a little piece of my heart, passed down through generations. I encourage you to try making them, adding your own personal touch and creating memories of your own. Don’t be afraid to experiment with different fillings and spices to find your perfect flavor combination. And most importantly, share your creations with loved ones and enjoy the deliciousness together! Happy baking!