
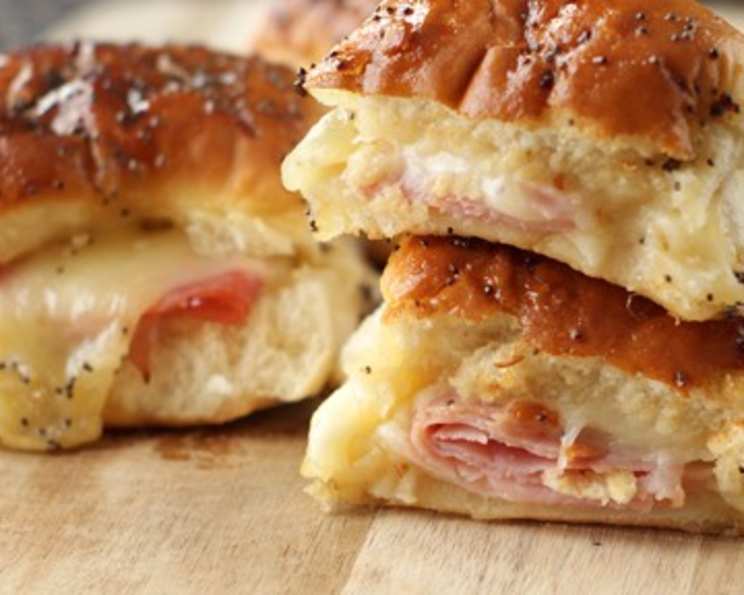
The Ultimate Baked Ham and Cheese Sandwich Experience
The aroma still takes me back. Picture this: a snow day in Chicago, the kind where the wind howls and the world outside is a blurry white. My grandma, a culinary wizard with a heart of gold, would emerge from the kitchen, her cheeks flushed from the oven’s warmth, bearing a tray of these very Baked Ham and Cheese Sandwiches. The foil-wrapped bundles, practically radiating comfort, were always the centerpiece of our cozy, snow-bound feasts. That first bite – the crispy bun, the melty Swiss, the savory ham – was pure magic. It’s a taste that embodies warmth, family, and simple, perfect joy.
Recipe Overview
- Prep Time: 15 minutes
- Cook Time: 25 minutes
- Total Time: 40 minutes
- Servings: 8 sandwiches
- Yields: 8 sandwiches
- Dietary Type: Not specified
Ingredients
- 5 tablespoons butter, softened
- 4 tablespoons mayonnaise
- 3 tablespoons strong mustard or 3 tablespoons Creole mustard
- ½ teaspoon onion powder
- 2-4 teaspoons poppy seeds
- 8 hamburger buns, split (the best you can find!)
- 2 ½ lbs thinly sliced baked deli ham
- 8 thick slices deli Swiss cheese, up to 12 ounces
- Aluminum foil
Equipment Needed
- Mixing bowl
- Whisk or electric mixer
- Baking sheet
- Knife or bread knife
Instructions
-
Begin by preheating your oven to 350 degrees Fahrenheit (175 degrees Celsius). This ensures even baking and melting of the cheese. While the oven heats, prepare the individual sandwich wraps by cutting sheets of aluminum foil, each large enough to fully enclose a single sandwich.
-
In a mixing bowl, combine the softened butter, mayonnaise, mustard (either the strong or Creole variety), onion powder, and poppy seeds. Using a whisk or an electric mixer, beat these ingredients together until they are thoroughly combined and form a smooth, flavorful sauce. The consistency should be easy to spread.
-
Next, split the hamburger buns in half, creating the top and bottom halves of each sandwich. Now, spread the prepared sauce generously on both the top and bottom halves of each bun. Feel free to be liberal with the sauce; while the recipe calls for a specific amount, you may wish to double it for extra flavor, although you might not need all of it. A good rule of thumb is to spread enough to lightly coat each surface.
-
Now, layer the thinly sliced baked deli ham onto the bottom half of each bun. Use a generous amount of ham, distributing it evenly across the surface. The weight of the ham in the recipe (2 ½ lbs) is designed to give each sandwich a substantial filling.
-
Place the thick slices of deli Swiss cheese evenly on top of the ham. Aim for a uniform coverage of cheese to ensure a consistent melty texture in every bite. The recipe suggests using up to 12 ounces of cheese, allowing for a customizable cheese-to-ham ratio.
-
Carefully replace the bun tops, completing each sandwich. Wrap each sandwich tightly in its individual sheet of aluminum foil. This wrapping step is crucial for trapping heat and steam, which helps to melt the cheese and warm the ham evenly while preventing the buns from drying out.
-
Arrange the foil-wrapped sandwiches on a baking sheet. Place the baking sheet in the preheated oven and bake for up to 25 minutes. The baking time may vary slightly depending on your oven, so check for doneness by unwrapping one sandwich and checking if the cheese is fully melted and the ham is heated through.
-
Once the sandwiches are heated and the cheese is melted, carefully remove them from the oven. Unwrap each sandwich and serve immediately. The combination of warm, gooey cheese and flavorful ham nestled in a toasted bun is irresistible.
-
Freezing Option: For make-ahead convenience, these sandwiches can be assembled, wrapped in foil, and frozen thoroughly. To bake from frozen, simply place the foil-wrapped sandwiches on a baking sheet and bake at 350 degrees Fahrenheit for 1 hour. This allows you to enjoy warm, homemade sandwiches even on busy days.
Expert Tips & Tricks
- Cheese Choice: While Swiss is classic, don’t be afraid to experiment! Gruyere, provolone, or even a sharp cheddar can add interesting flavor profiles.
- Mustard Magic: The type of mustard you use dramatically changes the flavor. For a tangier bite, try a Dijon mustard. For a sweeter, more rounded flavor, opt for Creole mustard.
- Bun Selection: The buns are the foundation! Choose high-quality hamburger buns that can hold up to the fillings without becoming soggy. Brioche buns offer a richer flavor and softer texture.
- Toasting Trick: For extra crispy buns, unwrap the sandwiches for the last 5 minutes of baking to let them toast slightly.
- Don’t Overbake: Overbaking can lead to dry buns. Check the sandwiches frequently during the last few minutes of baking time.
Serving & Storage Suggestions
Serve these sandwiches immediately after baking for the best flavor and texture. They are delicious on their own or paired with a side of chips, coleslaw, or a simple salad.
Leftover sandwiches can be stored in the refrigerator for up to 3 days. To reheat, wrap the sandwich in foil and bake at 350 degrees Fahrenheit until heated through, or microwave in 30-second intervals until warm. Freezing is not recommended after baking, as the texture of the bread can change upon thawing. It is best to freeze before baking.
Nutritional Information
| Nutrient | Amount per Serving | % Daily Value |
|---|---|---|
| Calories | 563.8 kcal | N/A |
| Calories from Fat | 261 g | 46% |
| Total Fat | 29 g | 44% |
| Saturated Fat | 12.3 g | 61% |
| Cholesterol | 133.3 mg | 44% |
| Sodium | 2911.4 mg | 121% |
| Total Carbohydrate | 36.4 g | 12% |
| Dietary Fiber | 4.1 g | 16% |
| Sugars | 3.7 g | N/A |
| Protein | 37.5 g | 74% |
Note: Nutritional information is an estimate and may vary based on specific ingredients and portion sizes.
Variations & Substitutions
- Vegetarian Option: Substitute the ham with sliced roasted vegetables like zucchini, bell peppers, and eggplant.
- Gluten-Free: Use gluten-free hamburger buns.
- Cheese Swap: Try pepper jack for a spicy kick or mozzarella for a milder flavor.
- Spicy Kick: Add a dash of hot sauce or a sprinkle of red pepper flakes to the sauce.
- Herbaceous Touch: Mix chopped fresh herbs like thyme or rosemary into the butter-mustard mixture.
FAQs (Frequently Asked Questions)
Q: Can I use different types of bread?
A: Absolutely! While hamburger buns are classic, you can use slider buns, Hawaiian rolls, or even slices of your favorite bread. Adjust baking time accordingly.
Q: Can I make these sandwiches ahead of time?
A: Yes, you can assemble and wrap the sandwiches in foil up to 24 hours in advance and store them in the refrigerator. Add a few extra minutes to the baking time to ensure they are heated through.
Q: Can I use pre-shredded cheese instead of sliced cheese?
A: While sliced cheese melts more evenly, you can use pre-shredded cheese if that’s what you have on hand.
Q: What’s the best way to prevent the buns from getting soggy?
A: Wrapping the sandwiches tightly in foil helps to trap steam and prevent the buns from drying out. Also, avoid overfilling the sandwiches with sauce.
Q: How do I know when the sandwiches are done?
A: The sandwiches are done when the cheese is fully melted and the ham is heated through. You can check by unwrapping one sandwich and testing the cheese with a fork.
Final Thoughts
These Baked Ham and Cheese Sandwiches are more than just a meal; they’re a comforting classic that brings people together. Whether you’re making them for a quick weeknight dinner, a weekend gathering, or a cozy snow day treat, I hope this recipe brings you as much joy as it has brought me over the years. Don’t hesitate to experiment with different variations and make it your own! And please, share your creations and feedback – I’d love to hear how you’ve put your unique spin on this beloved dish. Why not serve these with a crisp apple salad and a sparkling cider for the perfect lunch? Enjoy!