
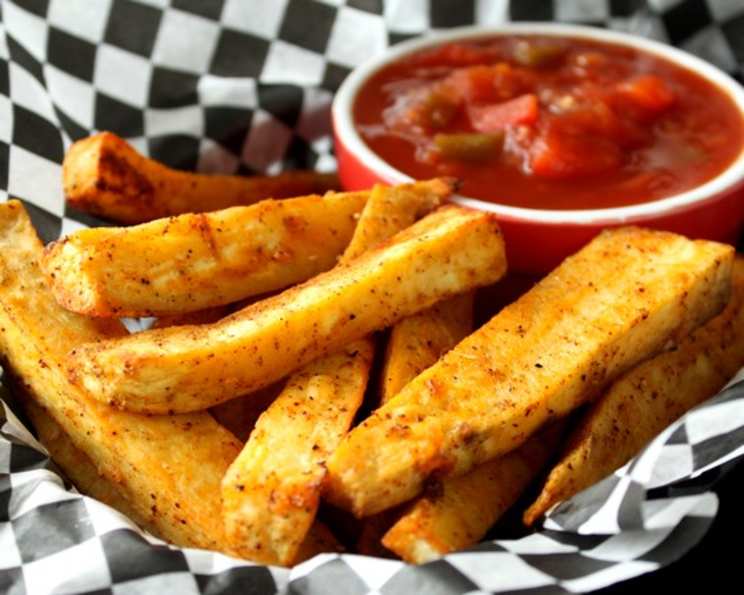
Baked Sweet Potato Fries: A Crispy, Healthy Delight
I can almost smell them now: the sweet, earthy aroma of sweet potatoes roasting in the oven, mingling with the savory scent of garlic powder and a hint of sea salt. As a kid, my dad would make us baked sweet potato fries on weekend afternoons. The whole family would gather in the kitchen, impatiently waiting for the timer to beep, signaling that crispy, golden-brown goodness was finally ready to be devoured. Those humble fries, shared with loved ones, transformed simple moments into treasured memories.
Recipe Overview
- Prep Time: 10 minutes
- Cook Time: 20 minutes
- Total Time: 30 minutes
- Servings: 2-3
- Yield: Varies depending on sweet potatoes used
- Dietary Type: Vegan, Gluten-Free
Ingredients
- 2 sweet potatoes, peeled and sliced like steak fries
- 2 tablespoons olive oil
- Salt and pepper to taste
- Optional seasonings: garlic powder, taco seasoning, smoked paprika, onion powder, cayenne pepper
Equipment Needed
- Large mixing bowl
- Cookie sheet or baking sheet
- Paring knife or vegetable peeler
- Cutting board
Instructions
-
Begin by preheating your oven to 425°F (220°C). This high temperature is key to achieving crispy fries.
-
While the oven is heating, prepare the sweet potatoes. Thoroughly wash and peel the sweet potatoes. Using a sharp knife and a cutting board, cut the sweet potatoes lengthwise into even fries, about 1/2-inch thick. Consistency in size is important for even cooking.
-
In a large mixing bowl, drizzle the olive oil over the sliced sweet potatoes. Make sure each fry is coated for maximum crispness and flavor.
-
Season the fries with salt and pepper to taste. Now’s the time to get creative! If desired, add your favorite seasonings. Garlic powder, taco seasoning, smoked paprika, and onion powder all work wonderfully. A pinch of cayenne pepper can add a delightful kick.
-
Toss the sweet potatoes thoroughly in the bowl until they are evenly coated with the oil and seasonings. This ensures every fry is packed with flavor.
-
Arrange the seasoned sweet potato fries in a single layer on a cookie sheet. Overcrowding the pan will steam the fries instead of baking them, resulting in soggy fries. Use two baking sheets if necessary.
-
Bake the fries for 10 minutes. Then, carefully flip each fry using a spatula to ensure even browning.
-
Bake for another 10 minutes, or until the fries are tender on the inside and nicely browned and crispy on the outside. Keep a close eye on them during the final minutes of baking to prevent burning. Baking times may vary depending on the thickness of the fries and your oven.
-
Remove the baked sweet potato fries from the oven and let them cool slightly before serving.
Expert Tips & Tricks
- Soaking for Extra Crispiness: For exceptionally crispy fries, soak the sweet potato fries in cold water for at least 30 minutes before baking. This removes excess starch. Drain and pat them very dry before tossing with oil and seasonings.
- Even Sizing is Key: Aim for consistent fry thickness. Inconsistent sizes lead to uneven cooking, with some fries burning while others remain undercooked.
- Don’t Overcrowd the Pan: Resist the urge to pile fries onto a single baking sheet. This creates steam, resulting in soggy fries. Use multiple sheets or bake in batches.
- Elevate for Airflow: Place a wire rack on top of the baking sheet and arrange the fries on the rack. This allows for better airflow around the fries, promoting crispness.
- Preheat the Baking Sheet: While the oven is preheating, place the baking sheet inside. This helps the fries cook faster and more evenly.
- Seasoning Adjustments: Taste and adjust the seasonings before baking. Different sweet potatoes have different levels of sweetness, so you may need to adjust the amount of salt or spices accordingly.
- Spice it Up: For a spicy kick, try adding a pinch of cayenne pepper, chipotle powder, or red pepper flakes to the seasoning mix.
- Sweet Variations: For a sweeter version, try a light sprinkle of brown sugar or cinnamon before baking.
- The Perfect Dip: While ketchup is a classic, consider serving these fries with aioli, sriracha mayo, or a creamy avocado dip for added flavor.
- Crispiness Check: If the fries aren’t crispy enough after the initial baking time, increase the oven temperature to 450°F (230°C) for the last few minutes. Watch them carefully to prevent burning!
Serving & Storage Suggestions
Serve the baked sweet potato fries immediately while they are still warm and crispy. They make a great side dish for burgers, sandwiches, chicken, or fish. They can also be enjoyed as a snack on their own with your favorite dipping sauce.
To store leftover fries, let them cool completely before placing them in an airtight container. Store in the refrigerator for up to 3 days. Reheat in a 350°F (175°C) oven for about 5-10 minutes, or until heated through and crispy. Reheating in a toaster oven or air fryer also works well.
While refrigeration is best, you can store them at room temperature for a few hours, but they’ll quickly lose their crispness. Freezing is not recommended as it will make them soggy.
Nutritional Information
| Nutrient | Amount per Serving | % Daily Value |
|---|---|---|
| Calories | 250 kcal | 13% |
| Total Fat | 12g | 18% |
| Saturated Fat | 2g | 10% |
| Cholesterol | 0mg | 0% |
| Sodium | 150mg | 7% |
| Total Carbohydrate | 35g | 12% |
| Dietary Fiber | 5g | 20% |
| Sugars | 8g | |
| Protein | 3g | 6% |
| Vitamin A | 900mcg | 100% |
| Vitamin C | 10mg | 17% |
| Potassium | 540mg | 11% |
Note: Nutritional information is an estimate and may vary based on specific ingredients and portion sizes.
Variations & Substitutions
- Coconut Oil: Substitute olive oil with coconut oil for a slightly sweeter flavor and potentially crispier result.
- Different Seasonings: Experiment with different seasoning blends. Try Cajun seasoning, Italian seasoning, or a blend of chili powder, cumin, and oregano.
- Herbaceous Twist: Add fresh herbs like rosemary or thyme to the seasoning mix for an aromatic flavor.
- Spicy Sweet Potato Fries: Toss the fries with a mixture of maple syrup and sriracha before baking for a sweet and spicy treat.
- Garlic Parmesan: After baking, toss the fries with grated Parmesan cheese and minced garlic.
- Lemon Herb: Zest a lemon and mix it with chopped fresh herbs like parsley, dill, and chives. Toss the fries with this mixture after baking.
- Vegan Parmesan: Use nutritional yeast for a cheesy, vegan-friendly topping.
- Sweet Potato Wedges: Cut the sweet potatoes into wedges instead of fries for a different shape and texture.
FAQs (Frequently Asked Questions)
Q: Why aren’t my sweet potato fries crispy?
A: The most common reasons are overcrowding the baking sheet, not using enough oil, or not baking at a high enough temperature. Make sure the fries are in a single layer, are well-coated with oil, and that your oven is preheated to 425°F (220°C).
Q: Can I make these in an air fryer?
A: Yes! Air frying is a great way to get crispy sweet potato fries. Preheat your air fryer to 400°F (200°C) and cook for about 12-15 minutes, shaking halfway through.
Q: Can I use different types of sweet potatoes?
A: Yes, different varieties of sweet potatoes can be used. Keep in mind that some varieties are sweeter or have a different texture, so adjust the seasonings accordingly.
Q: How do I prevent the fries from sticking to the baking sheet?
A: Use a non-stick baking sheet or line your baking sheet with parchment paper.
Q: Can I prepare these ahead of time?
A: You can cut the sweet potatoes into fries ahead of time, but it’s best to toss them with oil and seasonings just before baking to prevent them from drying out.
Final Thoughts
Now that you’re armed with this foolproof recipe, I urge you to try making your own batch of baked sweet potato fries. Embrace the aroma, the process, and the simple joy of sharing this healthy and delicious treat with your loved ones. Whether you stick to the classic recipe or experiment with your own unique flavor combinations, I am certain you’ll have a tasty experience! Don’t hesitate to let me know how yours turn out, and what dips you used!