
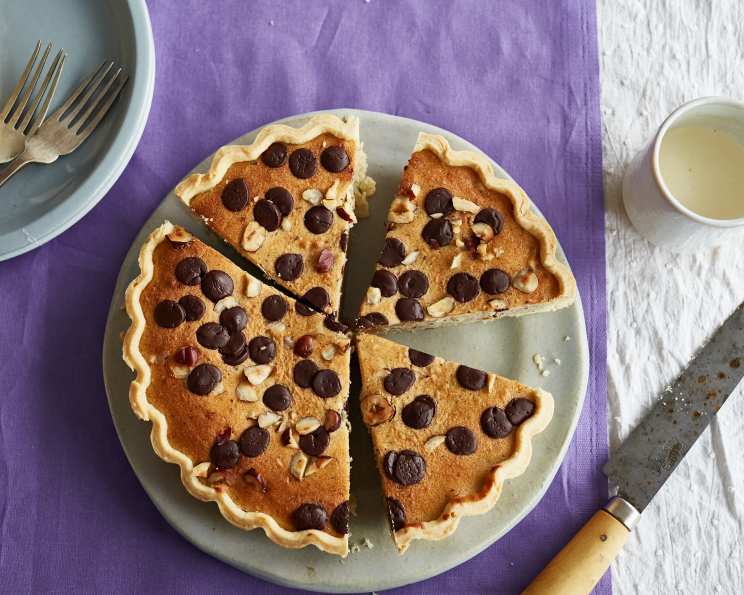
Banana Chocolate Hazelnut Tart: A Slice of Pure Comfort
There’s something magical about the aroma of baking that instantly transports me back to my grandmother’s kitchen. I can almost feel the warmth of the oven on my face as she’d pull out her signature hazelnut cake, its nutty fragrance filling every corner of the house. This Banana Chocolate Hazelnut Tart captures that same comforting essence. It’s a symphony of textures and flavors: a buttery, crumbly crust, a cakey hazelnut filling studded with melting chocolate, and the subtle sweetness of ripe bananas. Each bite is a warm hug, a delicious reminder of simpler times and the joy of sharing good food with loved ones.
Recipe Overview
- Prep Time: 30 minutes
- Cook Time: 35 minutes
- Total Time: 1 hour 5 minutes (plus 1 hour chilling)
- Servings: 8
- Yield: 1 tart
- Dietary Type: Vegetarian
Ingredients
For the Crust:
- 1/2 cup (1 stick) unsalted butter, cold
- 1 1/2 cups all-purpose flour
- 1 pinch salt
- 2-4 tablespoons cold water
For the Filling:
- 2/3 cup hazelnuts, plus a few for decoration
- 1 cup granulated sugar
- 2/3 cup unsalted butter, softened
- 4 large egg whites
- 2/3 cup all-purpose flour
- 1/4 teaspoon baking powder
- 1/4 teaspoon salt
- 1/2 cup mashed ripe banana (about 1 medium banana)
- 1 tablespoon lemon juice
- 3 ounces semi-sweet chocolate chips
Equipment Needed
- Food processor
- Plastic wrap
- Rolling pin
- 8-inch tart tin
- Baking paper
- Baking beans (or dried rice/beans)
- Small bowl
- Toothpick
Instructions
- Prepare the Pastry: In a food processor, combine the cold butter, flour, and salt. Pulse until you achieve a fine crumb texture with a few pea-sized lumps of butter remaining. This creates a flaky crust.
- Add Water: Drizzle in 2 tablespoons of the cold water and pulse again. To check the consistency, pinch some of the mixture between your fingertips. If it holds together, the dough is ready. If it’s too dry, drizzle in another tablespoon or two of water, pulsing after each addition. Avoid over-processing, as this will result in a tough crust.
- Chill the Dough: Tip the dough out onto a piece of plastic wrap. Press it together into a ball, then flatten it into a disk. Wrap tightly in the plastic wrap and chill in the refrigerator for 1 hour. This chilling time is crucial for the gluten to relax, preventing the crust from shrinking during baking.
- Make the Hazelnut Base: While the dough chills, wipe out the food processor. Place the 2/3 cup of hazelnuts into the food processor with half of the sugar (1/2 cup) and blend until the mixture is very fine in texture, almost a hazelnut flour.
- Cream the Filling: Add the softened butter to the hazelnut mixture and blend again until smooth and creamy.
- Incorporate the Egg Whites and Dry Ingredients: Add the egg whites, flour, baking powder, and salt. Blend again until smooth.
- Prepare the Banana Mixture: In a small bowl, mix the mashed banana with the remaining sugar (1/2 cup) and lemon juice. Set aside. The lemon juice prevents the banana from browning and adds a touch of acidity that balances the sweetness.
- Preheat the Oven: Preheat the oven to 350°F (175°C).
- Roll Out the Pastry: On a lightly floured surface, roll the chilled pastry out between two pieces of baking paper to a circle slightly larger than the 8-inch tart tin. The baking paper prevents the dough from sticking.
- Line the Tart Tin: Peel off the top layer of baking paper, flip the pastry into the tart tin, and carefully remove the other layer of baking paper. Gently press the pastry down into the tin, ensuring it fits snugly against the bottom and sides.
- Trim the Edges: Cut off any excess pastry around the edges of the tin, creating a neat and even edge. You can use a rolling pin to roll across the top of the tin, or a sharp knife to trim it.
- Blind Bake the Crust: Crumple up one of the pieces of baking paper you used for rolling, then un-crumple it and lay it into the lined tart tin. This helps the paper conform to the shape of the crust. Fill with baking beans (or dried rice or beans) to weigh down the pastry and prevent it from puffing up during baking.
- First Bake: Bake for 10 minutes with the baking paper and beans inside.
- Second Bake: Lift out the baking paper and baking beans and cook the pastry for a further 5 minutes. This allows the crust to dry out and become crisp.
- Assemble the Tart: Remove the tart tin from the oven. Spread the mashed banana mixture evenly over the bottom of the partially baked crust.
- Add Hazelnut Filling: Cover the banana layer with the hazelnut mixture you made earlier, spreading it evenly.
- Top with Chocolate: Sprinkle the semi-sweet chocolate chips evenly over the hazelnut filling. Garnish with a few extra hazelnuts.
- Bake: Bake for 25-30 minutes, or until the tart is golden brown and a toothpick inserted into the center comes out clean. If the crust starts to brown too quickly, you can loosely tent the tart with foil.
- Cool and Serve: Let the tart cool in the tin for at least 10 minutes before slicing and serving. This allows the filling to set slightly.
Expert Tips & Tricks
- Cold Ingredients are Key: Using cold butter and ice water for the crust is essential for a flaky texture.
- Don’t Overwork the Dough: Overworking the pastry dough develops the gluten, resulting in a tough crust. Pulse the ingredients in the food processor just until they come together.
- Toast the Hazelnuts: For an even more intense hazelnut flavor, lightly toast the hazelnuts in a dry skillet or in the oven before grinding them.
- Customize the Chocolate: Feel free to experiment with different types of chocolate chips, such as dark chocolate or milk chocolate, according to your preference.
- Blind Baking Insurance: For ultimate protection against a soggy bottom, brush the pre-baked crust with a thin layer of melted chocolate before adding the filling. This creates a waterproof barrier.
Serving & Storage Suggestions
Serve the Banana Chocolate Hazelnut Tart warm or at room temperature. A dollop of whipped cream or a scoop of vanilla ice cream complements the flavors beautifully.
- Room Temperature: The tart can be stored at room temperature for up to 2 days, but it’s best enjoyed fresh.
- Refrigerator: Store in the refrigerator for up to 4 days in an airtight container.
- Freezer: For longer storage, wrap the tart tightly in plastic wrap and then foil, and freeze for up to 2 months. Thaw overnight in the refrigerator before serving.
To reheat, warm individual slices in the microwave for a few seconds or in a preheated oven at 300°F (150°C) for about 10 minutes.
Nutritional Information
| Nutrient | Amount per Serving | % Daily Value |
|---|---|---|
| Calories | 450 kcal | 23% |
| Total Fat | 25g | 38% |
| Saturated Fat | 15g | 75% |
| Cholesterol | 60mg | 20% |
| Sodium | 100mg | 4% |
| Total Carbohydrate | 50g | 17% |
| Dietary Fiber | 2g | 8% |
| Sugars | 25g | – |
| Protein | 6g | 12% |
Note: Nutritional information is an estimate and may vary based on specific ingredients and portion sizes.
Variations & Substitutions
- Gluten-Free Crust: Substitute the all-purpose flour in the crust with a gluten-free blend.
- Dairy-Free: Use vegan butter for the crust and filling.
- Nut-Free: Substitute the hazelnuts with sunflower seeds or pumpkin seeds.
- Spice it Up: Add a pinch of cinnamon or nutmeg to the filling for a warm, spicy flavor.
- Seasonal Fruit: Experiment with other fruits, such as sliced apples, pears, or berries, instead of bananas.
FAQs (Frequently Asked Questions)
Q: Can I make the pastry dough ahead of time?
A: Absolutely! The pastry dough can be made up to 2 days in advance and stored in the refrigerator, or up to 1 month in the freezer. Just thaw it in the refrigerator overnight before rolling it out.
Q: My crust always shrinks when I blind bake it. What am I doing wrong?
A: Make sure your butter and water are very cold, and don’t overwork the dough. Chilling the dough is also crucial. When lining the tart tin, gently press the pastry into the corners without stretching it.
Q: Can I use a pre-made tart crust?
A: Yes, you can use a store-bought tart crust to save time, but homemade is always best for flavor and texture.
Q: The top of my tart is browning too quickly. What should I do?
A: If the top of the tart is browning too quickly, loosely tent it with aluminum foil during the last 10-15 minutes of baking.
Q: How can I tell if the tart is done?
A: The tart is done when the filling is golden brown and a toothpick inserted into the center comes out clean. The edges of the crust should also be golden brown.
Final Thoughts
This Banana Chocolate Hazelnut Tart is more than just a dessert; it’s an experience. The combination of textures and flavors is simply irresistible. I encourage you to try this recipe and make it your own. Don’t be afraid to experiment with variations and substitutions to create a tart that perfectly suits your taste. Share your creations with friends and family, and let the joy of baking fill your kitchen and your heart. Pair this tart with a cup of freshly brewed coffee or a glass of dessert wine for a truly decadent treat!