
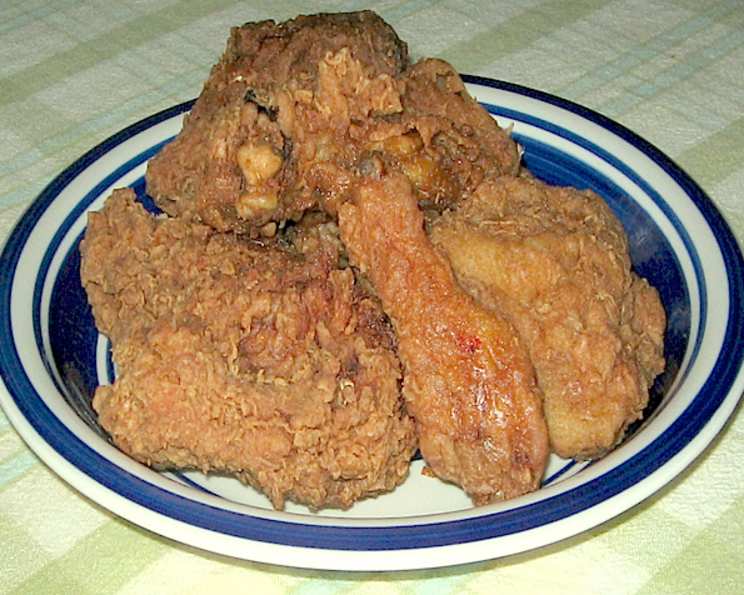
Banquet Crispy Fried Chicken (Copycat)
The first time I tasted truly incredible fried chicken, it wasn’t at some fancy restaurant or a roadside diner. It was at my grandma’s house, and while she never revealed her secrets, the memory of that perfectly crispy, golden-brown skin giving way to juicy, tender meat has stayed with me. It was a symphony of textures and flavors, a dish that transcended simple comfort food. Ever since, I’ve been chasing that perfect fried chicken experience, and this copycat recipe brings me closer than ever before. This recipe evokes a similar nostalgia, but with the homestyle love that only a home-cooked meal can provide.
Recipe Overview
- Prep Time: 24 hours, 15 minutes (includes marinating time)
- Cook Time: 18 minutes
- Total Time: 24 hours, 33 minutes
- Servings: 6-8
- Yield: 8-16 pieces of chicken
- Dietary Type: Not specified (Contains gluten, soy, and is not vegetarian or vegan)
Ingredients
For the Chicken:
- 8-16 pieces premium quality fresh chicken
For the Brine:
- 8 cups water (or 2 quarts water)
- 2 tablespoons fine sea salt
- 2 teaspoons Accent seasoning
For the Breading:
- 4 tablespoons ground soya granules (texturized soy protein)
- 6 1/2 teaspoons fine sea salt (2 tablespoons, plus 1/2 teaspoon)
- 2 tablespoons ground black pepper
- 4 teaspoons celery salt
- 4 teaspoons ground sage
- 1 tablespoon ground ginger
- 2 1/2 teaspoons sweet paprika
- 1 teaspoon ground leaf thyme
- 3/4 teaspoon ground fennel
- 1/2 teaspoon ground allspice
- 1/2 teaspoon ground mustard
- 1/4 teaspoon cayenne pepper
- 1/4 teaspoon garlic powder
- 1/4 teaspoon onion powder
- 1/2 cup cornstarch, packed
- 3 1/2 cups pre-sifted all-purpose flour
For the Water Wash:
- 2 quarts warm water
For Deep-Frying:
- Pure vegetable shortening (or canola or vegetable oil)
Equipment Needed
- Large bowl
- Clean spice mill or coffee grinder
- Whisk
- Large container
- Tongs
- Deep-fryer (or deep, heavy stovetop pot)
- Deep-fryer thermometer
- Wire rack
- Baking sheet
Instructions
- Rinse the chicken thoroughly under cold water.
- Prepare the Brine: In a large bowl, combine 8 cups of water, 2 tablespoons of fine sea salt, and 2 teaspoons of Accent seasoning. Blend the mixture very well until the salt is completely dissolved.
- Marinate the Chicken: Place the chicken pieces into the brine, ensuring they are fully submerged. Cover the bowl and marinate in the refrigerator for at least 2 hours, or preferably overnight (up to 24 hours) for optimal flavor and tenderness.
- Grind the Soya Granules: In a clean spice mill or coffee grinder, grind the 4 tablespoons of soya granules (texturized soy protein) until they are finely ground. It is recommended to grind them in two batches for a more consistent texture.
- Grind Other Seasonings: Separately grind any other seasonings that may need it, especially the fennel seeds. The finer the grind, the better the flavor distribution in the breading.
- Prepare the Breading Mix (Dry): In a large bowl, measure out all the breading ingredients except the flour and cornstarch: ground soya granules, 6 1/2 teaspoons fine sea salt, 2 tablespoons ground black pepper, 4 teaspoons celery salt, 4 teaspoons ground sage, 1 tablespoon ground ginger, 2 1/2 teaspoons sweet paprika, 1 teaspoon ground leaf thyme, 3/4 teaspoon ground fennel, 1/2 teaspoon ground allspice, 1/2 teaspoon ground mustard, 1/4 teaspoon cayenne pepper, 1/4 teaspoon garlic powder, and 1/4 teaspoon onion powder.
- Blend the Bread Mixture: Using a whisk, blend the breading mixture very well. Break up any clumps that may be present using the back of a spoon.
- Incorporate Flour and Cornstarch: Mix in the 3 1/2 cups pre-sifted all-purpose flour and 1/2 cup packed cornstarch into the breading mixture. Use the whisk to thoroughly blend all the ingredients together. Ensure everything is evenly distributed.
- Prepare the Water Wash: Pour 2 quarts of warm water into a large container. This will be used to help the breading adhere to the chicken.
- Remove Chicken from Brine: Using tongs, remove the chicken pieces from the brine, allowing excess liquid to drip off.
- First Breading: Dip each piece of chicken, one at a time, into the breading mixture, ensuring it is evenly and completely coated.
- Water Wash Dip: Dip the breaded chicken piece into the warm water wash, making sure it is fully submerged for a brief moment.
- Second Breading: Immediately dip the wet chicken back into the breading mixture again, coating it thoroughly for a second time. This double-breading is crucial for achieving the desired crispy texture.
- Resting Period: Remove the double-breaded chicken with tongs and place it on a wire rack. Allow the chicken to rest and absorb the breading for a few minutes (about 5-10 minutes). This allows the breading to adhere properly and prevents it from falling off during frying.
- Preheat Frying Fat: Preheat the manufacturer’s recommended amount of vegetable shortening (or canola or vegetable oil) in a deep-fryer to 315°F (157°C). Alternatively, if using a stovetop pot, preheat enough fat to completely immerse the chicken. Use a deep-fryer thermometer to maintain the temperature at 315°F (157°C). Maintaining a consistent temperature is crucial for even cooking and a crispy crust.
- Fry the Chicken: Carefully add the breaded chicken to the elevated fry basket in the deep-fryer without overcrowding. If using a standard-size home fryer, add no more than 2-3 pieces at a time to prevent the oil temperature from dropping too much. If frying in a stovetop pot, gently lower the breaded chicken pieces into the hot fat using tongs, turning them once halfway through the frying duration.
- Cooking Time: Fry the chicken for 15-18 minutes, until it is golden brown and fully cooked. The cooking time will vary depending on the size and thickness of the chicken pieces. To check for doneness, insert a meat thermometer into the thickest part of the chicken. It should register 165°F (74°C). Another method is to pierce the chicken with a fork; the juices should run clear when it’s done.
- Drain and Keep Warm: Drain the fried chicken on a wire rack placed over a baking sheet to allow excess oil to drip off. Transfer the chicken to a preheated 170°F (77°C) oven to keep it warm while you finish frying the remaining pieces.
- Serve: Serve immediately and enjoy!
Expert Tips & Tricks
- Brining is Key: Don’t skip the brining step! It’s crucial for adding moisture and flavor to the chicken.
- Consistent Temperature: Maintaining a steady oil temperature is essential for even cooking and a crispy crust. Use a deep-fry thermometer and adjust the heat as needed.
- Don’t Overcrowd: Fry the chicken in batches to prevent the oil temperature from dropping too much.
- Double Breading: The double-breading technique creates a thicker, crispier crust that stays on the chicken.
- Resting Period: Allowing the breaded chicken to rest for a few minutes before frying helps the breading adhere better and prevents it from falling off in the oil.
- Spice Grinding: Freshly grinding your spices will elevate the flavor profile of your fried chicken.
- Oil Choice: While vegetable shortening is listed, canola or vegetable oil work well. Avoid olive oil, as its smoke point is too low for frying.
- Flavor Boost: For added flavor, consider adding a dash of hot sauce to the water wash.
Serving & Storage Suggestions
Serve this crispy fried chicken hot and fresh, alongside classic sides like mashed potatoes, coleslaw, corn on the cob, and biscuits.
Storage: Leftover fried chicken can be stored in an airtight container in the refrigerator for up to 3-4 days. It’s best enjoyed within the first 2 days for optimal quality.
Reheating: To reheat, preheat your oven to 350°F (175°C). Place the chicken on a baking sheet lined with parchment paper and bake for 10-15 minutes, or until heated through and the skin is crispy again. Avoid microwaving, as it can make the crust soggy. You can also reheat in an air fryer for a crispier result.
Nutritional Information
Please note: The nutritional information below is an estimate and may vary depending on the specific ingredients used and portion sizes.
| Nutrient | Amount per Serving | % Daily Value |
|---|---|---|
| Calories | 608.8 kcal | N/A |
| Calories from Fat | N/A | 190 g / 31% |
| Total Fat | 21.2 g | 32% |
| Saturated Fat | 6 g | 29% |
| Cholesterol | 100 mg | 33% |
| Sodium | 4950 mg | 206% |
| Total Carbohydrate | 68.8 g | 22% |
| Dietary Fiber | 3.5 g | 14% |
| Sugars | 0.4 g | 1% |
| Protein | 33 g | 66% |
Variations & Substitutions
- Gluten-Free: Substitute the all-purpose flour with a gluten-free blend for a gluten-free version. Ensure all other ingredients are also gluten-free.
- Spicier Kick: Add more cayenne pepper or a pinch of your favorite hot sauce to the breading for a spicier flavor.
- Herb Infusion: Experiment with different herbs in the breading, such as rosemary, oregano, or marjoram, for a unique flavor profile.
- Buttermilk Brine: Replace the water in the brine with buttermilk for extra tenderness and tang.
- Vegetarian Option: While this recipe is designed for chicken, you could adapt the breading for other items like thickly sliced eggplant or cauliflower florets. Be mindful of adjusted cooking times.
FAQs (Frequently Asked Questions)
Q: Why is it important to brine the chicken?
A: Brining helps to season the chicken from the inside out, resulting in more flavorful and juicy meat. It also helps to tenderize the chicken, making it more pleasant to eat.
Q: Can I use bone-in, skin-on chicken pieces for this recipe?
A: Yes, this recipe works well with bone-in, skin-on chicken pieces. The skin will contribute to the crispy texture of the final product.
Q: How do I know when the oil is at the right temperature?
A: The best way to ensure the oil is at the correct temperature is to use a deep-fry thermometer. The oil should be at 315°F (157°C) before adding the chicken.
Q: Can I bake this chicken instead of frying it?
A: While this recipe is designed for frying, you can try baking it for a healthier option. However, the texture will be different. Bake at 400°F (200°C) until the internal temperature reaches 165°F (74°C), but the skin may not be as crispy.
Q: How can I prevent the breading from falling off during frying?
A: Ensure the chicken is properly coated with breading and allow it to rest for a few minutes before frying. This allows the breading to adhere better and prevents it from falling off in the oil. Also, avoid overcrowding the fryer.
Final Thoughts
There’s something truly special about the satisfying crunch of perfectly fried chicken. I encourage you to try this recipe and recreate the flavors and textures of the iconic Banquet Crispy Fried Chicken in your own kitchen. This isn’t just about replicating a recipe; it’s about creating memories and sharing delicious food with the people you love. Don’t be afraid to experiment with variations and make it your own. And most importantly, share your creations and feedback – happy frying!