
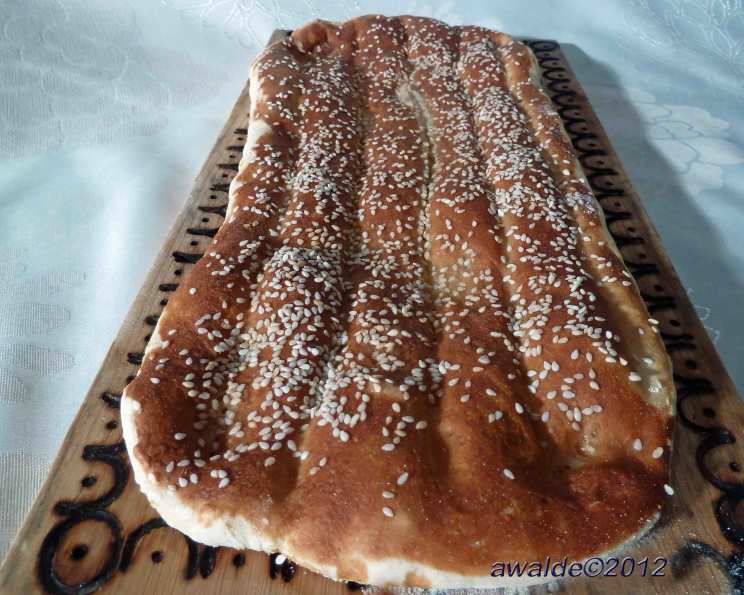
Barbari: A Taste of Persia in Every Bite
I can still recall the first time I tasted nan-e barbari. It was at a Nowruz celebration, the Persian New Year, in a bustling community center filled with the aroma of saffron rice and grilled kebabs. A warm, fragrant flatbread, its surface dotted with sesame seeds, was placed before me. One bite, and I was transported. The slightly chewy texture, the subtle tang from the glaze, and the nutty sesame seeds created a symphony of flavors. It was more than just bread; it was a taste of home, of family, of a culture steeped in tradition. And now, I am thrilled to share this beloved recipe with you.
Recipe Overview
- Prep Time: 2 hours
- Cook Time: 25-30 minutes
- Total Time: 2 hours 30 minutes
- Yields: 2 loaves
- Serves: 12-14
- Dietary Type: Vegetarian
Ingredients
- 3 1⁄4 cups bread flour (if not available, add 1 tbsp gluten per cup of all-purpose flour)
- 1 1⁄2 cups water
- 1 teaspoon baking powder
- 1 1⁄4 ounces active dry yeast (2 1/4 tsp)
- 1 – 1 1⁄2 teaspoon salt
- 2 teaspoons sugar
- Cornmeal (for bottom of pan)
- Poppy seeds or sesame seeds
For Glaze
- 1 teaspoon flour
- 1 teaspoon baking soda
- 2⁄3 cup water
Equipment Needed
- Large mixing bowl
- Measuring cups and spoons
- Baking sheet
- Clean kitchen towel or plastic wrap
- Saucepan
- Whisk
Instructions
-
Proof the Yeast: In a small bowl, dissolve the yeast with the sugar in 1/2 cup of water. Let it sit for a few minutes until it begins to foam, indicating that the yeast is active. This step is crucial; if the yeast doesn’t foam, it’s likely inactive and you’ll need to start with fresh yeast.
-
Combine Dry Ingredients: In a large mixing bowl, mix together the bread flour, baking powder, and salt. If you are using all-purpose flour, add gluten to improve the bread’s texture.
-
Form the Dough: Make a well in the center of the dry ingredients. Slowly incorporate the yeast mixture into the well, followed by the remaining 1 cup of water. Mix until a shaggy dough forms.
-
Knead the Dough: Turn the dough out onto a lightly floured surface and knead for 15 minutes until it becomes smooth and elastic. The dough should be slightly tacky but not sticky. Proper kneading develops the gluten, which gives the barbari its characteristic chewy texture.
-
Divide and Shape: Divide the dough into two equal round pieces.
-
Prepare Baking Sheet: Sprinkle a large baking sheet generously with cornmeal. This will prevent the bread from sticking and add a pleasant texture to the bottom crust.
-
Transfer Dough: Transfer the two rounds of dough onto the prepared baking sheet. Lightly cover them with a clean kitchen towel or plastic wrap.
-
First Rise: Place the baking sheet in a warm place and allow the dough to rise until it has doubled in bulk, approximately 1.5 hours. The rising time can vary depending on the temperature of your environment; a warmer environment will accelerate the process.
-
Prepare the Glaze: While the dough is rising, prepare the glaze. In a small saucepan, combine the flour, baking soda, and water. Bring the mixture to a boil over medium heat, stirring constantly to prevent lumps from forming. Once boiling, remove from heat and let it cool. The glaze is what gives barbari its distinctive sheen and slightly tangy flavor.
-
Preheat Oven: About 30 minutes before the rising time is complete, preheat your oven to 375°F (190°C).
-
First Glaze Application: Once the dough has doubled, lightly brush the cooled glaze over the surface of each loaf.
-
Create the Ridges: Now comes the signature technique for barbari. Dip your fingers into the remaining glaze, and use the edges of your hands to punch down into the dough, creating several long, parallel ridges along the length of each loaf. These ridges are not only decorative but also help to distribute heat evenly during baking.
-
Second Glaze Application and Seed Topping: Brush the dough with the glaze again, ensuring that the ridges are well coated. Then, sprinkle generously with either sesame seeds or poppy seeds, or a combination of both.
-
Stretch the Dough: Carefully stretch each loaf lengthwise until it is approximately 8 inches wide and 18 inches long, and about 1/4 to 1/2 inch thick. Don’t worry too much about precise measurements; the goal is to achieve a relatively uniform thickness.
-
Bake: Bake in the preheated oven for 25-30 minutes, or until the bread is golden brown and the bottom sounds hollow when tapped. The bread should be slightly flexible when done. Watch it carefully, as ovens can vary.
-
Cool and Serve: Remove the baked barbari from the oven and let it cool slightly on the baking sheet before transferring it to a wire rack to cool completely.
Expert Tips & Tricks
- Gluten Boost: If using all-purpose flour, adding 1 tablespoon of vital wheat gluten per cup of flour will greatly improve the texture of your barbari, making it chewier and more authentic.
- Warm Environment: To encourage the dough to rise properly, create a warm environment by placing the covered dough in a slightly warmed oven (turned off), or near a sunny window.
- Glaze Consistency: The glaze should be thin enough to brush easily but thick enough to adhere to the dough. If it’s too thick, add a little more water, a teaspoon at a time.
- Finger Dipping Technique: Keep a small bowl of water nearby when creating the ridges. This will prevent the glaze from sticking to your fingers and making the process easier.
- Doneness Check: The bread is done when it’s golden brown and sounds hollow when tapped on the bottom. If you’re unsure, use a thermometer; the internal temperature should be around 200-210°F (93-99°C).
Serving & Storage Suggestions
Barbari is best served warm, ideally fresh out of the oven. It’s traditionally eaten with feta cheese, fresh herbs (such as mint, basil, and parsley – known as sabzi), and a cup of tea for breakfast. It also pairs well with stews, kebabs, and other Persian dishes.
To store, wrap the cooled barbari tightly in plastic wrap or place it in an airtight container. It will keep at room temperature for 2-3 days. For longer storage, freeze it for up to 2 months. To reheat, wrap the bread in foil and warm it in a 350°F (175°C) oven for about 10-15 minutes, or until heated through.
Nutritional Information
| Nutrient | Amount per Serving | % Daily Value |
|---|---|---|
| Calories | 136.5 kcal | N/A |
| Calories from Fat | 5g | 4% |
| Total Fat | 0.6 g | 0% |
| Saturated Fat | 0.1 g | 0% |
| Cholesterol | 0 mg | 0% |
| Sodium | 332.4 mg | 13% |
| Total Carbohydrate | 28 g | 9% |
| Dietary Fiber | 1.7 g | 6% |
| Sugars | 0.8 g | 3% |
| Protein | 4.7 g | 9% |
Note: Nutritional information is an estimate and can vary based on specific ingredients and serving sizes.
Variations & Substitutions
- Whole Wheat Barbari: Substitute up to half of the bread flour with whole wheat flour for a nuttier flavor and added fiber.
- Garlic Barbari: Before baking, brush the dough with garlic-infused olive oil for a savory twist.
- Herb Barbari: Incorporate chopped fresh herbs, such as rosemary or thyme, into the dough for a fragrant variation.
- Seed Variations: Experiment with different seeds, such as sunflower seeds, pumpkin seeds, or nigella seeds, for added texture and flavor.
- Sweet Barbari: Add a touch of honey or maple syrup to the dough for a slightly sweet bread that pairs well with fruit and cheese.
FAQs (Frequently Asked Questions)
Q: Why is my barbari tough?
A: Over-kneading or using too much flour can result in a tough bread. Be sure to knead for the recommended time and measure your flour accurately. Also, avoid overbaking.
Q: Can I make the dough ahead of time?
A: Yes, you can prepare the dough ahead of time and store it in the refrigerator for up to 24 hours. Let it come to room temperature before shaping and baking.
Q: What if I don’t have bread flour?
A: If you don’t have bread flour, you can use all-purpose flour and add 1 tablespoon of vital wheat gluten per cup of flour to improve the texture.
Q: Can I freeze barbari?
A: Yes, barbari freezes well. Wrap it tightly in plastic wrap or place it in an airtight container and freeze for up to 2 months.
Q: How do I get the perfect ridges on my barbari?
A: The key is to dip your fingers in the glaze frequently to prevent sticking and to use the edges of your hands to firmly press down into the dough, creating deep, even ridges.
Final Thoughts
Now that you’re armed with this recipe, I encourage you to embark on your own nan-e barbari adventure. It may seem a little daunting at first, but the reward of warm, fragrant, homemade bread is well worth the effort. Share your creation with friends and family, and let them experience the magic of Persian cuisine. And please, don’t hesitate to experiment with variations and make it your own. Noosh-e jân! (Bon appétit!)