
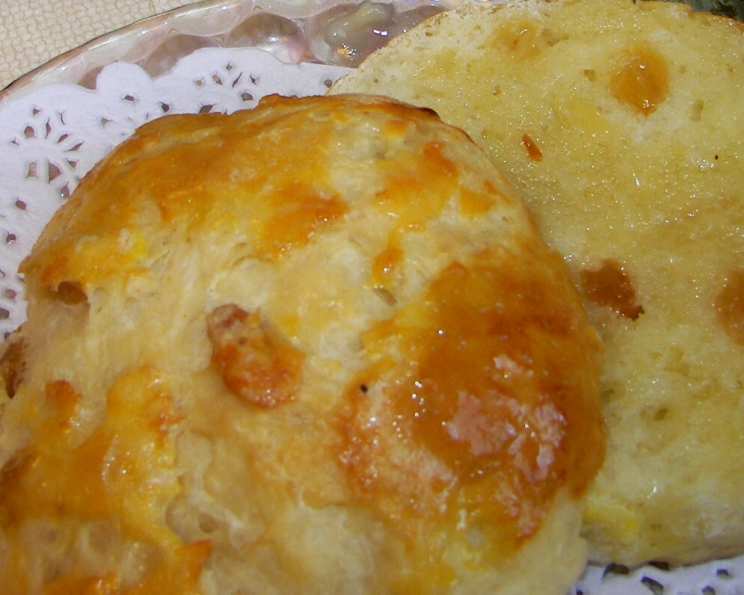
Bath Buns: A Taste of History
The first time I ever tasted a Bath Bun, I was wandering through the charming streets of Bath, England. The aroma of freshly baked bread, sweet citrus, and warm spice wafted from a local bakery, pulling me in like a siren’s song. The bun, glistening with a sugary glaze and dotted with currants, was an explosion of textures and flavors. The pillowy dough, the bursts of juicy fruit, and the crackling sweetness of the glaze all combined to create an unforgettable experience, a perfect representation of the city’s refined elegance and comforting warmth. From that moment on, I was determined to recreate that taste of Bath in my own kitchen.
Recipe Overview
- Prep Time: 1 hour 30 minutes
- Cook Time: 20-30 minutes
- Total Time: 2 hours 55 minutes
- Servings: 24
- Yield: 24 buns
- Dietary Type: Not specified
Ingredients
- 5-6 cups all-purpose flour
- 1 (1/4 ounce) package yeast
- 1/2 cup sugar
- 1 teaspoon salt
- 1/2 teaspoon ground mace
- 1/3 cup nonfat dry milk powder
- 1 1/2 cups hot water
- 3 eggs, beaten
- 1/4 cup butter, room temperature
- 1 cup raisins (or currants)
- 1/2 cup water
Glazes
- 1 egg yolk, beaten
- 1 tablespoon lemon juice, mixed with 3 tablespoons sugar
- 1 tablespoon milk
Equipment Needed
- Mixing bowl
- Mixer (stand mixer or hand mixer)
- Flat beater attachment (for mixer)
- Wooden spoon
- Dough hook attachment (optional, for mixer)
- Greased bowl
- Plastic wrap
- Baking sheet
- Wax paper or parchment paper
- Metal rack
Instructions
- In a large mixing bowl, measure 2 cups of all-purpose flour.
- Stir in the dry ingredients: the package of yeast, 1/2 cup of sugar, 1 teaspoon of salt, 1/2 teaspoon of ground mace, and 1/3 cup of nonfat dry milk powder.
- Pour in 1 1/2 cups of hot water. Ensure the water is hot, but not scalding, to activate the yeast properly.
- Add the 3 beaten eggs to the bowl.
- Using a mixer with the flat beater attachment, beat the mixture at slow speed for 30 seconds. This will help combine the wet and dry ingredients.
- Add 1/4 cup of room temperature butter.
- Increase the mixer speed to medium and beat for 3 minutes. Alternatively, if you are mixing by hand, use a wooden spoon and beat vigorously for an equal length of time.
- Stop the mixer and gradually add the remaining flour, 1/2 cup at a time. Initially, stir it in with the spoon, and then incorporate it by hand, or using the dough hook in the mixer.
- The dough will form a rough, shaggy mass that should begin to pull away from the sides of the bowl. If the dough remains too moist and sticky, add flour in small sprinkles until it reaches the desired consistency.
- If kneading by hand, turn the dough onto a lightly floured work surface. Knead using a rhythmic push-turn-fold motion. Continue kneading until the dough becomes smooth and elastic, and bubbles begin to form under the surface.
- If using a mixer with a dough hook, allow the dough to form a ball around the hook. The sides of the bowl should be wiped clean as the dough kneads.
- Knead the dough for a total of 8 minutes, whether by hand or with a mixer.
- Place the kneaded dough on a floured work surface and shape it into a ball. The dough should be soft, smooth, and only slightly sticky (especially after being dusted with flour).
- Drop the dough into a greased bowl. Turn the dough to coat all sides with the grease.
- Cover the bowl tightly with plastic wrap.
- Set the bowl aside at room temperature and allow the dough to double in volume. This will take approximately 1 1/2 hours, but the time may be shorter if using rapid-rise yeast.
- While the dough is rising, prepare the raisins (or currants). Soak them in 1/2 cup of water for about 1 hour, then drain them thoroughly. This step helps to plump the fruit and keep it moist during baking.
- Remember that each Bath Bun should be approximately 4 inches in diameter.
- Once the dough has doubled, punch it down to release the air.
- Knead the soaked and drained raisins (or currants) into the dough.
- Shape the dough into a 24-inch long roll.
- Cut the roll into 24 equal pieces. Each piece should be about the size of a large egg and weigh approximately 2 ounces.
- Shape each piece into a ball and then flatten the top slightly.
- Place the shaped buns on a baking sheet, leaving about 1 1/2 inches of space between them to allow for expansion during baking.
- Brush the top of each bun with the beaten egg yolk.
- Drizzle the lemon juice and sugar mixture over the tops of the buns. Distribute the glaze evenly for a visually appealing finish.
- Place the baking sheet in a warm place and cover it carefully with a length of wax paper or parchment paper. Allow the buns to double in bulk, which should take approximately 45 minutes.
- Preheat the oven to 350°F (175°C) about 20 minutes before baking.
- Just before placing the buns in the oven, brush them with 1 tablespoon of milk. This will contribute to a golden-brown crust.
- Bake in the preheated oven until the buns test done, about 20-30 minutes.
- To check for doneness, rap once on the bottom crust of a bun. A hard, hollow sound indicates that the bun is baked through. Be careful not to overbake, as this will result in a hard bun.
- Remove the baking sheet from the oven and transfer the baked buns to a metal rack to cool completely before serving.
Expert Tips & Tricks
- Yeast Activation: Make sure your hot water isn’t too hot or it will kill the yeast. Lukewarm water is optimal for proofing yeast.
- Dough Handling: A slightly sticky dough will result in a lighter, airier bun. Resist the urge to add too much flour while kneading.
- Even Baking: Rotate the baking sheet halfway through the baking time to ensure the buns bake evenly.
- Glaze Variation: For a richer glaze, consider adding a touch of vanilla extract to the lemon juice and sugar mixture.
- Fruit Placement: To prevent the raisins or currants from burning during baking, gently press them into the dough after shaping the buns.
Serving & Storage Suggestions
Bath Buns are best served warm, ideally within a few hours of baking. Their slightly sweet flavor makes them a perfect accompaniment to a cup of tea or coffee. You can also serve them with a dollop of clotted cream or a drizzle of honey for an extra indulgent treat.
To store leftover Bath Buns, place them in an airtight container at room temperature. They will stay fresh for about 2-3 days. For longer storage, you can freeze the buns. Wrap them individually in plastic wrap and then place them in a freezer bag. Frozen buns can be reheated in a low oven (around 300°F or 150°C) until warmed through.
Nutritional Information
| Nutrient | Amount per Serving | % Daily Value |
|---|---|---|
| Calories | 170.9 kcal | N/A |
| Calories from Fat | 27 kcal | N/A |
| Total Fat | 3g | 4% |
| Saturated Fat | 1.5g | 7% |
| Cholesterol | 39.8mg | 13% |
| Sodium | 130.6mg | 5% |
| Total Carbohydrate | 31.6g | 10% |
| Dietary Fiber | 1g | 4% |
| Sugars | 10.3g | N/A |
| Protein | 4.5g | 9% |
Note: Nutritional information is an estimate and may vary based on specific ingredients and preparation methods.
Variations & Substitutions
- Citrus Zest: Add orange or lemon zest to the dough for an extra burst of citrus flavor.
- Spice Blend: Experiment with different spice blends, such as cinnamon, nutmeg, or cardamom, in addition to or instead of the mace.
- Gluten-Free: Substitute the all-purpose flour with a gluten-free blend for a gluten-free version. You may need to adjust the liquid content to achieve the right dough consistency.
- Dried Fruit: Try using other dried fruits like cranberries, chopped apricots, or dried cherries in place of the raisins or currants.
- Vegan Bath Buns: Substitute the butter with a vegan butter alternative, use an egg replacement for the beaten eggs, and use plant-based milk.
- Almond Extract: Add 1/2 teaspoon of almond extract to the dough for a delicate almond flavor.
FAQs (Frequently Asked Questions)
Q: Can I make the dough ahead of time?
A: Yes, you can prepare the dough the day before and let it rise in the refrigerator overnight. This slow fermentation can enhance the flavor of the buns. Be sure to bring the dough back to room temperature before shaping and baking.
Q: What if I don’t have mace?
A: Mace has a unique flavor, but if you don’t have it on hand, you can substitute it with an equal amount of nutmeg or a pinch of allspice.
Q: How do I prevent the bottoms of the buns from burning?
A: Place a second baking sheet underneath the one with the buns to provide an extra layer of insulation and prevent burning.
Q: Can I use fresh yeast instead of dry yeast?
A: Yes, you can substitute fresh yeast. Use about three times the amount of fresh yeast as dry yeast. So, for this recipe, you would use approximately 0.75 ounces (21 grams) of fresh yeast.
Q: What is the best way to reheat Bath Buns?
A: To reheat Bath Buns, wrap them in foil and warm them in a low oven (300°F or 150°C) for about 10-15 minutes, or until heated through. This will help to keep them moist.
Final Thoughts
Now it’s your turn to bring the taste of Bath into your own kitchen. Baking these Bath Buns may require a bit of patience and a few steps, but the reward is well worth the effort. The warm, fragrant, and subtly sweet buns are a delightful treat to share with family and friends, transporting you to the charming streets of Bath with every bite. So, gather your ingredients, roll up your sleeves, and experience the joy of creating these historical and delicious delights. Don’t be afraid to experiment with variations and substitutions to make them your own. And most importantly, enjoy the process!