
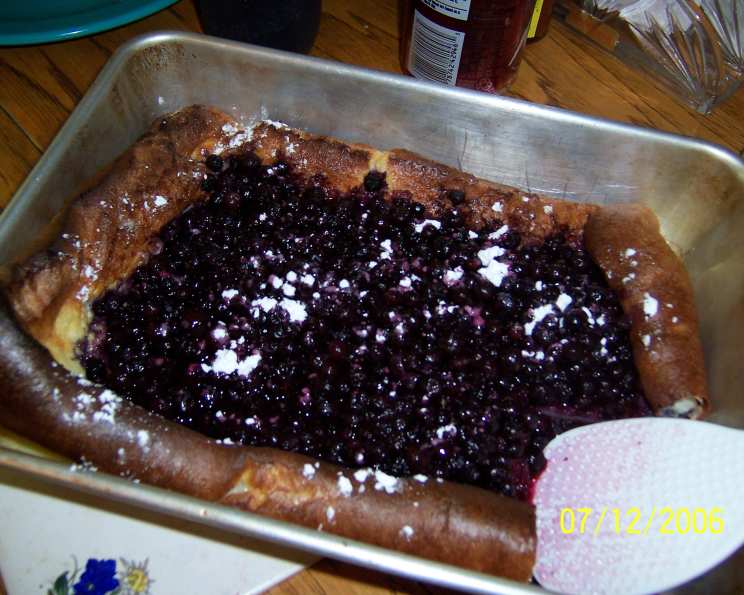
Berry Dutch Baby (Low-Fat)
The memory is so vivid: a sunny Sunday morning, my grandmother’s kitchen filled with the comforting aroma of baking dough. She would pull out her trusty cast-iron skillet, the one passed down through generations, and with a flurry of whisks and pours, transform simple ingredients into a towering, golden-brown marvel. The Dutch Baby, as she called it, was always topped with a generous heap of fresh berries, their vibrant colors mirroring the joy it brought to our faces. That first bite – the crisp edges yielding to a custardy center bursting with sweet-tart berries – remains etched in my mind as pure, unadulterated happiness. It’s a taste of home, of love, and of simple, shared moments.
Recipe Overview:
- Prep Time: 10 minutes
- Cook Time: 25 minutes
- Total Time: 35 minutes
- Servings: 4-6
- Dietary Type: Low-Fat
Ingredients:
- 3 large egg whites
- 2 large eggs
- 1 cup all-purpose flour
- 1 cup nonfat milk
- 2 tablespoons granulated sugar
- 2 teaspoons vanilla
- ½ teaspoon salt
- 1 tablespoon unsalted butter or 1 tablespoon margarine
- 3 ½ cups strawberries (or a combo) or 3 ½ cups blueberries (or a combo)
- ½ teaspoon cinnamon
- 2 tablespoons powdered sugar
Equipment Needed:
- Oven
- Cast iron skillet (or other oven-proof frying pan)
- Blender or whisk
- Mixing bowl
Instructions:
-
Begin by preheating your oven to 425 degrees Fahrenheit (220 degrees Celsius). This high heat is essential for creating the dramatic puff of a Dutch Baby. Place your cast iron skillet (or any other oven-proof frying pan) inside the oven while it preheats. This ensures the pan is scorching hot when the batter is added, contributing to its characteristic rise.
-
While the oven heats, prepare the batter. In a blender or using a whisk in a mixing bowl, combine the egg whites, eggs, all-purpose flour, nonfat milk, granulated sugar, vanilla, and salt. Blend or whisk until the batter is perfectly smooth. A smooth batter is crucial for a light and airy Dutch Baby, so ensure there are no lumps of flour remaining.
-
Carefully remove the preheated skillet from the oven. Add the butter or margarine to the hot skillet. Swirl the pan to melt the butter and ensure it coats both the bottom and the sides completely. This step is vital as it prevents the Dutch Baby from sticking and adds a rich flavor to the crust. Work quickly, as the pan will cool down rapidly.
-
Pour the prepared batter into the hot skillet. Immediately return the skillet to the oven and bake for 25 minutes. Keep a close watch – the Dutch Baby is ready when it’s noticeably puffy and beautifully well-browned. Avoid opening the oven door during baking, as this can cause the Dutch Baby to deflate.
-
While the cake is baking, prepare the berry topping. In a separate bowl, gently mix the strawberries (or blueberries, or a combination) with the cinnamon. The cinnamon enhances the natural sweetness of the berries and adds a warm, comforting spice.
-
Once the Dutch Baby is baked to golden perfection, carefully remove it from the oven. Spoon the cinnamon-coated berries generously onto the center of the Dutch Baby.
-
Dust the entire creation with powdered sugar. The powdered sugar not only adds a touch of sweetness but also creates a visually appealing snowy finish.
-
Serve the Berry Dutch Baby immediately while it’s still hot and puffy. The contrast between the warm, custardy pancake and the fresh, slightly tart berries is heavenly.
Expert Tips & Tricks:
- Achieving Maximum Puff: The secret to a towering Dutch Baby lies in the temperature difference between the hot pan and the cold batter. Make sure your skillet is thoroughly preheated and your batter is cold.
- Preventing Sticking: A well-seasoned cast iron skillet is ideal for preventing sticking. If using a different pan, ensure it’s non-stick or generously greased.
- Flavor Infusion: For an extra layer of flavor, consider adding a teaspoon of lemon zest to the batter or a splash of almond extract along with the vanilla.
- Customize Your Berries: Don’t feel limited to just strawberries or blueberries! Raspberries, blackberries, or even a mix of all your favorite berries will work beautifully.
- Fixing a Deflated Dutch Baby: If your Dutch Baby deflates slightly after removing it from the oven, don’t worry! It’s perfectly normal. The taste will still be fantastic.
Serving & Storage Suggestions:
Serve the Berry Dutch Baby immediately after baking for the best experience. Its dramatic puff and warm flavors are best enjoyed fresh. To complement this dish, consider serving it alongside a dollop of whipped cream (lightly sweetened, of course) or a scoop of vanilla ice cream.
Leftovers can be stored in the refrigerator for up to 2 days. However, the texture will change, and it will lose some of its initial puffiness. To reheat, warm it gently in a low oven (around 300°F/150°C) for a few minutes or microwave in short intervals until heated through. Note that reheating may make it slightly less crisp. Due to its texture, freezing is not recommended.
Nutritional Information:
| Nutrient | Amount per Serving | % Daily Value |
|---|---|---|
| Calories | 313 kcal | – |
| Calories from Fat | 58 g | 19% |
| Total Fat | 6.5 g | 10% |
| Saturated Fat | 2.7 g | 13% |
| Cholesterol | 114.6 mg | 38% |
| Sodium | 401 mg | 16% |
| Total Carbohydrate | 50.8 g | 16% |
| Dietary Fiber | 8 g | 31% |
| Sugars | 18.8 g | – |
| Protein | 12.5 g | 24% |
Variations & Substitutions:
- Gluten-Free Dutch Baby: Substitute the all-purpose flour with a gluten-free blend. Be sure to choose a blend that contains xanthan gum for proper binding.
- Dairy-Free Dutch Baby: Replace the nonfat milk with almond milk, soy milk, or oat milk.
- Fruity Variations: As mentioned earlier, experiment with different fruits. Pitted peaches, plums, or nectarines are excellent alternatives to berries. You could also add a sprinkle of shredded coconut for a tropical twist.
- Savory Dutch Baby: Omit the sugar and vanilla, and add herbs like thyme or rosemary to the batter. Top with sauteed mushrooms and Gruyere cheese for a savory brunch option.
- Citrus Zest: Add lemon, orange, or lime zest to the batter for a bright and zesty flavor.
FAQs (Frequently Asked Questions):
Q: Why is my Dutch Baby not puffing up?
A: The most common reason is that the pan wasn’t hot enough, or the batter wasn’t cold enough. Ensure the skillet is preheated in the oven for a sufficient amount of time, and use cold ingredients for the batter.
Q: Can I make the batter ahead of time?
A: While it’s best to use the batter immediately, you can prepare it up to 30 minutes in advance and store it in the refrigerator. Whisk briefly before pouring into the hot skillet.
Q: My Dutch Baby is burning on the bottom. What can I do?
A: If your oven tends to run hot, try lowering the temperature by 25 degrees Fahrenheit (about 15 degrees Celsius) and baking for a slightly longer time. You can also place a baking sheet on the rack below the skillet to deflect some of the heat.
Q: Can I use a different size pan?
A: Yes, but you may need to adjust the baking time. A smaller pan will require a shorter baking time, while a larger pan may need a few extra minutes. Keep a close eye on it.
Q: Is it normal for the Dutch Baby to deflate after baking?
A: Yes, it’s perfectly normal for the Dutch Baby to deflate slightly after removing it from the oven. The dramatic puff is caused by steam, which dissipates as it cools.
Final Thoughts:
This Berry Dutch Baby is more than just a recipe; it’s an invitation to create a warm, comforting memory of your own. Embrace the simplicity, the deliciousness, and the joy of sharing a homemade treat with loved ones. Don’t be afraid to experiment with different fruits and flavors to make it your own signature dish. So, preheat that oven, gather your ingredients, and get ready to experience the magic of a perfectly puffed, berry-filled Dutch Baby. Enjoy!