
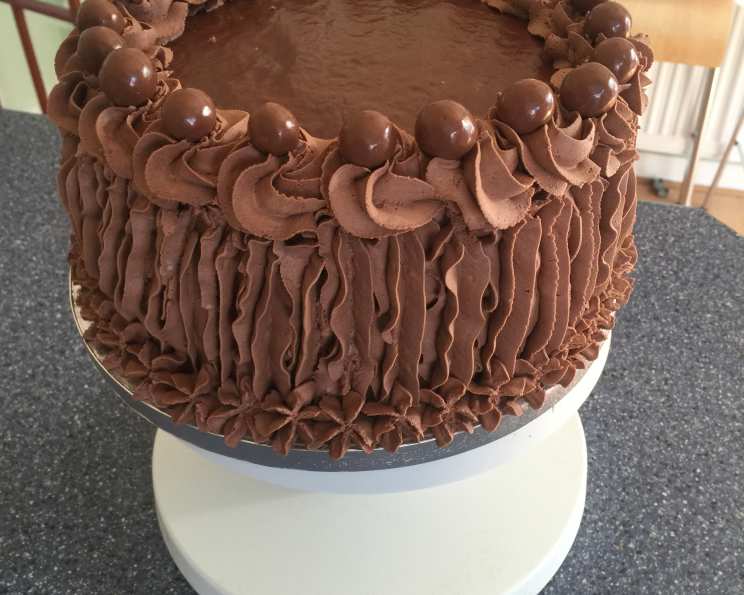
Best Ever Rich Chocolate Fudge Cake
I’ll never forget the first time I tasted this cake. It was at my Aunt Carol’s house, during a particularly gloomy summer afternoon. The air was thick with humidity, but one bite of this intensely chocolatey, melt-in-your-mouth fudge cake, and the sun seemed to burst through the clouds. Aunt Carol, a woman known for her no-nonsense attitude and even more impressive baking skills, simply smiled and said, “It’s the sour cream, darling. That’s the secret.” And she was right – this cake is an unforgettable experience.
Recipe Overview
- Prep Time: 15 minutes
- Cook Time: 25 minutes
- Total Time: 40 minutes
- Servings: Variable (3 x 9-inch cakes)
- Yield: 3 x 9-inch cakes
- Dietary Type: Not specified
Ingredients
- 3 ounces baking chocolate, melted in microwave
- 1/2 cup (1 stick) butter or margarine
- 2 1/4 cups light brown sugar, lightly packed
- 3 eggs
- 1 1/2 teaspoons vanilla extract
- 2 teaspoons baking soda
- 1/2 teaspoon salt
- 2 1/4 cups sifted cake flour
- 1 cup sour cream
- 1 cup boiling water
Equipment Needed
- 3 x 9-inch cake pans
- Large mixing bowl
- Electric mixer
- Microwave
- Measuring cups and spoons
- Sifter
- Wire racks
Instructions
-
Preheat your oven to 350°F (175°C). This is crucial for even baking and that perfect fudgey texture.
-
Prepare your cake pans. Generously grease and flour three 9-inch cake pans. This step is essential to ensure the cakes release cleanly after baking. A light coating of cooking spray followed by flour works well. Tap out any excess flour.
-
In a large mixing bowl, cream the butter until smooth. Using an electric mixer on medium speed will make this process easier. The butter should be softened but not melted.
-
Gradually pour in the light brown sugar into the creamed butter, then add the eggs one at a time. This gradual addition helps to create a smooth and even mixture.
-
Beat with the mixer until the mixture is light and fluffy, approximately 5 minutes. This incorporates air into the batter, resulting in a tender cake. Don’t rush this step; it’s important for the final texture.
-
On low speed, beat in the vanilla extract, melted chocolate, baking soda, and salt. Make sure the melted chocolate isn’t too hot, as it could cook the eggs slightly. The baking soda will react with the sour cream and hot water, creating lift in the cake.
-
Add the sifted cake flour alternately with the sour cream, beating at low speed until just smooth. Start and end with the flour. Sifting the flour ensures a lighter, more tender crumb. Be careful not to overmix, as this can lead to a tough cake.
-
Pour in the boiling hot water and stir until just blended. The batter will be thin at this point; don’t worry, this is normal. The hot water helps to bloom the cocoa and creates a very moist cake.
-
Pour the batter evenly into the prepared cake pans. Use a scale for accuracy, or simply eyeball it, ensuring each pan receives roughly the same amount of batter.
-
Bake for about 25 minutes, or until a toothpick inserted into the center comes out clean or with a few moist crumbs. Baking times may vary slightly depending on your oven, so start checking for doneness around 23 minutes.
-
Remove from the oven and let the cakes cool in the pans for about 10-15 minutes. This allows them to set slightly before inverting them onto wire racks to cool completely.
-
Once cooled, frost with your favorite chocolate frosting or ganache.
Expert Tips & Tricks
-
Room Temperature Ingredients: Using room temperature butter and eggs is crucial for achieving a smooth, emulsified batter. This ensures the ingredients combine properly, resulting in a lighter, more tender cake.
-
Don’t Overmix: Overmixing the batter after adding the flour can develop the gluten, resulting in a tough cake. Mix only until the ingredients are just combined.
-
Even Baking: To ensure even baking, use oven thermometer to make sure your oven temperature is accurate. Rotate the cake pans halfway through baking.
-
Chocolate Quality: Use good quality baking chocolate for the best flavor. The difference between a generic baking chocolate and a high-quality one will be noticeable in the final product.
-
Add Coffee: Dissolve a teaspoon of instant coffee in the boiling water to enhance the chocolate flavor.
Serving & Storage Suggestions
This cake is best served at room temperature, allowing the flavors to fully develop. It’s fantastic on its own, or you can dress it up with a scoop of vanilla ice cream, fresh berries, or a dusting of powdered sugar.
To store leftover cake, wrap it tightly in plastic wrap or place it in an airtight container. It will keep at room temperature for up to 3 days, in the refrigerator for up to a week, or in the freezer for up to 3 months. To freeze, wrap individual slices tightly in plastic wrap, then place them in a freezer-safe bag.
To reheat frozen cake, thaw it overnight in the refrigerator or at room temperature for a few hours. You can also microwave individual slices for a few seconds until warmed through.
Nutritional Information
Please note that the following nutritional information is an estimate and may vary based on specific ingredients and serving sizes.
| Nutrient | Amount per Serving (Estimate) | % Daily Value (Estimate) |
|---|---|---|
| Calories | 545 kcal | 27% |
| Total Fat | 25g | 38% |
| Saturated Fat | 15g | 75% |
| Cholesterol | 102mg | 34% |
| Sodium | 562mg | 23% |
| Total Carbohydrate | 84g | 28% |
| Dietary Fiber | 2g | 8% |
| Sugars | 55g | N/A |
| Protein | 7g | 14% |
Variations & Substitutions
-
Gluten-Free: Substitute the cake flour with a gluten-free all-purpose flour blend. You may need to add a binder like xanthan gum to help with the texture.
-
Dairy-Free: Replace the butter with a dairy-free butter substitute, and the sour cream with a dairy-free sour cream alternative. Be mindful of the taste and texture when using substitutes.
-
Spice It Up: Add a teaspoon of cinnamon or a pinch of cayenne pepper to the batter for a hint of warmth and spice.
-
Nuts: Incorporate chopped walnuts or pecans into the batter for added texture and flavor.
-
Espresso: For a deeper, richer chocolate flavor, add a shot of espresso to the batter along with the boiling water.
FAQs (Frequently Asked Questions)
Q: Why is the boiling water added at the end?
A: The boiling water helps to dissolve the cocoa powder and create a moist, fudge-like texture. It also helps to thin the batter, which contributes to the cake’s tenderness.
Q: Can I use regular all-purpose flour instead of cake flour?
A: While you can, cake flour has a lower protein content, resulting in a more tender crumb. If using all-purpose flour, consider using 2 tablespoons less per cup and adding 2 tablespoons of cornstarch to mimic the effect of cake flour.
Q: My cake is sinking in the middle. What went wrong?
A: This could be due to several factors, including overmixing the batter, opening the oven door too frequently, or not baking the cake long enough. Make sure to follow the instructions carefully and use an oven thermometer to ensure accurate baking temperature.
Q: Can I make this cake in one large pan instead of three smaller ones?
A: Yes, you can bake this as a single layer cake, but you’ll need to adjust the baking time. Use a 9×13 inch pan and bake for approximately 35-40 minutes, or until a toothpick inserted into the center comes out clean.
Q: What’s the best way to melt the chocolate?
A: You can melt the chocolate in the microwave in 30-second intervals, stirring in between, or over a double boiler. Be careful not to overheat the chocolate, as it can seize up.
Final Thoughts
This Rich Chocolate Fudge Cake is a true indulgence, perfect for birthdays, holidays, or simply a special treat for yourself. Don’t be intimidated by the slightly longer ingredient list – the result is well worth the effort. This recipe is a testament to the transformative power of simple ingredients, meticulously combined to create something extraordinary. So, preheat your oven, gather your ingredients, and prepare to experience chocolate cake bliss. Share your creations and feedback; happy baking!