
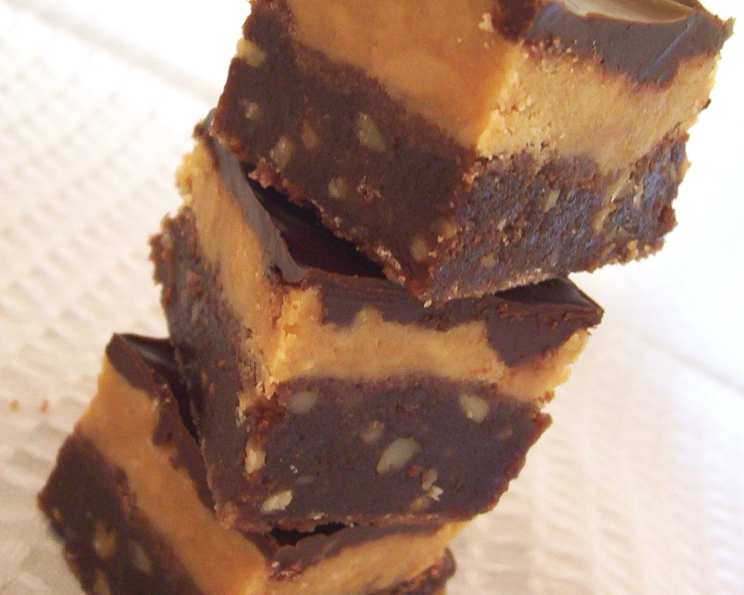
Best Peanut Butter Layered Brownies
The memory is as vivid as the smell of chocolate baking in the oven. My grandmother, Nana Elsie, would always make these brownies for our birthdays. I can picture myself perched on the kitchen counter, mesmerized as she smoothed the peanut butter layer with a wet spatula, a trick I still use today. The combination of fudgy brownie, creamy peanut butter, and rich chocolate ganache was pure magic, a taste of childhood happiness I try to recreate every time I bake them.
Recipe Overview
- Prep Time: 20 minutes
- Cook Time: 30-35 minutes
- Total Time: 50-55 minutes
- Servings: 24 squares
- Yield: 24 squares
- Dietary Type: Vegetarian
Ingredients
For the Brownie Layer:
- 4 ounces unsweetened chocolate
- ¾ cup (1 ½ sticks) butter
- 2 cups granulated sugar
- 3 large eggs
- 1 ½ teaspoons vanilla extract
- 1 cup all-purpose flour
- 1 cup chopped walnuts (optional, can substitute other nuts or omit)
For the Peanut Butter Layer:
- 1 cup peanut butter (creamy or chunky, your preference)
- ½ cup powdered sugar
- ½ teaspoon vanilla extract
- 3 tablespoons room temperature butter
- Up to ¼ cup milk (or more, as needed for consistency)
For the Chocolate Ganache Topping:
- 4 ounces semisweet chocolate
- ¼ cup butter
- ¼ cup milk
Equipment Needed
- 13×9-inch baking pan
- Microwave-safe bowls
- Mixing bowls
- Electric mixer (optional, but recommended)
- Spatula
- Measuring cups and spoons
Instructions
- Preheat your oven to 350°F (175°C). Ensure your oven rack is positioned in the center.
- Prepare the Brownie Layer: In a microwave-safe bowl, combine the unsweetened chocolate and ¾ cup (1 ½ sticks) of butter. Microwave on high for 1 ½ minutes, or until the butter is melted.
- Stir the chocolate and butter mixture until the chocolate is completely melted and the mixture is smooth. Be careful not to overheat the chocolate.
- Add the granulated sugar to the melted chocolate mixture and stir until well combined. The mixture should be glossy.
- Beat in the eggs, one at a time, ensuring each egg is fully incorporated before adding the next. Add the 1 ½ teaspoons of vanilla extract and blend well.
- Gradually stir in the flour until just combined. Be careful not to overmix, as this can result in tough brownies. If using, stir in the chopped walnuts.
- Grease a 13×9-inch baking pan thoroughly to prevent the brownies from sticking.
- Spread the brownie batter evenly into the prepared pan.
- Bake in the preheated oven for 30 to 35 minutes. It’s crucial not to overbake the brownies. A toothpick inserted into the center should come out with moist crumbs attached, not completely clean.
- Cool the brownies completely in the pan before adding the peanut butter layer. This is important to prevent the peanut butter from melting.
- Prepare the Peanut Butter Layer: In a separate bowl, combine the peanut butter, 3 tablespoons of room temperature butter, powdered sugar, and ½ teaspoon of vanilla extract.
- Blend the peanut butter mixture until smooth.
- Gradually add milk, a tablespoon at a time, until you reach a nice spreading consistency. This step can be tricky; the amount of milk needed may vary depending on the type of peanut butter you use. Aim for a texture that is easily spreadable but not too runny.
- If the peanut butter layer is too thick to spread, dip your spatula in water. You can even sprinkle a little water on top of the peanut butter and gently smooth it out. The moisture helps create a smoother surface.
- Spread the peanut butter layer evenly over the cooled brownies.
- Prepare the Chocolate Ganache Topping: In a microwave-safe bowl, combine the semisweet chocolate and ¼ cup butter. Microwave on high for 1 ½ minutes, or until the butter is melted.
- Stir the chocolate and butter mixture until smooth. Add the ¼ cup of milk and stir until the ganache is glossy and evenly combined.
- Spread the chocolate ganache evenly over the peanut butter layer.
- Cool completely until the ganache is set before cutting into squares. This allows the layers to firm up and makes for cleaner slices.
Expert Tips & Tricks
- For extra fudgy brownies: Slightly underbake them. Remove them from the oven when the center still jiggles slightly.
- Prevent sticking: Line the baking pan with parchment paper, leaving an overhang on the sides. This makes it easy to lift the brownies out of the pan after baking.
- Upgrade your nuts: Toast your walnuts (or other nuts) before adding them to the batter for a deeper, more pronounced nutty flavor.
- Salted Peanut Butter: Use salted peanut butter to add a delightful contrast to the sweetness of the brownies and ganache.
- Even Ganache: For a perfectly smooth ganache, warm the milk slightly before adding it to the melted chocolate and butter.
Serving & Storage Suggestions
Serve these brownies chilled or at room temperature. Chilling them slightly before serving will make the layers firmer and easier to cut. Store leftover brownies in an airtight container at room temperature for up to 3 days, in the refrigerator for up to a week, or in the freezer for up to 2 months. To freeze, cut the brownies into individual squares and wrap them tightly in plastic wrap before placing them in a freezer bag. To reheat, thaw in the refrigerator or at room temperature.
Nutritional Information
| Nutrient | Amount per Serving | % Daily Value |
|---|---|---|
| Calories | 328 kcal | N/A |
| Calories from Fat | 210 kcal | N/A |
| Total Fat | 23.4 g | 36% |
| Saturated Fat | 10.5 g | 52% |
| Cholesterol | 51 mg | 16% |
| Sodium | 126.6 mg | 5% |
| Total Carbohydrate | 28.9 g | 9% |
| Dietary Fiber | 2.7 g | 10% |
| Sugars | 20.4 g | N/A |
| Protein | 6.2 g | 12% |
Note: Nutritional information is an estimate and may vary based on specific ingredients and portion sizes.
Variations & Substitutions
- Gluten-Free Brownies: Substitute the all-purpose flour with a gluten-free all-purpose flour blend.
- Dairy-Free Brownies: Use a dairy-free butter substitute and dairy-free milk. Check your chocolate to ensure it’s also dairy-free.
- Nut-Free Brownies: Omit the walnuts or substitute them with sunflower seeds or pumpkin seeds.
- Different Nut Butters: Experiment with almond butter, cashew butter, or sunflower seed butter in place of the peanut butter.
- Chocolate Chip Ganache: Stir in ½ cup of chocolate chips into the ganache while it’s still warm for added texture and flavor.
FAQs (Frequently Asked Questions)
Q: Why is my peanut butter layer too thick to spread?
A: The peanut butter mixture can be too thick if the peanut butter is cold or if too much powdered sugar was added. Try adding a tablespoon of milk at a time until you reach a spreadable consistency. Dipping your spatula in water helps, too.
Q: Can I use natural peanut butter for this recipe?
A: Yes, but natural peanut butter tends to be runnier. You may need to add a bit more powdered sugar to the peanut butter layer to achieve the desired consistency.
Q: How do I know when the brownies are done?
A: Insert a toothpick into the center of the brownies. It should come out with moist crumbs attached, not completely clean. Overbaking will result in dry brownies.
Q: Can I make these brownies ahead of time?
A: Absolutely! These brownies are perfect for making ahead. Simply prepare them according to the recipe, let them cool completely, and store them in an airtight container. The flavors meld together beautifully over time.
Q: My ganache is too thick/thin. What can I do?
A: If your ganache is too thick, add a tablespoon of warm milk at a time until it reaches the desired consistency. If it’s too thin, refrigerate it for a short period to thicken it up.
Final Thoughts
These Peanut Butter Layered Brownies are more than just a dessert; they’re a slice of comfort, a reminder of happy memories, and a chance to create new ones. Don’t be afraid to experiment with variations, adding your personal touch to this classic recipe. Bake a batch, share them with loved ones, and let the sweet symphony of chocolate and peanut butter transport you to a place of pure bliss. I hope you enjoy making these as much as I do, and I’d love to hear your feedback!