
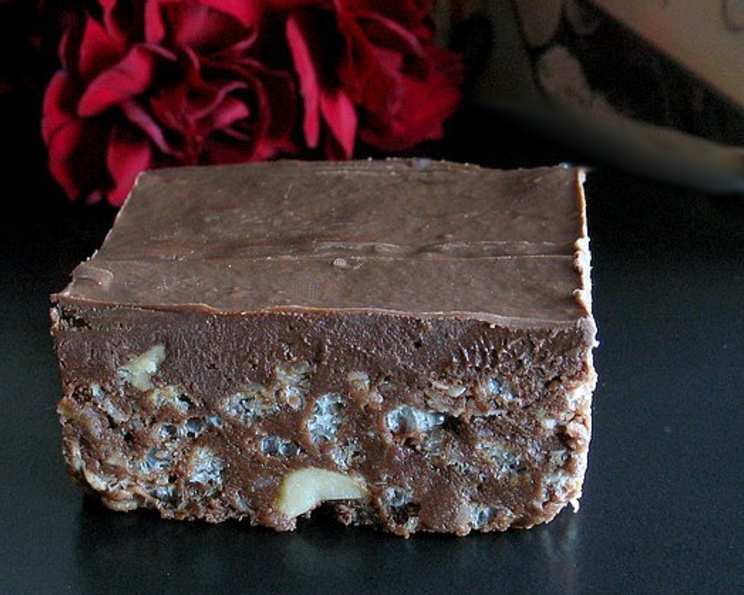
Betty Bars: A Symphony of Sweet and Salty
The church bake sale was always a blur of pastel frostings and perfumed floral dresses. But through that sugary haze, one treat consistently cut through, a beacon of salty-sweet perfection – Betty Bars. Mrs. Henderson, with her ever-present smile and flour-dusted apron, always brought a platter piled high with these squares of utter delight. The combination of chewy marshmallows, crunchy cereal, and that decadent chocolate-butterscotch topping… it was, and still is, pure magic. They disappeared faster than she could set them down, and to this day, just the aroma of melting butterscotch chips takes me right back to that bustling church hall, a small child, sticky fingers reaching for another Betty Bar.
Recipe Overview: Betty Bars
- Prep Time: 15 minutes
- Cook Time: 4 minutes
- Total Time: 19 minutes
- Servings: Variable
- Yield: 40-45 bars
- Dietary Type: Not specified
Ingredients
- 1 (10 1/2 ounce) package mini marshmallows
- 1/2 cup (1 stick) butter
- 1 cup peanut butter, divided
- 2 tablespoons peanut butter, divided
- 2 cups semi-sweet chocolate chips, divided
- 1 cup blanched peanuts
- 1 cup quick-cooking oats
- 2 cups Rice Krispies
- 1 cup butterscotch chips
Equipment Needed
- 2-quart glass bowl
- 9×13 inch baking pan
- Microwave oven
- Spatula or wooden spoon
- Butter or cooking spray
Instructions
-
In a 2-quart glass bowl, combine the mini marshmallows, butter, 1 cup of peanut butter, and 1 cup of semi-sweet chocolate chips.
-
Microwave the mixture on high for 2 to 2 1/2 minutes, watching carefully to prevent burning. The marshmallows should be puffed and the chocolate beginning to melt.
-
Remove the bowl from the microwave and stir the mixture until it is smooth and completely combined. If needed, return it to the microwave for very short bursts (5-10 seconds) to help it melt further, stirring after each burst.
-
Add the blanched peanuts, quick-cooking oats, and Rice Krispies cereal to the melted marshmallow mixture.
-
Stir thoroughly until all the dry ingredients are evenly coated with the marshmallow mixture. Make sure to scrape the bottom of the bowl to incorporate everything fully.
-
Butter a 9×13 inch baking pan thoroughly. Alternatively, you can use cooking spray.
-
Spread the cereal mixture evenly into the prepared baking pan, pressing down gently to create a compact and even layer. A slightly damp spatula or your fingers can help prevent sticking.
-
Now, clean the bowl you used previously. This is important to prevent any marshmallow residue from affecting the next step.
-
In the clean bowl, combine the remaining 1 cup of semi-sweet chocolate chips, 2 tablespoons of peanut butter, and the butterscotch chips.
-
Microwave this mixture on high for 1 1/2 minutes, or until the chips are melted. Again, watch carefully to prevent burning.
-
Stir the melted chocolate and butterscotch mixture until it is smooth and glossy.
-
Spread the melted chocolate-butterscotch mixture evenly over the cereal base in the baking pan.
-
Let the bars stand at room temperature until they are firm and set. This may take at least 30 minutes, or longer depending on the temperature of your kitchen. You can speed up the process by placing the pan in the refrigerator.
-
Once the bars are firm, cut them into squares. The size of the squares is up to you; this recipe typically yields 40-45 bars.
Expert Tips & Tricks
- Marshmallow Melt Mastery: Microwaving marshmallows can be tricky. If they start to puff up excessively, stop the microwave and let them deflate slightly before continuing in shorter intervals.
- Pan Prep Perfection: A well-buttered pan is crucial for easy removal. Consider lining the pan with parchment paper, leaving an overhang on the sides, for effortless lifting and cutting.
- Chocolate Consistency: If your chocolate-butterscotch topping is too thick to spread easily, add a teaspoon of vegetable oil or shortening. This will thin it out without compromising the flavor.
- Pressing Power: Don’t be afraid to press the cereal mixture firmly into the pan. This helps the bars hold their shape and prevents them from crumbling.
- Chill Out: Chilling the bars completely before cutting them is essential for clean, even slices. Use a warm knife for smoother cutting.
Serving & Storage Suggestions
Betty Bars are best served at room temperature, allowing the textures and flavors to fully express themselves. These bars are perfect for parties, potlucks, bake sales (of course!), or a simple after-dinner treat.
Storage: Store leftover Betty Bars in an airtight container at room temperature for up to 3 days. For longer storage, they can be refrigerated for up to a week. If you want to keep them for an extended period, wrap them individually and freeze them for up to 2 months. Thaw at room temperature before serving.
Nutritional Information
Please note that the following values are estimates and can vary based on specific ingredient brands and portion sizes.
| Nutrient | Amount per Serving | % Daily Value |
|---|---|---|
| Calories | 183.8 kcal | N/A |
| Calories from Fat | 105 kcal | N/A |
| Total Fat | 11.7 g | 17% |
| Saturated Fat | 5 g | 25% |
| Cholesterol | 6.1 mg | 2% |
| Sodium | 72.9 mg | 3% |
| Total Carbohydrate | 18.9 g | 6% |
| Dietary Fiber | 1.5 g | 5% |
| Sugars | 12.7 g | 50% |
| Protein | 3.7 g | 7% |
Variations & Substitutions
- Nut-Free Betty Bars: If allergies are a concern, omit the blanched peanuts and substitute with sunflower seeds or chopped pretzels for added crunch. Ensure the peanut butter is also replaced with a safe alternative like sunflower seed butter.
- Dark Chocolate Delight: Swap the semi-sweet chocolate chips for dark chocolate chips for a richer, more intense chocolate flavor.
- White Chocolate Wonder: Use white chocolate chips and macadamia nuts for a completely different, yet equally delicious, variation.
- Festive Betty Bars: Add seasonal sprinkles or candies to the chocolate-butterscotch topping for a festive touch. Red and green sprinkles for Christmas, pastel sprinkles for Easter, or orange and black sprinkles for Halloween.
- Salted Caramel Twist: Drizzle salted caramel sauce over the top of the finished bars for an extra layer of indulgence.
FAQs (Frequently Asked Questions)
Q: Can I use regular oats instead of quick-cooking oats?
A: Quick-cooking oats are recommended because they absorb the marshmallow mixture better. However, if you only have regular oats, you can use them. Just be aware that the texture of the bars may be slightly chewier.
Q: My chocolate-butterscotch topping is too thick to spread. What can I do?
A: Add a teaspoon of vegetable oil or shortening to the melted chocolate-butterscotch mixture and stir until smooth. This will thin it out without affecting the flavor.
Q: How do I prevent the bars from sticking to the pan?
A: Thoroughly butter the baking pan, or use cooking spray. For extra insurance, line the pan with parchment paper, leaving an overhang on the sides for easy removal.
Q: Can I freeze Betty Bars?
A: Yes, Betty Bars freeze well. Wrap them individually in plastic wrap and then place them in an airtight container or freezer bag. They can be frozen for up to 2 months.
Q: My marshmallows are burning in the microwave! What am I doing wrong?
A: Microwave the marshmallow mixture in shorter intervals (30 seconds), stirring after each interval. Microwaves vary in power, so it’s important to watch carefully and adjust the cooking time accordingly.
Final Thoughts
Betty Bars are more than just a recipe; they’re a memory, a comfort, and a reminder of simpler times. I encourage you to try this recipe and create your own memories around these delightful treats. Whether you stick to the classic recipe or experiment with variations, I’m confident that Betty Bars will become a favorite in your home too. So, gather your ingredients, preheat your microwave, and get ready to experience a symphony of sweet and salty that will have everyone reaching for seconds (and thirds!). Don’t hesitate to share your creations and feedback – I’d love to hear about your Betty Bar adventures! Perhaps pair them with a cold glass of milk, or a warm cup of coffee for the ultimate indulgence.