
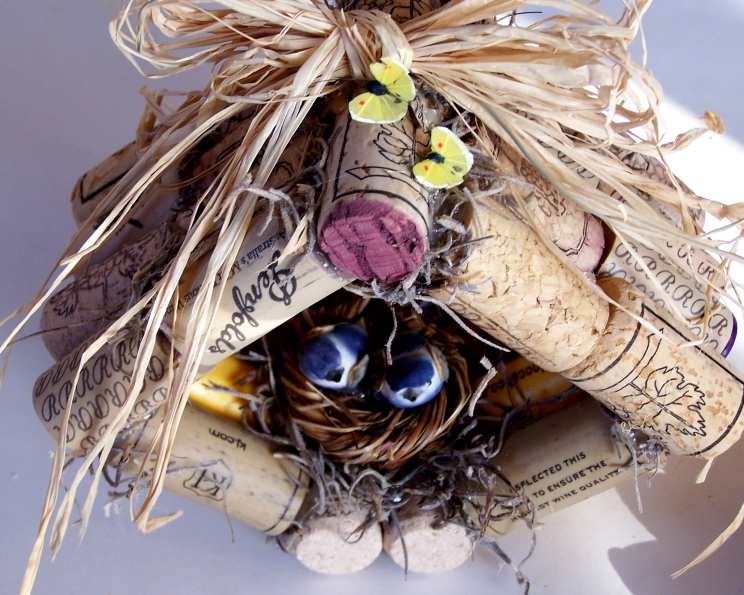
Crafting Whimsical Bird Houses: A Cork-Filled Culinary Creation
There’s something undeniably charming about miniature homes, especially when they’re destined for feathered friends. My grandmother, a passionate gardener with a twinkle in her eye, used to adorn her apple trees with an array of handcrafted birdhouses. As a child, I remember spending countless afternoons watching her meticulously assemble them, humming a cheerful tune. The scent of sawdust and fresh paint always lingered in the air, mingling with the sweet fragrance of her roses. Each little house was unique, reflecting her playful spirit and boundless creativity. These aren’t edible birdhouses, but they invoke the same feelings of creativity and delight. Today, I’m excited to share a project that captures that same whimsical essence: creating birdhouses from wine corks.
Recipe Overview
- Prep Time: 30 minutes
- Total Time: 30 minutes
- Yields: 1 bird house
- Dietary Type: N/A (Craft Project)
Ingredients
- 30 Wine corks
- 6-18 inches Ribbon (raffia)
- Dried Spanish moss
- Dried herb like lavender or rosemary
- 6 Glue sticks (you may need more or less depends on how long the sticks are)
- Ribbon (Raffia, to make a bird nest)
- Hot glue gun
- Decorative birds, butterflies, or ladybugs (optional)
Equipment Needed
- Hot glue gun
Instructions
-
Begin by tying a bow with the raffia ribbon. Set aside.
-
Assemble the corks by size as best as you can. This will help to create sections that are relatively uniform in size, leading to a more balanced and visually appealing birdhouse.
-
Apply hot glue to the corks and adjust them while the glue is still warm and pliable to ensure an even and sturdy construction. Be cautious when handling hot glue to avoid burns.
-
This birdhouse is essentially glued together in six sections, which are then combined to form the final structure.
-
To create the base, glue four corks together, two side-by-side, and then the two pairs end-to-end to form a small square.
-
For the sides of the house, attach one row of four corks (glued side by side) to the right and left of the base.
-
The peak of the roof is formed by gluing two corks end-to-end.
-
The two roof tops are each made up of eight corks. To achieve this, create two rows of four corks glued side-by-side, and then glue the two rows together.
-
Assemble the house by starting with the base and attaching the right and left sides. Angle them slightly inward to create a house shape. Eye it carefully to ensure the angles are consistent.
-
Next, move to the top half. Glue the peak to the roof sides. Pay close attention to the pictures provided to understand how the sections should meet and align. This step is crucial for creating a structurally sound and visually appealing roof.
-
Adjust the corks as needed while the glue is still warm. This allows for fine-tuning the alignment and ensuring that all pieces fit together snugly.
-
Randomly place hot glue on any open spaces within the cork structure. This step serves a dual purpose: it strengthens the birdhouse and provides a surface for attaching decorative elements.
-
Top the glued areas with Spanish moss or dried herbs. The moss adds a natural, rustic look, while the herbs, such as lavender or rosemary, impart a delightful aroma.
-
Place a nest made from raffia ribbon inside the birdhouse and add decorative birds to the nest.
-
Adhere the raffia bow you made in step one on top of the birdhouse using hot glue. This adds a finishing touch and enhances the overall aesthetic appeal.
-
Exercise caution when using the hot glue gun to avoid burns.
Expert Tips & Tricks
- Corks of Varying Sizes: Don’t be afraid to use corks of slightly different lengths. This adds character and a more rustic feel. A little variance can actually enhance the birdhouse’s charm.
- Preheating the Glue Gun: Ensure your hot glue gun is fully preheated before starting. This ensures a smooth and consistent flow of glue, making the assembly process easier and more efficient.
- Reinforce Key Joints: For extra durability, apply a generous amount of hot glue to the joints where the sections of the birdhouse meet. This will help to create a stronger and more stable structure.
- Alternative Adhesives: While hot glue is recommended for its quick drying time, you can also experiment with other adhesives like wood glue for a more permanent bond. However, keep in mind that wood glue requires a longer drying time, so you’ll need to clamp the pieces together while it sets.
- Customizing the Moss and Herbs: Feel free to experiment with different types of moss and herbs to create a unique look and scent for your birdhouse. Consider using fragrant herbs like mint or chamomile in addition to lavender and rosemary.
Serving & Storage Suggestions
This isn’t a recipe that you eat! Once the birdhouse is assembled and decorated, find a suitable place to display it. It can be hung from a tree branch, placed on a garden post, or used as a decorative element on a patio or balcony. Since it’s made from durable materials like wine corks and hot glue, it can withstand outdoor conditions for extended periods. To keep it looking its best, periodically inspect it for any damage or loose pieces and make repairs as needed.
Nutritional Information
Not applicable for this craft project.
Variations & Substitutions
- Different Embellishments: Instead of Spanish moss, use other natural materials like twigs, small pebbles, or dried flowers to decorate your birdhouse.
- Paint or Stain: Add a coat of paint or stain to the corks before assembling the birdhouse to create a more colorful or polished look. Use non-toxic, outdoor-safe paints or stains to ensure the safety of the birds.
- Roofing Materials: Get creative with the roofing material by using small pieces of bark, wooden shingles, or even metal flashing to create a more realistic roof.
- Unique Shapes and Designs: Experiment with different shapes and sizes for your birdhouse. Try building a taller, more slender house or a wider, more squat one. You can also incorporate architectural details like windows, doors, or even a small porch.
FAQs (Frequently Asked Questions):
Q: Can I use synthetic corks for this project?
A: Yes, you can use synthetic corks if you don’t have enough natural wine corks. They will glue together just as well.
Q: Is it safe to leave the birdhouse outside year-round?
A: Yes, the materials used are durable enough to withstand most weather conditions. However, it’s a good idea to check it periodically for any damage and make repairs as needed.
Q: Can I use different types of glue instead of hot glue?
A: Yes, you can use other strong adhesives like wood glue or epoxy, but keep in mind that they may require a longer drying time.
Q: How can I attract birds to my cork birdhouse?
A: Place it in a quiet, sheltered location near trees or shrubs. You can also add birdseed or nesting materials to the inside of the house.
Q: Can children participate in this craft project?
A: Yes, but adult supervision is required, especially when using the hot glue gun.
Final Thoughts
Building these whimsical birdhouses is more than just a craft project; it’s an opportunity to unleash your creativity and add a touch of charm to your surroundings. Each birdhouse will be slightly different, reflecting your individual style and personality. Whether you choose to display them in your garden, on your patio, or even indoors, these cork creations are sure to bring a smile to your face and delight any visiting feathered friends. So gather your supplies, embrace your inner artist, and get ready to embark on a crafting adventure that’s as fun as it is rewarding. Don’t hesitate to experiment with different designs, materials, and embellishments to create a birdhouse that’s truly one-of-a-kind. Happy crafting!