
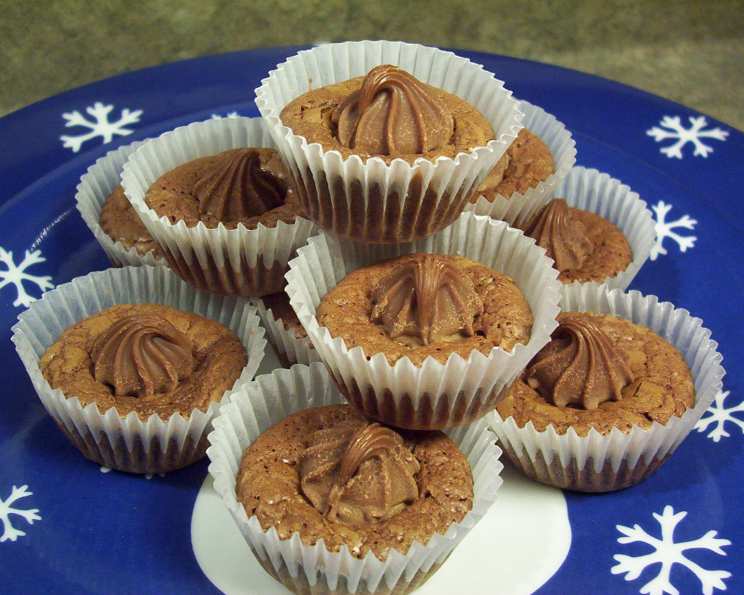
Bite-Sized Brownie Bliss: A Christmas Bake Exchange Favorite
The memory is as vivid as the scent of chocolate wafting from the oven. It was a bustling Christmas bake exchange, the kind where every table groaned under the weight of frosted cookies, elaborate cakes, and fudge squares. But nestled amongst the towering treats were these unassuming, perfect little bites of brownie heaven. I remember popping one into my mouth and instantly being transported back to childhood, to simpler times and the pure, unadulterated joy of chocolate. Ever since, these bite-sized brownies have been a holiday staple, a reminder of the warmth and generosity shared during that special season.
Recipe Overview
- Prep Time: 10 minutes
- Cook Time: 10-12 minutes
- Total Time: 18 minutes
- Servings: 24
- Yield: 24 brownies
- Dietary Type: Vegetarian
Ingredients
- ⅓ cup brown sugar
- 3 ounces semisweet chocolate
- ¼ cup butter
- ½ teaspoon vanilla
- 1 egg
- ⅓ cup flour
- 24 rosebud or Hershey chocolate kisses
Equipment Needed
- Mini muffin tin
- Measuring cups and spoons
- Mixing bowl
- Microwave-safe bowl or double boiler
- Spatula or spoon
Instructions
-
Begin by preparing your mini muffin tin. You can either grease it generously with butter or cooking spray, or line it with paper liners for easy removal. Preheat your oven to 350 degrees Fahrenheit (175 degrees Celsius). Ensuring the oven is properly preheated is crucial for even baking.
-
Now, let’s tackle the chocolate base. In a microwave-safe bowl (or a double boiler, if you prefer a more traditional approach), combine the brown sugar, butter, and semisweet chocolate. Melt the ingredients together until just melted and smooth. Be careful not to overheat the chocolate, as this can cause it to seize. If using a microwave, melt in 30-second intervals, stirring in between, to prevent burning.
-
Remove the melted chocolate mixture from the heat and let it cool for about 1 minute. This step is important to prevent the egg from cooking when you add it.
-
Once slightly cooled, blend in the vanilla extract and the egg. Make sure the egg is fully incorporated into the mixture. This will help create a smooth and even batter.
-
Gradually fold in the flour until just combined. Be careful not to overmix the batter, as this can result in tough brownies. Overmixing develops the gluten in the flour, leading to a less tender final product.
-
Pour the brownie mixture into the prepared mini muffin tins, filling each cup about two-thirds full. This will allow for some expansion during baking without overflowing.
-
Bake at 350 degrees Fahrenheit (175 degrees Celsius) for 10-12 minutes. The brownies are done when a toothpick inserted into the center comes out with moist crumbs attached. Be careful not to overbake, as this will result in dry brownies. Start checking for doneness at the 10-minute mark.
-
While the brownies are still warm, immediately place one chocolate kiss (either rosebud or Hershey’s) on top of each brownie, gently pressing it down into the soft surface. The residual heat will slightly melt the chocolate kiss, creating a deliciously gooey topping.
-
Let the brownies cool completely in the muffin tin before removing them. This will prevent them from breaking apart. If you used paper liners, simply lift them out. If you greased the tin, you may need to gently loosen the edges with a knife before removing the brownies.
Expert Tips & Tricks
- For an extra fudgy brownie, slightly underbake them by a minute or two. The center will be incredibly moist and decadent.
- If you’re using a convection oven, reduce the baking time by a minute or two and keep a close eye on them.
- To enhance the chocolate flavor, add a pinch of sea salt to the batter. The salt will complement the sweetness of the chocolate and create a more complex flavor profile.
- Don’t have chocolate kisses on hand? Feel free to use other small chocolate pieces, such as chocolate chips or even pieces from an advent calendar!
- For a richer flavor, use European-style butter, which has a higher fat content.
Serving & Storage Suggestions
These bite-sized brownies are perfect for serving at parties, potlucks, or as a sweet treat after dinner. Arrange them on a platter for an elegant presentation, or package them in small gift boxes for a thoughtful homemade gift.
To store, keep them in an airtight container at room temperature for up to 3 days. For longer storage, you can refrigerate them for up to a week or freeze them for up to 2 months. To freeze, wrap them individually in plastic wrap and then place them in a freezer-safe bag or container.
To reheat frozen brownies, simply thaw them at room temperature for about 30 minutes, or microwave them for a few seconds until warmed through.
Nutritional Information
Note: Nutritional information is an estimate and may vary based on specific ingredients and portion sizes.
| Nutrient | Amount per Serving | % Daily Value |
|---|---|---|
| Calories | 79 kcal | 4% |
| Total Fat | 5.3g | 8% |
| Saturated Fat | 3g | 15% |
| Cholesterol | 14.9mg | 4% |
| Sodium | 22.1mg | 0% |
| Total Carbohydrate | 8g | 2% |
| Dietary Fiber | 0.8g | 3% |
| Sugars | 5.3g | 21% |
| Protein | 1.3g | 2% |
Variations & Substitutions
- Gluten-Free Brownies: Substitute the all-purpose flour with a gluten-free flour blend. Ensure the blend contains xanthan gum or guar gum for binding.
- Dairy-Free Brownies: Replace the butter with a dairy-free butter alternative, such as coconut oil or vegan butter sticks. Make sure to choose a semisweet chocolate that is also dairy-free.
- Nutty Brownies: Add ¼ cup of chopped nuts, such as walnuts or pecans, to the batter for a crunchy texture and nutty flavor.
- Peppermint Brownies: Add ¼ teaspoon of peppermint extract to the batter and top the brownies with crushed peppermint candies after baking.
- Mocha Brownies: Add 1 teaspoon of instant espresso powder to the batter for a rich mocha flavor.
FAQs (Frequently Asked Questions)
Q: Can I use unsweetened chocolate instead of semisweet chocolate?
A: Yes, but you’ll need to increase the amount of brown sugar to compensate for the lack of sweetness in the chocolate. I’d recommend adding an extra tablespoon or two of brown sugar, and taste the batter to adjust to your preference.
Q: Can I make these brownies ahead of time?
A: Absolutely! These brownies are perfect for making ahead of time. Just store them in an airtight container at room temperature, in the refrigerator or freezer as mentioned in the Storage section.
Q: My brownies came out dry. What did I do wrong?
A: Overbaking is the most common cause of dry brownies. Be sure to start checking for doneness at the 10-minute mark and remove them from the oven when a toothpick inserted into the center comes out with moist crumbs attached.
Q: Can I use a different type of chocolate for the kisses on top?
A: Of course! Feel free to experiment with different types of chocolate kisses, such as dark chocolate, milk chocolate, or even caramel-filled kisses.
Q: My batter is too thick. What should I do?
A: If your batter is too thick, you can add a tablespoon or two of milk (or non-dairy milk) to thin it out. Be careful not to add too much, as this can make the brownies too cakey.
Final Thoughts
I encourage you to try this recipe for bite-sized brownies and experience the simple joy they bring. Whether you’re baking them for a holiday gathering, a special occasion, or just a sweet treat for yourself, I’m confident they’ll be a hit. Don’t be afraid to experiment with variations and substitutions to make them your own. And most importantly, have fun in the kitchen! Share your creations with friends and family, and let me know what you think. Consider pairing these delightful brownies with a scoop of vanilla ice cream or a warm cup of coffee for the perfect indulgence. Happy baking!