
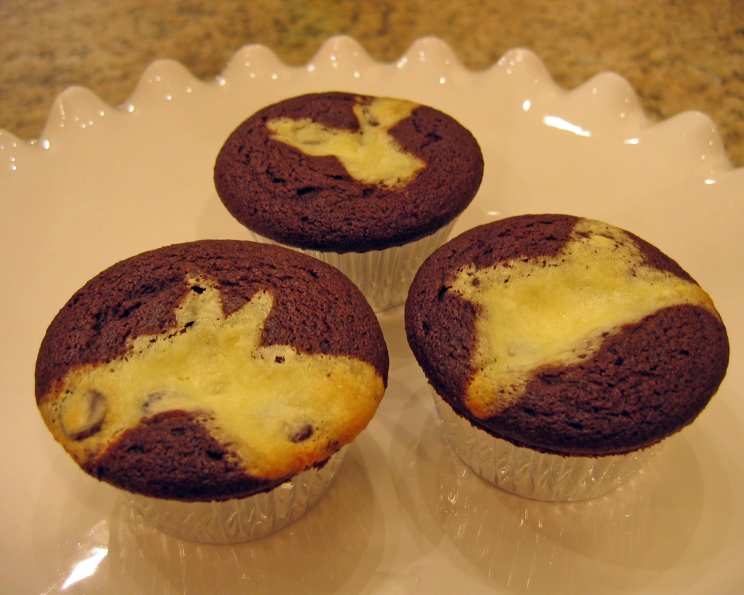
Black Bottom Cupcakes: A Sweet Nostalgia
The aroma of chocolate and cream cheese still takes me back to my grandmother’s kitchen. Every Sunday, a platter of these black bottom cupcakes would grace the table, their dark, fudgy bases peeking from beneath a creamy, sweet topping. It wasn’t just the taste, but the feeling of warmth and love that these simple treats evoked. They were a testament to her ability to transform everyday ingredients into something truly special, a tradition I’m honored to continue in my own kitchen.
Recipe Overview
- Prep Time: 20 minutes
- Cook Time: 20 minutes
- Total Time: 40 minutes
- Yields: 16 muffins
- Serves: 16
- Dietary Type: Vegetarian
Ingredients
For the Chocolate Cupcake Base:
- 1 ½ cups flour
- 1 teaspoon baking soda
- ½ teaspoon salt
- 1 cup sugar
- ¼ cup cocoa
- 1 cup water
- 1 teaspoon vanilla
- ½ cup vegetable oil
- 1 tablespoon vinegar
For the Cream Cheese Filling:
- 8 ounces cream cheese, softened
- 1 egg
- ½ cup sugar
- 1 cup chocolate chips
Equipment Needed
- Muffin tin
- Paper liners
- Mixing bowls
- Electric mixer (optional)
- Measuring cups and spoons
Instructions
-
Preheat your oven to 350°F (175°C). Line a muffin tin with paper liners. This prevents sticking and makes for easier cleanup.
-
In a large mixing bowl, stir together the dry ingredients for the cupcake base: flour, baking soda, salt, sugar, and cocoa. Ensure everything is well combined to prevent pockets of baking soda or cocoa in the finished cupcakes.
-
In a separate bowl, combine the wet ingredients: water, vanilla, vegetable oil, and vinegar. Whisk them together until they are emulsified. The vinegar reacts with the baking soda to create a light and airy texture.
-
Add the wet ingredients to the dry ingredients and mix well. Be careful not to overmix; just combine until the batter is smooth. Overmixing can lead to tough cupcakes.
-
Fill the paper-lined muffin cups halfway full with the chocolate batter. This leaves room for the cream cheese filling, which will expand slightly during baking.
-
In another mixing bowl, beat together the softened cream cheese, sugar, and egg until smooth and creamy. If using an electric mixer, start on low speed to prevent splattering, then increase to medium speed. Ensure the cream cheese is thoroughly softened for a lump-free filling.
-
Stir in the chocolate chips to the cream cheese mixture. You can use any type of chocolate chip you prefer – milk, dark, or semi-sweet all work well.
-
Drop a spoonful of the cream cheese filling into each muffin cup on top of the chocolate batter. Aim for an even distribution of the filling.
-
Bake at 350°F (175°C) for 20 minutes. A toothpick inserted into the chocolate portion of the cupcake should come out clean or with a few moist crumbs. The cream cheese filling should be set and slightly golden.
-
Let the cupcakes cool in the muffin tin for a few minutes before transferring them to a wire rack to cool completely. Cooling on a wire rack prevents the bottoms of the cupcakes from becoming soggy.
Expert Tips & Tricks
- Softened Cream Cheese is Key: Ensure your cream cheese is thoroughly softened to avoid lumps in the filling. Leaving it at room temperature for at least 30 minutes is ideal.
- Don’t Overmix: Overmixing the chocolate batter develops the gluten in the flour, resulting in a tougher cupcake. Mix just until the ingredients are combined.
- Room Temperature Ingredients: Using room temperature ingredients helps everything blend together more easily and creates a smoother batter.
- Adjust Baking Time: Ovens vary, so keep an eye on the cupcakes and adjust the baking time as needed. If the tops are browning too quickly, tent the muffin tin with foil.
- Make-Ahead Tip: You can prepare the chocolate batter and the cream cheese filling separately and store them in the refrigerator for up to 24 hours before baking. This is a great time-saver when entertaining.
- Level Up the Chocolate: For a richer chocolate flavor, add a teaspoon of instant espresso powder to the dry ingredients. This intensifies the cocoa flavor without adding a coffee taste.
- Preventing Sinkage: To prevent the cream cheese filling from sinking into the chocolate batter during baking, chill the batter for 15 minutes before adding the filling.
Serving & Storage Suggestions
Black bottom cupcakes are best served slightly warm or at room temperature. The contrast between the warm, fudgy base and the cool, creamy topping is simply divine. These cupcakes are also delicious with a scoop of vanilla ice cream or a dollop of whipped cream.
Storage: Store leftover cupcakes in an airtight container at room temperature for up to 2 days, or in the refrigerator for up to 5 days. For longer storage, you can freeze the cupcakes for up to 2 months. Thaw them in the refrigerator overnight before serving. Reheating is not necessary, but you can warm them in the microwave for a few seconds if desired.
Nutritional Information
| Nutrient | Amount per Serving | % Daily Value |
|---|---|---|
| Calories | 284.8 kcal | N/A |
| Calories from Fat | 138 g | 49% |
| Total Fat | 15.4 g | 23% |
| Saturated Fat | 5.6 g | 27% |
| Cholesterol | 27.2 mg | 9% |
| Sodium | 203.4 mg | 8% |
| Total Carbohydrate | 35.8 g | 11% |
| Dietary Fiber | 1.2 g | 4% |
| Sugars | 25 g | 99% |
| Protein | 3.1 g | 6% |
Note: Nutritional information is an estimate and can vary based on specific ingredients and portion sizes.
Variations & Substitutions
- Dairy-Free: Substitute the cream cheese with a dairy-free cream cheese alternative. Ensure it’s a brand that melts well and has a similar consistency to regular cream cheese.
- Gluten-Free: Use a gluten-free all-purpose flour blend in place of the regular flour. You may need to add a binder like xanthan gum to help with the texture.
- Chocolate Variation: Use different types of chocolate chips in the filling, such as white chocolate chips or peanut butter chips.
- Spiced Cupcakes: Add a pinch of cinnamon or nutmeg to the chocolate batter for a warm, spiced flavor.
- Nutty Delight: Add chopped nuts, such as walnuts or pecans, to the chocolate batter or sprinkle them on top of the cream cheese filling before baking.
- Vegan Black Bottom Cupcakes: This requires adapting both the cupcake and filling. Use a flax egg (1 tbsp ground flaxseed mixed with 3 tbsp water, left to sit for 5 minutes) to replace the egg in the filling. Substitute the cream cheese with a vegan cream cheese alternative. Ensure the chocolate chips are also vegan.
FAQs (Frequently Asked Questions)
Q: Why are my cupcakes sinking in the middle?
A: This can happen if the oven temperature is too high or if the batter is overmixed. Make sure your oven is at the correct temperature and avoid overmixing the batter.
Q: Can I use a different type of oil instead of vegetable oil?
A: Yes, you can use other neutral-tasting oils like canola oil or grapeseed oil. Avoid oils with strong flavors, such as olive oil, as they can affect the taste of the cupcakes.
Q: How do I know when the cupcakes are done?
A: A toothpick inserted into the chocolate portion of the cupcake should come out clean or with a few moist crumbs. The cream cheese filling should be set and slightly golden.
Q: Can I make these cupcakes without paper liners?
A: Yes, but you’ll need to grease and flour the muffin tin thoroughly to prevent the cupcakes from sticking. Paper liners are recommended for easier cleanup.
Q: What can I do if my cream cheese filling is too thin?
A: Make sure your cream cheese is cold before you begin beating it. Adding a tablespoon of flour or cornstarch to the filling can also help thicken it.
Final Thoughts
Black bottom cupcakes are more than just a dessert; they’re a little piece of happiness baked into a single bite. The combination of rich chocolate and creamy filling is a classic for a reason, and I hope this recipe inspires you to create your own cherished memories. Whether you’re baking for a special occasion or simply craving a sweet treat, these cupcakes are sure to bring a smile to your face. Don’t be afraid to experiment with variations and substitutions to make them your own. And most importantly, enjoy the process of creating something delicious and sharing it with those you love!