
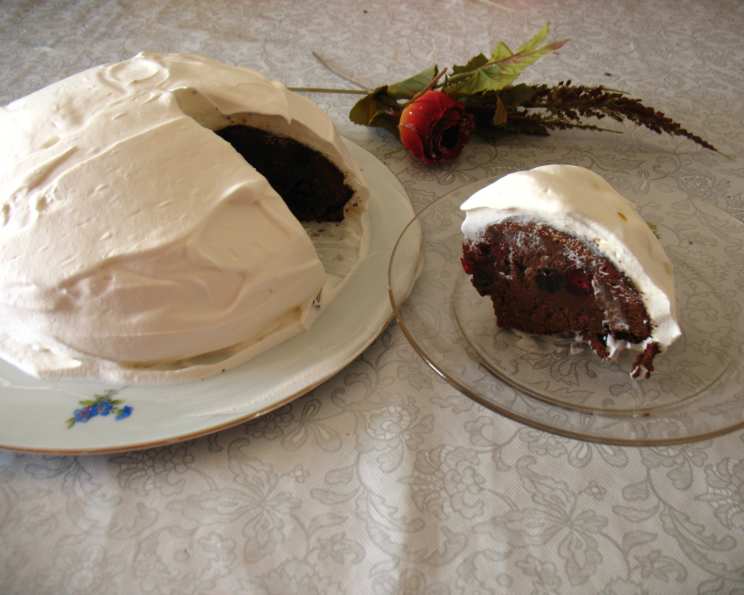
Black Forest Boule De Neige: A Snowy Delight
The scent of chocolate and cherries always transports me back to my grandmother’s kitchen. She wasn’t German, but she had a well-worn copy of a classic German baking book, and every winter, she’d attempt a Black Forest Cake. It was always a little lopsided, the whipped cream never quite perfect, but the taste? Oh, the taste was pure magic. This Black Forest Boule de Neige, a “snowball” cake, captures that same rich, decadent flavor in a slightly more forgiving, and undeniably charming, form.
Recipe Overview
- Prep Time: 45 minutes
- Cook Time: 1 hour 25 minutes
- Total Time: 2 hours 10 minutes
- Servings: 14
- Yield: 1 cake
- Dietary Type: Not Gluten-Free
Ingredients
For the Cake:
- Vegetable oil cooking spray
- 1/3 cup cherry preserves
- 2 tablespoons kirsch
- 1 1/2 cups dried tart cherries (about 8 ounces)
- 1 lb bittersweet chocolate or 1 lb semisweet chocolate, chopped (not unsweetened)
- 1 cup unsalted butter
- 1 1/4 cups sugar
- 1 teaspoon vanilla extract
- 6 large eggs
- 1/3 cup all-purpose flour
For the Kirsch Whipped Cream:
- 2 cups chilled whipping cream
- 1/4 cup powdered sugar
- 4 teaspoons kirsch
- 1/4 teaspoon almond extract
For Garnish:
- 16 candied violets, petals
Equipment Needed
- 10-cup metal bowl
- Foil
- Medium skillet
- Heavy large saucepan
- Whisk
- Electric mixer
- Large bowl
- Pastry bag fitted with a medium star tip
- Cooling rack
Instructions
- Prepare the Oven and Bowl: Position a rack in the lowest third of your oven and preheat to 350°F (175°C). Line a 10-cup metal bowl with foil, allowing it to extend about 3 inches over the sides. This overhang will be crucial later on. Generously spray the foil with vegetable oil cooking spray.
- Infuse the Cherries: In a medium skillet set over medium heat, stir together the cherry preserves and kirsch. Heat until the preserves melt into a smooth, glossy sauce. Add the dried tart cherries to the skillet, bring the mixture to a boil, then cover and remove from the heat. Allow this to cool completely; this step helps plump the cherries and infuse them with flavor.
- Melt the Chocolate and Butter: In a heavy large saucepan set over medium-low heat, combine the chopped bittersweet or semisweet chocolate (remember, not unsweetened) and unsalted butter. Stir constantly until the chocolate and butter are completely melted and smooth. Remove the saucepan from the heat.
- Incorporate the Sugar and Eggs: Whisk the sugar and vanilla extract into the melted chocolate mixture. Then, whisk in the eggs one at a time, ensuring each egg is fully incorporated before adding the next. This will help create a smooth and emulsified batter.
- Combine Wet and Dry Ingredients: Mix in the all-purpose flour until just combined, being careful not to overmix. Gently fold in the cooled cherry mixture. The batter will be rich, dark, and studded with juicy cherries.
- Bake the Cake: Transfer the batter to the prepared bowl. Bake the cake in the preheated oven for 30 minutes. After 30 minutes, carefully fold the foil overhang over the edges of the cake to prevent it from overbrowning.
- Continue Baking: Continue baking the cake until the top is cracked and dry, and a tester inserted into the center comes out with some moist batter attached. This usually takes about 55 minutes longer, for a total baking time of approximately 1 hour 25 minutes. Be patient; a longer, slower bake is key to a moist and fudgy center.
- Cool the Cake: Cool the cake completely in the bowl on a wire rack. Don’t worry if the center of the cake falls slightly; this is perfectly normal for this type of cake. Once cooled, press the edge of the cake firmly to level it with the center.
- Chill Overnight: Cover the bowl tightly and let the cake stand at room temperature overnight. This allows the flavors to meld and the cake to fully set.
- Prepare the Whipped Cream: In a large bowl, use an electric mixer to beat the chilled whipping cream, powdered sugar, kirsch, and almond extract until stiff peaks form. Be careful not to overwhip, or the cream will turn grainy.
- Assemble the Boule de Neige: Invert the cake onto a serving platter. Carefully peel off the foil. Spoon the kirsch whipped cream into a large pastry bag fitted with a medium star tip.
- Decorate: Pipe whipped cream stars all over the cake, covering it completely. Pipe additional stars over the top flat center of the cake to form a dome, resembling a snowball.
- Garnish and Chill: Decorate with candied violets. The cake can be made one day ahead; cover with a cake dome or loosely with plastic wrap and chill until serving.
Expert Tips & Tricks
- Chocolate Choice: Using high-quality chocolate is crucial for the best flavor. Look for chocolate with a cocoa percentage of at least 60%.
- Cherry Quality: Use good quality dried cherries. If they seem very dry, plump them up by soaking them in warm kirsch for 30 minutes before adding them to the preserves.
- Preventing a Soggy Bottom: Ensure the foil is tightly pressed against the bowl to prevent any batter from seeping underneath.
- Whipped Cream Stability: For extra stable whipped cream, add a tablespoon of mascarpone cheese to the mixture. This will help it hold its shape for longer.
Serving & Storage Suggestions
Serve the Black Forest Boule de Neige chilled. The contrast between the rich, fudgy cake and the light, airy whipped cream is delightful. Store any leftovers in an airtight container in the refrigerator for up to 3 days. The whipped cream may soften slightly over time. Freezing is not recommended, as it will alter the texture of both the cake and the whipped cream.
Nutritional Information
| Nutrient | Amount per Serving | % Daily Value |
|---|---|---|
| Calories | 383.9 kcal | N/A |
| Calories from Fat | 251 kcal | N/A |
| Total Fat | 27.9 g | 43% |
| Saturated Fat | 16.8 g | 84% |
| Cholesterol | 172.1 mg | 57% |
| Sodium | 47.8 mg | 1% |
| Total Carbohydrate | 30.7 g | 10% |
| Dietary Fiber | 0.4 g | 1% |
| Sugars | 25.3 g | N/A |
| Protein | 4 g | 8% |
Note: % Daily Value is based on a 2000 calorie diet. Values may vary.
Variations & Substitutions
- Gluten-Free: Substitute the all-purpose flour with a gluten-free flour blend. Ensure the blend contains xanthan gum or another binding agent.
- Dairy-Free: Replace the unsalted butter with a plant-based butter alternative and use a dairy-free whipping cream alternative (such as coconut cream or almond-based whipping cream).
- Alcohol-Free: Substitute the kirsch with cherry juice or cherry extract. You may need to reduce the liquid slightly to maintain the batter consistency.
- Nut-Free: Omit the almond extract from the whipped cream or replace it with vanilla extract.
- Seasonal: Top with fresh cherries in summer.
FAQs (Frequently Asked Questions)
Q: Can I use fresh cherries instead of dried cherries?
A: While you can, dried cherries are recommended for their concentrated flavor and chewy texture. Fresh cherries will release more moisture and may affect the cake’s consistency. If using fresh, pit and halve them, and reduce the liquid in the preserves mixture accordingly.
Q: My cake sank in the middle. Is this normal?
A: Yes, a slight sinking in the center is common for this type of cake, due to its moist and fudgy texture. This is why the instructions advise pressing the edges to level it out.
Q: Can I use a different size bowl?
A: A 10-cup bowl is ideal for this recipe. A smaller bowl might cause the batter to overflow, while a larger bowl could result in a thinner cake.
Q: How do I know when the cake is done?
A: The cake is done when the top is cracked and dry, and a tester inserted into the center comes out with some moist batter attached. It should not be completely clean, as this would indicate the cake is overbaked.
Q: Can I make the whipped cream ahead of time?
A: Yes, you can make the whipped cream a few hours in advance and store it in the refrigerator. However, it’s best to whip it just before assembling the cake to ensure it’s at its freshest and most stable.
Final Thoughts
This Black Forest Boule de Neige is more than just a cake; it’s a celebration of flavor, a nod to tradition, and a comforting hug in every bite. Don’t be intimidated by the multiple steps; each one contributes to the incredible depth and richness of this dessert. I encourage you to give it a try, share it with loved ones, and create your own cherished memories around this snowy delight. Pair it with a glass of chilled dessert wine or a steaming cup of coffee for the perfect ending to any meal. Happy baking!