
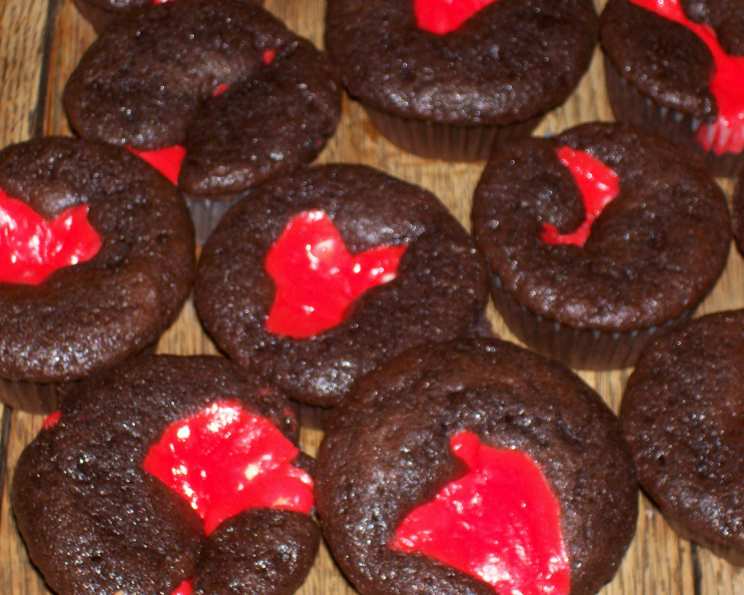
Bleeding Cupcakes: A Spooky Sweet Treat
I’ll never forget my first Halloween baking session with my grandmother. The house was filled with the aroma of pumpkin spice and chocolate, and we were on a mission to create the spookiest treats imaginable. While we made ghostly cookies and spiderweb cupcakes, it was the “bleeding” cupcakes that truly captured our imaginations. The look of surprise and delight on my younger brother’s face when he bit into one, and a cascade of “blood” oozed out, is a memory I cherish every year when October rolls around. These cupcakes are more than just a dessert; they’re a conversation starter, a guaranteed crowd-pleaser, and a whole lot of fun.
Recipe Overview
- Prep Time: 45 minutes
- Cook Time: As directed by cake mix
- Total Time: Varies (see instructions)
- Servings: 18-24 (depending on cake mix)
- Yield: 18-24 cupcakes
- Dietary Type: Varies depending on cake mix ingredients
Ingredients
- 1 egg
- 8 ounces cream cheese, softened
- 1/3 cup sugar
- Red food coloring
- 6 ounces white chocolate baking squares, chunks
- 1 (18 1/4 ounce) cake mix (flavor of your choice)
- 3 eggs (or as directed by cake mix)
- 1/3 cup oil (or as directed by cake mix)
- 1 1/4 cups water (or as directed by cake mix)
Equipment Needed
- Muffin tin
- Foil or paper liners
- Medium bowl
- Mixer (hand or stand)
- Spoons or small ice cream scoop
- Oven
Instructions
-
Preheat your oven to the temperature specified on your chosen cake mix box. This is crucial for even baking and proper cupcake rise.
-
Line your muffin tin with foil or paper liners. Liners prevent the cupcakes from sticking and make for easy removal.
-
In a medium bowl, beat the egg until light and frothy. This helps create a smooth and creamy filling.
-
Add the softened cream cheese to the bowl and mix until completely smooth. Ensure the cream cheese is properly softened to avoid any lumps in the filling.
-
Add the sugar to the cream cheese mixture and mix until smooth and well combined.
-
Now for the “bleeding” effect! Add the red food coloring to the cream cheese mixture, a few drops at a time, until you reach the desired color. Remember to make the color several shades darker than your desired end result, as the color will lighten slightly during baking. A gel food coloring will provide a more intense color with less liquid.
-
Fold in the white chocolate chunks. Ensure they are evenly distributed throughout the filling. The white chocolate adds a touch of sweetness and a pleasant textural contrast.
-
Prepare the cupcake batter according to the instructions on your cake mix box. Typically, this involves combining the cake mix, eggs, oil, and water in a large bowl and mixing until smooth.
-
Fill the prepared cupcake liners approximately 2/3 full with the cake batter. This leaves enough room for the filling and prevents the cupcakes from overflowing during baking.
-
Using a spoon or small ice cream scoop, place about 1 1/2 teaspoonful of the cream cheese filling in the center of each cupcake. Be sure to gently press the filling down into the batter slightly. This helps to create the “bleeding” effect when bitten into.
-
Bake the cupcakes according to the time and temperature instructions on the cake mix box. Baking times can vary depending on your oven, so keep a close eye on them.
-
Cool the cupcakes completely on a wire rack before frosting, as directed on the cake mix box. This prevents the frosting from melting and allows the cupcakes to set properly.
-
Frost as directed on the cake mix box, or with your favorite frosting. A simple buttercream or cream cheese frosting works well. Consider using a white or light-colored frosting to create a stark contrast with the “bleeding” center.
Expert Tips & Tricks
- Softened Cream Cheese is Key: Ensure your cream cheese is fully softened before mixing. Cold cream cheese will result in a lumpy filling.
- Gel Food Coloring: Use gel food coloring for a more vibrant and concentrated color without adding extra liquid to the filling.
- Don’t Overbake: Overbaking the cupcakes can make them dry. Check for doneness by inserting a toothpick into the center; it should come out clean or with a few moist crumbs attached.
- Customize the Flavor: Experiment with different cake mix flavors. Chocolate, red velvet, or even lemon would all be delicious.
- Enhance the “Bleeding” Effect: For an extra dramatic effect, consider adding a small amount of corn syrup to the red food coloring before mixing it into the cream cheese filling. This will give the “blood” a slightly glossy and realistic appearance.
Serving & Storage Suggestions
Serve these cupcakes chilled or at room temperature. They’re perfect for Halloween parties, spooky movie nights, or any occasion that calls for a touch of frightful fun.
Store the unfrosted cupcakes in an airtight container at room temperature for up to 2 days or in the refrigerator for up to 5 days. Frosted cupcakes should be stored in the refrigerator due to the cream cheese filling. They are best consumed within 3 days to maintain optimal freshness and flavor.
To freeze the cupcakes, wrap them individually in plastic wrap and then place them in a freezer-safe bag or container. They can be frozen for up to 2 months. Thaw them in the refrigerator overnight before serving.
Nutritional Information
Note: Nutritional information is an estimate and may vary depending on the specific ingredients used.
| Nutrient | Amount per Serving | % Daily Value |
|---|---|---|
| Calories | 350 kcal | 18% |
| Total Fat | 18g | 28% |
| Saturated Fat | 9g | 45% |
| Cholesterol | 70mg | 23% |
| Sodium | 300mg | 13% |
| Total Carbohydrate | 45g | 15% |
| Dietary Fiber | 1g | 4% |
| Sugars | 30g | N/A |
| Protein | 4g | 8% |
Variations & Substitutions
- Vegan “Bleeding” Cupcakes: Use a vegan cake mix and substitute the egg in the cream cheese filling with a flax egg (1 tablespoon ground flaxseed mixed with 3 tablespoons water, let sit for 5 minutes). Use vegan cream cheese and white chocolate.
- Gluten-Free: Use a gluten-free cake mix. Ensure all other ingredients are also gluten-free.
- Chocolate Lovers: Use a chocolate cake mix and add chocolate chips to the batter.
- Berry Filling: Substitute half of the cream cheese with mashed raspberries or strawberries for a fruity twist.
- Spiced Cupcakes: Add a teaspoon of cinnamon, nutmeg, or allspice to the cake batter for a warm, comforting flavor.
FAQs (Frequently Asked Questions)
Q: Can I make these cupcakes ahead of time?
A: Yes, you can bake the cupcakes a day ahead and store them in an airtight container at room temperature. The cream cheese filling can also be made a day ahead and stored in the refrigerator. Assemble the cupcakes just before serving.
Q: Why is my filling sinking to the bottom of the cupcake?
A: This can happen if the batter is too thin or the filling is too heavy. Make sure to use the correct amount of liquid in your cake batter and gently press the filling into the batter. Chilling the filling slightly before adding it to the cupcakes can also help.
Q: Can I use a different type of chocolate in the filling?
A: Yes, you can substitute milk chocolate or dark chocolate for the white chocolate, but keep in mind that it will alter the flavor and color of the filling.
Q: How do I prevent the red food coloring from bleeding into the cupcake batter?
A: Gently place the filling in the center of the batter, being careful not to mix it in. Using a thicker cake batter can also help prevent the color from bleeding.
Q: What’s the best way to store leftover cupcakes?
A: Store leftover cupcakes in an airtight container in the refrigerator. They are best consumed within 3 days to maintain optimal freshness and flavor.
Final Thoughts
Now it’s your turn to create these spooktacular “Bleeding” Cupcakes and bring a chillingly delightful surprise to your next Halloween gathering. Don’t be afraid to experiment with different cake mix flavors and fillings to create your own unique version. I encourage you to share your creations and feedback with me; I’d love to hear how they turned out! And why not pair these with a witch’s brew punch or some ghostly meringues for a truly unforgettable Halloween feast? Happy baking, and happy haunting!