
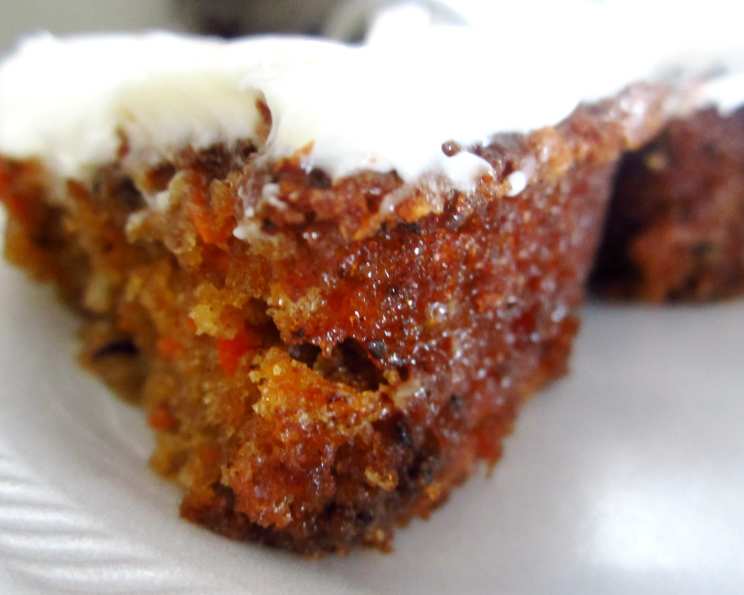
Blue Ribbon Carrot Cake [with Buttermilk Glaze]
My grandmother, Nana Elsie, had a carrot cake that was legendary. It wasn’t just the moist, spiced crumb or the tangy cream cheese frosting; it was the way the whole house smelled while it baked – a warm hug of cinnamon, carrots, and something undeniably comforting. Every year, for her birthday, or really any excuse we could find, someone would request Nana Elsie’s carrot cake. This recipe reminds me so much of her beloved cake. The buttermilk glaze, instead of her traditional frosting, adds an incredible sweetness.
Recipe Overview
- Prep Time: 30 minutes
- Cook Time: 45-55 minutes
- Total Time: 1 hour 15 minutes + cooling & chilling time
- Servings: 20-24
- Yield: One 9×13 inch cake or two 9-inch cakes
- Dietary Type: Not specified
Ingredients
Buttermilk Glaze:
- 1 cup granulated sugar
- ½ teaspoon baking soda
- ½ cup buttermilk
- ¼ cup (½ stick) butter
- 1 tablespoon light corn syrup
- 1 teaspoon vanilla extract
Cake:
- 2 cups all-purpose flour
- 2 teaspoons baking soda
- 2 teaspoons cinnamon
- ½ teaspoon salt
- 3 eggs
- ¾ cup vegetable oil
- ¾ cup buttermilk
- 2 cups granulated sugar
- 2 teaspoons vanilla extract
- 1 (8 ounce) can crushed pineapple, drained
- 2 cups grated carrots
- 3 ½ ounces shredded coconut
- 1 cup seedless raisins
- 1 cup coarsely chopped walnuts
Frosting:
- ¼ cup (½ stick) butter, softened
- 1 (8 ounce) package cream cheese, room temperature
- 1 teaspoon vanilla extract
- 2 cups powdered sugar
- 1 teaspoon freshly squeezed orange juice
- 1 teaspoon grated orange peel
Equipment Needed
- Small saucepan
- 9×13 inch baking dish or two 9-inch cake pans
- Large mixing bowl
- Electric mixer
- Sifter
- Measuring cups and spoons
- Rubber spatula or wooden spoon
- Toothpick
- Cooling rack
Instructions
- Prepare the Buttermilk Glaze: In a small saucepan over high heat, combine granulated sugar, baking soda, buttermilk, butter, and corn syrup.
- Bring to a Boil: Bring the mixture to a boil.
- Cook: Cook for 5 minutes, stirring occasionally to prevent scorching.
- Add Vanilla: Remove the saucepan from the heat and stir in the vanilla extract. Set aside until the cake is baked. The glaze needs to cool slightly to thicken, but should still be pourable when the cake comes out of the oven.
- Preheat the Oven: Preheat oven to 350°F (175°C).
- Prepare the Baking Dish(es): Generously grease a 9×13 inch baking dish or two 9-inch cake pans. This step is crucial to prevent sticking. You can also dust the greased pan with flour for extra insurance.
- Sift Dry Ingredients: Sift together the flour, baking soda, cinnamon, and salt in a medium bowl. Sifting ensures a light and airy cake. Set aside.
- Combine Wet Ingredients: In a large bowl, beat the eggs.
- Add Remaining Wet Ingredients: Add the vegetable oil, buttermilk, sugar, and vanilla to the eggs and mix well until combined.
- Incorporate Dry and Wet Ingredients: Add the sifted flour mixture to the wet ingredients. Mix until just combined, being careful not to overmix. Overmixing can lead to a tough cake.
- Add Fruits and Nuts: Gently fold in the drained crushed pineapple, grated carrots, shredded coconut, raisins, and walnuts. Ensure that all ingredients are evenly distributed throughout the batter.
- Pour into Pan: Pour the batter into the prepared baking dish or cake pans.
- Bake: Bake for 45-55 minutes, or until a toothpick inserted into the center comes out clean. Start checking for doneness around 45 minutes; oven temperatures can vary.
- Glaze the Cake: Remove the cake from the oven and immediately and slowly pour the buttermilk glaze evenly over the hot cake. The heat of the cake will help the glaze soak in.
- Cool: Cool the cake in the pan until the buttermilk glaze is totally absorbed, about 15 minutes.
- Prepare the Frosting: In a large bowl, cream together the softened butter and cream cheese until light and fluffy. An electric mixer works best for this step.
- Add Flavorings: Add the vanilla, powdered sugar, orange juice, and orange peel to the creamed mixture.
- Mix Until Smooth: Mix until the frosting is smooth and creamy. If the frosting seems too thick, add a tiny splash of milk or orange juice. If it’s too thin, add a bit more powdered sugar.
- Frost the Cake: Once the cake has cooled completely, frost the top with the cream cheese frosting.
- Chill: Refrigerate the frosted cake until the frosting is set, about 30 minutes to an hour.
- Serve: Serve the cake chilled.
Expert Tips & Tricks
- Toast the Nuts: Toasting the walnuts before adding them to the batter enhances their flavor and adds a pleasant crunch.
- Grate Your Own Carrots: While pre-shredded carrots are convenient, freshly grated carrots provide a better texture and moisture.
- Don’t Overbake: Overbaking can result in a dry cake. Start checking for doneness around 45 minutes and err on the side of slightly underbaked. The cake will continue to cook slightly as it cools.
- Room Temperature Ingredients: Using room temperature butter and cream cheese ensures a smooth and lump-free frosting.
- Make Ahead: The cake layers can be baked a day ahead, cooled completely, and wrapped tightly in plastic wrap. The frosting can also be made ahead and stored in the refrigerator. Bring the frosting to room temperature before frosting the cake.
Serving & Storage Suggestions
Serve the Blue Ribbon Carrot Cake chilled for the best flavor and texture. A dusting of cinnamon or a sprinkle of chopped walnuts can add an elegant touch to the presentation.
Storage:
- Room Temperature: The cake can be stored at room temperature for up to 2 days in an airtight container.
- Refrigerator: For longer storage, keep the cake refrigerated for up to 5 days.
- Freezer: The cake can be frozen for up to 3 months. Wrap individual slices tightly in plastic wrap and then place them in a freezer-safe bag or container. Thaw in the refrigerator before serving.
Nutritional Information
Nutritional information is an estimate and can vary based on specific ingredients and portion sizes.
| Nutrient | Amount per Serving | % Daily Value |
|---|---|---|
| Calories | 480 kcal | 24% |
| Total Fat | 23g | 35% |
| Saturated Fat | 8g | 42% |
| Cholesterol | 53mg | 17% |
| Sodium | 344mg | 14% |
| Total Carbohydrate | 66g | 21% |
| Dietary Fiber | 2g | 7% |
| Sugars | 52g | 208% |
| Protein | 5g | 9% |
Variations & Substitutions
- Gluten-Free: Substitute the all-purpose flour with a gluten-free blend. Be sure to add a binder like xanthan gum to mimic the texture of gluten.
- Dairy-Free: Replace the butter with a plant-based alternative and use non-dairy cream cheese. Substitute the buttermilk with a mixture of plant-based milk and a tablespoon of lemon juice or vinegar.
- Spice It Up: Add a pinch of ground cloves, nutmeg, or ginger to the batter for a warmer, more complex flavor profile.
- Add Other Fruits: Dried cranberries, chopped dates, or candied ginger can be added along with the raisins for an extra layer of flavor and texture.
FAQs (Frequently Asked Questions)
Q: Can I use pre-shredded carrots?
A: While you can use pre-shredded carrots, freshly grated carrots provide a moister and more flavorful cake.
Q: Can I skip the walnuts?
A: Yes, if you have a nut allergy or simply don’t like walnuts, you can omit them or substitute with another type of nut like pecans.
Q: How do I prevent the cake from sticking to the pan?
A: Generously grease the pan with butter or cooking spray, and then dust it with flour. This creates a barrier that prevents the cake from sticking.
Q: Can I make this cake into cupcakes?
A: Yes, you can bake the batter in cupcake liners for about 20-25 minutes, or until a toothpick inserted into the center comes out clean. Adjust the baking time accordingly.
Q: Why is the glaze so thin?
A: The glaze should thicken slightly as it cools. If it’s too thin, you can simmer it for a minute or two longer on low heat, stirring constantly. Be careful not to burn it.
Final Thoughts
This Blue Ribbon Carrot Cake is more than just a dessert; it’s a celebration of flavors and textures, a trip down memory lane, and a promise of sweet moments shared with loved ones. Whether you’re a seasoned baker or just starting out, I encourage you to give this recipe a try. Don’t be afraid to make it your own by adding your personal touch. I’d love to hear your thoughts and see your creations! This cake pairs beautifully with a cup of freshly brewed coffee or a glass of chilled milk. Happy baking!