
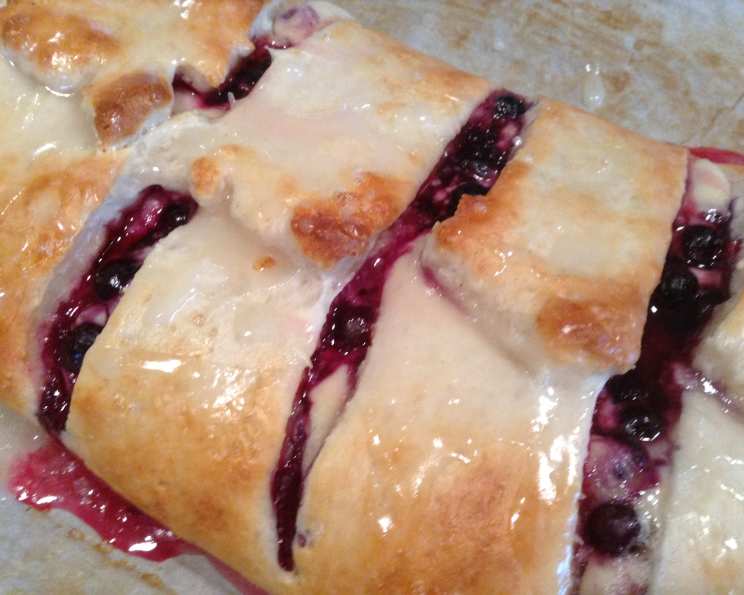
Blueberry Cheese Danish: A Taste of Summer Morning
I remember the first time I tasted a truly exceptional blueberry cheese danish. It was at a small bakery tucked away on a side street during a summer trip to Copenhagen. The buttery, flaky pastry, the tangy cream cheese filling, and the burst of sweet blueberries created a symphony of flavors that danced on my tongue. The memory of that perfect pastry, enjoyed with a strong cup of coffee in the warm morning sun, has stayed with me ever since, inspiring me to recreate that magic in my own kitchen.
Recipe Overview
- Prep Time: 45 minutes
- Cook Time: 20-22 minutes
- Total Time: 1 hour 5 minutes (including chilling)
- Servings: 10
- Yield: 1 large danish
- Dietary Type: Not specified (contains dairy and gluten)
Ingredients
For the Dough:
- ¾ cup 1% fat cottage cheese
- ⅓ cup sugar
- ⅓ cup 1% low-fat milk
- ¼ cup canola oil
- 1 teaspoon vanilla extract
- 2 cups all-purpose flour
- 2 teaspoons baking powder
- ½ teaspoon salt
For the Filling:
- 4 ounces reduced-fat cream cheese
- ¼ cup sugar
- 1 egg, separated
- 1 teaspoon lemon peel, grated
- 1 teaspoon vanilla extract
- 1 cup blueberries (fresh or frozen – do not thaw if frozen)
- 1 tablespoon water
For the Glaze:
- ½ cup confectioners’ sugar
- 2 teaspoons lemon juice
Equipment Needed
- Blender or food processor
- Mixing bowls
- Rolling pin
- Parchment paper
- Baking sheet
- Wire rack
Instructions
- Begin by preparing the dough. In a blender or food processor, process the cottage cheese until completely smooth. This is key to achieving the right texture for the dough.
- Add the sugar, milk, oil, and vanilla to the blended cottage cheese. Continue processing until the mixture is uniform and smooth.
- In a separate bowl, whisk together the flour, baking powder, and salt. This ensures the leavening agent is evenly distributed.
- Slowly add the dry ingredients to the wet ingredients in the blender or food processor. Process until a dough forms. Note that the dough will be sticky – this is perfectly normal.
- Turn the dough out onto a lightly floured surface. Knead the dough gently, about 4-5 times, just enough to bring it together. Avoid over-kneading, as this can make the dough tough.
- Place the dough in a bowl, cover it with plastic wrap or a clean kitchen towel, and refrigerate for 30 minutes. This chilling period is crucial for relaxing the gluten in the dough, making it easier to roll out and preventing it from shrinking excessively during baking.
- While the dough is chilling, prepare the filling. In a mixing bowl, beat the cream cheese and sugar together until light and fluffy. This incorporates air into the filling, resulting in a more tender texture.
- Add the egg yolk, lemon peel, and vanilla extract to the cream cheese mixture. Mix well until everything is fully incorporated and the filling is smooth.
- Once the dough has chilled, place it onto a 17″ x 13″ piece of parchment paper. Lightly flour the dough if it’s still too sticky.
- Roll the dough out with a rolling pin into a 16″ x 12″ rectangle. Aim for a consistent thickness to ensure even baking.
- Transfer the dough (along with the parchment paper) to a baking sheet.
- Spread the cream cheese mixture lengthwise down the center of the dough, creating a strip that is approximately 3 ½ inches wide.
- Sprinkle the blueberries evenly over the cream cheese filling. If using frozen blueberries, do NOT thaw them first, as this can make the dough soggy.
- On each long side of the dough, cut 1-inch-wide strips at an angle, cutting across to the berry filling. These strips will form the braided pattern of the danish.
- Pinch the ends of the dough to seal and tuck them under, creating a neat and presentable shape.
- In a small bowl, beat the egg white with the water to create an egg wash. Brush the egg wash evenly over the dough. This will give the danish a beautiful golden-brown color and a slightly glossy finish.
- Bake the danish in a preheated oven at 400 degrees F (200 degrees C) for 20-22 minutes, or until golden brown. Keep a close eye on the danish during baking, as ovens can vary.
- Remove the baked danish from the oven and transfer it to a wire rack to cool slightly.
- While the danish is cooling, prepare the glaze. In a small bowl, combine the confectioners’ sugar and lemon juice. Whisk until smooth. Add a tiny bit more lemon juice or water if needed to reach your desired consistency.
- Drizzle the glaze evenly over the warm pastry. The warmth of the pastry will help the glaze set slightly.
Expert Tips & Tricks
- For a richer flavor, use full-fat cream cheese instead of reduced-fat.
- To prevent the bottom crust from becoming soggy, preheat the baking sheet in the oven before placing the danish on it.
- If your blueberries are very juicy, toss them with a tablespoon of cornstarch before sprinkling them over the cream cheese filling. This will help absorb excess moisture and prevent the danish from becoming soggy.
- Don’t be afraid to experiment with other fruit fillings! Raspberries, strawberries, or even a mix of berries would be delicious.
- For a nuttier flavor, sprinkle some chopped almonds or pecans over the danish before baking.
Serving & Storage Suggestions
Serve the blueberry cheese danish warm or at room temperature. It’s delicious on its own or with a scoop of vanilla ice cream. Leftovers can be stored in an airtight container at room temperature for up to 2 days or in the refrigerator for up to 4 days. To reheat, warm individual slices in the microwave for a few seconds or in a low oven until heated through. The danish can also be frozen for longer storage. Wrap it tightly in plastic wrap and then in foil. Thaw overnight in the refrigerator before reheating.
Nutritional Information
| Nutrient | Amount per Serving | % Daily Value |
|---|---|---|
| Calories | 264.9 kcal | N/A |
| Calories from Fat | 73 g | 28% |
| Total Fat | 8.2 g | 12% |
| Saturated Fat | 1.8 g | 8% |
| Cholesterol | 25.8 mg | 8% |
| Sodium | 322.7 mg | 13% |
| Total Carbohydrate | 41.1 g | 13% |
| Dietary Fiber | 1.1 g | 4% |
| Sugars | 20.8 g | 83% |
| Protein | 6.6 g | 13% |
Variations & Substitutions
- Gluten-Free: Substitute the all-purpose flour with a gluten-free blend. You may need to add a binder like xanthan gum for better structure.
- Dairy-Free: Replace the cottage cheese, milk, and cream cheese with their dairy-free alternatives (e.g., cashew cream cheese, almond milk). Be aware that these substitutions may affect the texture and flavor of the final product.
- Lemon Variation: Increase the amount of lemon peel in the filling for an even more pronounced citrus flavor.
- Seasonal Fruit: Use other seasonal fruits, such as peaches, plums, or apples, in place of the blueberries. Adjust the sugar content accordingly.
FAQs (Frequently Asked Questions)
Q: Can I use frozen blueberries?
A: Yes, you can use frozen blueberries. However, do not thaw them before using, as this will make the dough soggy.
Q: Can I make the dough ahead of time?
A: Absolutely! The dough can be made up to 24 hours in advance and stored in the refrigerator. Just make sure to wrap it tightly to prevent it from drying out.
Q: My dough is too sticky. What should I do?
A: Add a little more flour, one tablespoon at a time, until the dough is easier to handle. Be careful not to add too much flour, as this can make the dough tough.
Q: How do I know when the danish is done?
A: The danish is done when it is golden brown and the filling is set. You can also insert a toothpick into the center of the filling to check for doneness. If the toothpick comes out clean, the danish is ready.
Q: Can I freeze the baked danish?
A: Yes, you can freeze the baked danish. Wrap it tightly in plastic wrap and then in foil. Thaw overnight in the refrigerator before reheating.
Final Thoughts
I truly hope you try this Blueberry Cheese Danish recipe! It’s a delightful way to start the day or enjoy as a special treat. Feel free to experiment with different fillings and variations to create your own signature danish. And most importantly, don’t be afraid to have fun in the kitchen! Share your creations with friends and family, and let me know how it turns out. This danish pairs perfectly with a strong cup of coffee or a glass of cold milk. Happy baking!