
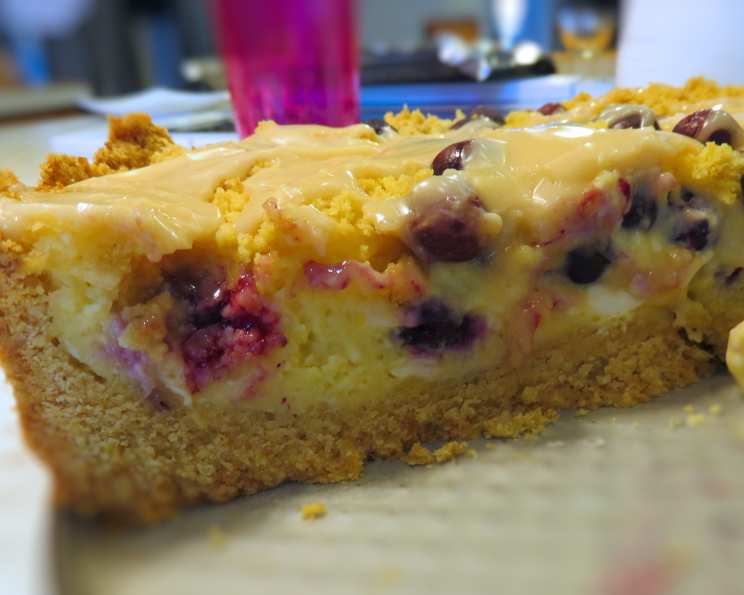
Blueberry Cheesecake Crumb Cake: A Slice of Heaven
I’ll never forget the first time I tasted a truly exceptional crumb cake. It was at a local bakery, a tiny place overflowing with the aroma of butter and sugar. The baker, a sweet older woman named Agnes, handed me a warm slice, and as the buttery crumbs melted on my tongue, I was transported. Since then, I’ve been obsessed with perfecting the art of crumb cake, always looking for ways to elevate it. This Blueberry Cheesecake Crumb Cake is my proudest creation, a delightful combination of textures and flavors that evokes those same feelings of comfort and pure joy.
Recipe Overview
- Prep Time: 30 minutes
- Cook Time: 65-75 minutes
- Total Time: 1 hour 45 minutes
- Servings: 12
- Yield: 1 cake
- Dietary Type: Not specified
Ingredients
Crumb Cake
- 3 1/3 cups flour
- 2 teaspoons baking powder
- 1/4 teaspoon salt
- 1/2 cup butter, cold & cut in cubes
- 1 lemon, zested (optional)
- 1/3 cup light brown sugar
- 1/3 cup sugar
- 2 eggs
- 1 teaspoon vanilla
Blueberry Cheesecake Filling
- 8 ounces mascarpone
- 8 ounces cream cheese, softened
- 1/2 cup caster sugar, plus 2 tablespoons
- 2 tablespoons cornstarch
- 2 eggs
- 1 teaspoon vanilla
- 1 2/3 cups blueberries
Glaze
- 1/2 cup powdered sugar
- 2-3 teaspoons milk
Equipment Needed
- 9″ spring form pan
- Parchment paper
- Nonstick cooking spray
- Large bowl
- Fork or mixer
- Measuring cups and spoons
- Small bowl
Instructions
-
Begin by preheating your oven to 350°F (175°C). Line the bottom of a 9-inch spring form pan with parchment paper. Then, grease both the bottom and sides of the pan generously with nonstick cooking spray. Set the prepared pan aside. This step is crucial for easy release of the cake.
-
In a large bowl, whisk together the dry ingredients for the crumb cake: flour, baking powder, salt, brown sugar, sugar, and lemon zest (if using). The lemon zest adds a lovely brightness to the crumb topping, but it is entirely optional depending on your preference.
-
Add the cold, cubed butter to the dry ingredient mixture. Now, you have a few options for incorporating the butter. You can use your hands, working the butter in with your fingertips until the mixture resembles coarse crumbs. Alternatively, you can use a fork to press the butter into the flour. For a quicker method, use a mixer with a pastry blender attachment. Regardless of your chosen method, work the mixture until it’s grainy with small clumps.
-
Add the eggs and vanilla to the crumb mixture and mix to combine. The resulting mixture should be crumbly. If it seems too sandy, gently squeeze it with your fingers to form pea-sized crumbs. Avoid overmixing at this stage, as it can result in a tough crumb.
-
Press about 2/3 of the crumb mixture into the bottom and up the sides (about 1 1/2 inches in height) of the prepared spring form pan. This forms the base for the cheesecake filling. Place the pan, along with the remaining crumbs, in the refrigerator to chill while you prepare the filling. Chilling the crust helps it maintain its shape during baking.
-
To prepare the blueberry cheesecake filling, in a separate bowl, combine the cream cheese, mascarpone, vanilla, sugar, and cornstarch. Mix just until combined. Be sure your cream cheese is properly softened so it incorporates smoothly. The mascarpone adds richness, but you can substitute with more cream cheese if needed.
-
Add the eggs to the cream cheese mixture and mix just to combine. It’s important not to overmix at this stage, as overmixing can incorporate too much air and lead to cracks in the cheesecake during baking.
-
Pour half of the cheesecake mixture into the chilled crust. Then, scatter about 2/3 cup of blueberries evenly over the filling. These juicy blueberries will add bursts of flavor throughout the cake.
-
Spread the remaining cheesecake mixture evenly over the blueberry layer. Top with the remaining blueberries and the reserved crumb topping. Distribute the crumbs evenly for a beautiful and delicious crust.
-
Bake in the preheated oven at 350°F (175°C) until the cake is golden brown and a toothpick inserted into the center comes out clean. This typically takes about 65-75 minutes. Keep a close eye on the cake during baking. If the top starts to brown too quickly, tent it loosely with aluminum foil to prevent it from burning.
-
Once the cake is baked, let it cool completely in the pan on a wire rack before removing the spring form ring. Cooling slowly helps prevent cracking.
-
To make the glaze, stir together the powdered sugar and milk in a small bowl until smooth. Add more milk, a teaspoon at a time, if the glaze is too thick, or more powdered sugar if it’s too thin.
-
Drizzle the glaze evenly over the cooled cake. Let the glaze set before slicing and serving.
Expert Tips & Tricks
- For a more intense blueberry flavor, consider using wild blueberries in the filling.
- To prevent the crust from becoming soggy, lightly brush the bottom crust with melted white chocolate before adding the filling.
- If you don’t have mascarpone, you can use an equal amount of cream cheese. The flavor will be slightly different, but still delicious.
- Allow the cake to cool completely before glazing to prevent the glaze from melting.
Serving & Storage Suggestions
Serve this Blueberry Cheesecake Crumb Cake chilled or at room temperature. It’s delicious on its own or with a scoop of vanilla ice cream or a dollop of whipped cream.
To store leftovers, cover the cake tightly and keep it in the refrigerator for up to 3-4 days. You can also freeze the cake for longer storage; wrap it tightly in plastic wrap and then aluminum foil. Thaw it in the refrigerator overnight before serving. Reheating isn’t usually necessary, but you can warm individual slices in the microwave for a few seconds if desired.
Nutritional Information
| Nutrient | Amount per Serving | % Daily Value |
|---|---|---|
| Calories | 398.9 kcal | N/A |
| Calories from Fat | 145 g | 37% |
| Total Fat | 16.2 g | 24% |
| Saturated Fat | 9.1 g | 45% |
| Cholesterol | 103.3 mg | 34% |
| Sodium | 264.4 mg | 11% |
| Total Carbohydrate | 56.8 g | 18% |
| Dietary Fiber | 1.4 g | 5% |
| Sugars | 27.6 g | 110% |
| Protein | 7.1 g | 14% |
Variations & Substitutions
- Gluten-Free: Use a gluten-free flour blend for the crumb topping and crust.
- Lemon Lovers: Add more lemon zest to both the crumb topping and cheesecake filling for a brighter, more citrusy flavor.
- Different Berries: Substitute the blueberries with other berries, such as raspberries, blackberries, or a mixed berry blend.
- Chocolate Chips: Add chocolate chips to the crumb topping or cheesecake filling for a chocolatey twist.
FAQs (Frequently Asked Questions)
Q: Can I make this cake ahead of time?
A: Yes, this cake can be made a day or two in advance. Just store it covered in the refrigerator until ready to serve.
Q: Can I use frozen blueberries instead of fresh?
A: Yes, you can use frozen blueberries. There’s no need to thaw them first. Just toss them with a tablespoon of flour to prevent them from sinking to the bottom of the cake.
Q: What if I don’t have a spring form pan?
A: If you don’t have a spring form pan, you can use a regular cake pan lined with parchment paper, allowing the parchment to overhang the sides for easy removal.
Q: Why did my cheesecake crack?
A: Cheesecakes crack when they cool too quickly. To prevent cracking, let the cheesecake cool slowly in the oven with the door slightly ajar.
Q: Can I freeze this cake?
A: Yes, this cake freezes well. Wrap it tightly in plastic wrap and then aluminum foil. Thaw it in the refrigerator overnight before serving.
Final Thoughts
This Blueberry Cheesecake Crumb Cake is more than just a dessert; it’s a celebration of flavors and textures. The buttery crumb topping, creamy cheesecake filling, and juicy blueberries create a symphony of tastes that will delight your senses. Don’t be intimidated by the multiple components; each step is simple and straightforward, and the result is well worth the effort. So, preheat your oven, gather your ingredients, and prepare to bake a masterpiece. I encourage you to try this recipe and share your own creations and variations. Happy baking!