
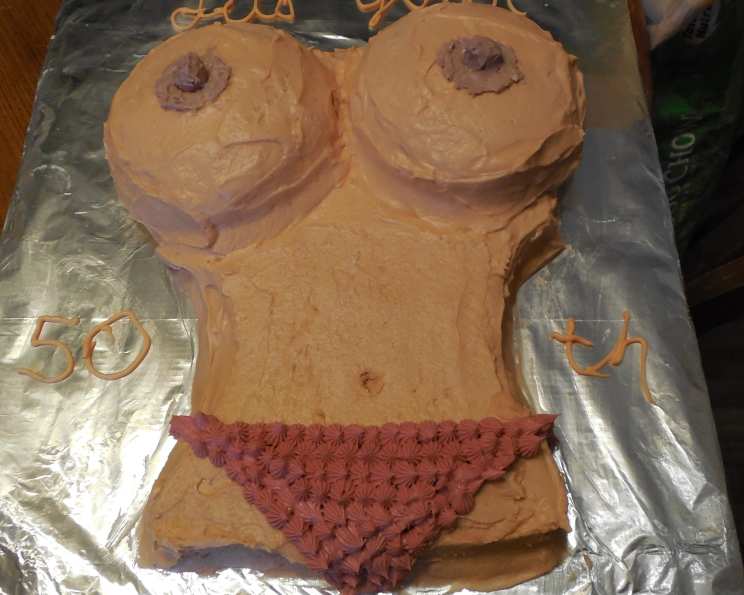
Boob Cake: A Recipe for Laughter and Deliciousness
I’ll never forget the bake sale during my first year as a pastry chef. Mrs. Higgins, bless her heart, usually brought her famous lemon bars, but that year, she unveiled something…different. It was a boob cake. Not a crudely sculpted one, mind you, but a surprisingly elegant confection, complete with perfectly frosted curves and strategically placed gumdrop “details.” The initial shock gave way to uproarious laughter, and the cake, naturally, sold out within minutes. That day, I learned that sometimes, the best desserts are the ones that don’t take themselves too seriously.
Recipe Overview
- Prep Time: 30 minutes
- Cook Time: 30 minutes
- Total Time: 1 hour
- Servings: 20
- Yield: 1 Cake
- Dietary Type: Vegetarian
Ingredients
For the Cake:
- 4 1/2 cups flour
- 3 cups sugar
- 1/2 cup cocoa
- 1 tablespoon baking soda
- 1 1/2 teaspoons salt
- 1 cup salad oil
- 3 tablespoons white vinegar
- 1 tablespoon vanilla
- 3 cups cold water
For the Frosting:
- 16 ounces cream cheese, softened
- 4 ounces butter, softened
- 2 teaspoons vanilla
- 1 1/2 – 2 lbs powdered sugar
- 2 small gumdrops
- Yellow food coloring
- Red food coloring
- Green food coloring
Equipment Needed
- Large mixing bowl
- Two small stainless steel mixing bowls (approximately 7″ diameter and 4″ deep)
- 9 x 13 inch baking pan
- Electric mixer
- Serving tray
- Spatula
Instructions
-
Preheat your oven to 350°F (175°C).
-
In a large mixing bowl, sift together the flour, sugar, cocoa, baking soda, and salt. This ensures even distribution and prevents clumps.
-
Add the salad oil, white vinegar, vanilla, and cold water to the dry ingredients. Mix well until a smooth batter forms. Don’t overmix, as this can develop the gluten in the flour and result in a tough cake.
-
Fill two small stainless steel mixing bowls to a depth of about 2 inches with the batter. There’s no need to grease the bowls, as the cake should release easily once cooled.
-
Pour the remaining batter into a 9 x 13 inch baking pan. Again, no need to grease the pan.
-
Bake the bowls for approximately 20 minutes and the 9 x 13 inch pan for about 30 minutes, or until a toothpick inserted into the center comes out clean. Check the bowls after 18 minutes as smaller cakes bake faster. Be careful not to overbake, or the cake will be dry.
-
Cool the cakes completely on a wire rack before frosting. This is crucial; otherwise, the frosting will melt.
-
While the cakes are cooling, prepare the frosting. In a large bowl, beat the cream cheese until smooth and creamy.
-
Add the butter and vanilla to the cream cheese and beat until well combined and smooth.
-
Gradually add the powdered sugar, beating until you achieve your desired consistency and sweetness. Taste as you go and adjust the sugar accordingly.
-
In a separate small bowl, mix 8 drops of yellow food coloring, 6 drops of red food coloring, and 2 drops of green food coloring. This will create a base flesh tone.
-
Add the coloring mixture a few drops at a time to the frosting, mixing well after each addition, until you achieve a good flesh color. Remember that the colors provided are for Caucasian coloring. For darker skin tones, consider using blue instead of green or consulting the food coloring box for color suggestions.
-
Invert the large cake layer onto a serving tray. If desired, you can split it into two layers and frost in between for extra moisture and flavor. This step is optional but enhances the overall cake experience.
-
Place the boob cakes appropriately on top of the large cake layer. Arrange them for a natural look.
-
Frost the entire cake, including the boob cakes, with the flesh-toned frosting.
-
Save a few tablespoons of frosting in a separate small bowl. Add additional food coloring mixture to this smaller portion to achieve a darker color for the nipples and areolas.
-
Frost the areolas onto the boob cakes.
-
Coat the gumdrops with the darker frosting and place them in the middle of the areolas to create the nipples. Secure them well so they don’t fall off.
-
Enjoy the reactions!
Expert Tips & Tricks
- For a richer flavor, use melted butter instead of salad oil in the cake.
- To prevent the cake from sticking to the bottom of the 9×13 pan, line it with parchment paper before pouring in the batter.
- If you find the frosting too sweet, add a pinch of salt or a squeeze of lemon juice to balance the flavors.
- To achieve a smoother frosting, sift the powdered sugar before adding it to the cream cheese and butter mixture.
- If you’re short on time, you can use store-bought frosting and simply add the food coloring to achieve the desired flesh tone.
- If your batter seems a bit lumpy after mixing the wet and dry ingredients, let it rest for 5-10 minutes. This allows the gluten to relax and the lumps will often disappear.
- For a more pronounced “boob” shape, use oven-safe glass bowls, which tend to hold their shape better than stainless steel during baking.
Serving & Storage Suggestions
Serve the boob cake immediately for the best flavor and texture. If you have leftovers, store them in an airtight container in the refrigerator for up to 3 days. The cake is best served chilled, as this helps to firm up the frosting.
The unfrosted cake layers can be wrapped tightly in plastic wrap and frozen for up to 2 months. Thaw them overnight in the refrigerator before frosting.
Nutritional Information
| Nutrient | Amount per Serving | % Daily Value |
|---|---|---|
| Calories | 577.5 kcal | N/A |
| Calories from Fat | N/A | N/A |
| Total Fat | 23.6 g | 36% |
| Saturated Fat | 8.8 g | 44% |
| Cholesterol | 37.2 mg | 12% |
| Sodium | 478.9 mg | 19% |
| Total Carbohydrate | 88 g | 29% |
| Dietary Fiber | 1.2 g | 4% |
| Sugars | 64.4 g | N/A |
| Protein | 4.7 g | 9% |
Note: Nutritional information is an estimate and may vary based on specific ingredients and portion sizes.
Variations & Substitutions
- For a chocolate boob cake, increase the amount of cocoa powder to 1 cup.
- For a gluten-free version, substitute the all-purpose flour with a gluten-free flour blend.
- Add toasted coconut flakes to the frosting for a textured finish and tropical flavor. Consider toasting unsweetened coconut shreds for areola detailing instead of gumdrops.
- Use different food coloring combinations to create a variety of skin tones.
FAQs (Frequently Asked Questions)
Q: Can I make this cake ahead of time?
A: Yes, you can bake the cake layers a day or two in advance and store them in the refrigerator, wrapped tightly in plastic wrap. Frost the cake on the day you plan to serve it.
Q: Can I use store-bought cake mix instead of making the cake from scratch?
A: Absolutely! Just make sure to bake the cake in the appropriate pans and adjust the baking time accordingly.
Q: How do I prevent the boob cakes from sliding off the base cake?
A: Make sure the base cake and the boob cakes are completely cooled before frosting. Use a generous amount of frosting to secure the boob cakes to the base. You can also insert toothpicks to hold them in place, but be sure to remove them before serving.
Q: What can I use instead of gumdrops for the nipples?
A: M&Ms, small chocolate chips, or even piped frosting can be used as substitutes for gumdrops.
Q: Can I make this cake dairy-free?
A: Yes, you can substitute the cream cheese and butter in the frosting with dairy-free alternatives. Use a plant-based margarine and a dairy-free cream cheese alternative for the frosting. For the cake, use a dairy-free milk substitute instead of water.
Final Thoughts
This boob cake is more than just a dessert; it’s a conversation starter, a source of laughter, and a celebration of the human form. Don’t be afraid to get creative with the decorations and personalize it to your liking. Whether you’re celebrating a special occasion or simply want to bring a smile to someone’s face, this cake is sure to be a hit. So, gather your ingredients, preheat your oven, and get ready to bake a cake that’s as unforgettable as it is delicious. I encourage you to try this recipe and share your own unique creations. Maybe even pair it with a bottle of champagne for the ultimate celebration!