
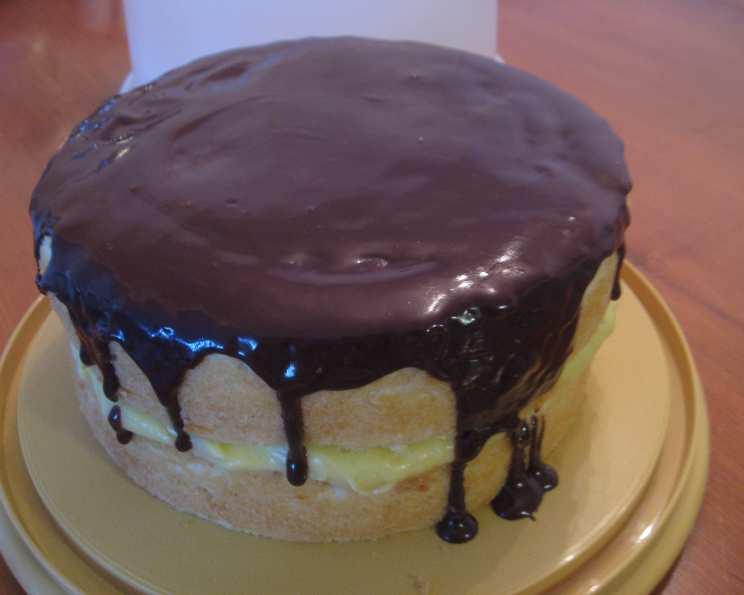
Boston Cream Pie: A Culinary Classic Reimagined
My grandmother, a true Bostonian, always declared that no birthday was complete without a Boston Cream Pie. Not cake, not cupcakes, but pie. To a child, it seemed like a magical paradox – a pie that was actually a cake, filled with creamy delight and draped in a glossy chocolate cloak. Each bite was a symphony of textures and flavors, the tender cake yielding to the smooth custard and rich chocolate. It wasn’t just dessert; it was a tradition, a connection to my family’s history, and a reminder of the warmth and love that filled my grandmother’s kitchen.
Recipe Overview
- Prep Time: 1 hour
- Cook Time: 35 minutes
- Total Time: 2 hours 30 minutes (includes chilling)
- Servings: 12
- Yield: 1 pie
- Dietary Type: Not specified
Ingredients
The Cake:
- 2 1⁄4 cups cake flour
- 1 tablespoon baking powder
- 1⁄2 teaspoon salt
- 1 1⁄4 cups whole milk or 1 1/4 cups buttermilk
- 4 large egg whites
- 1 1⁄2 cups sugar
- 1⁄2 vanilla bean, split and scraped
- 1⁄2 cup unsalted butter, room temperature
- 1⁄2 teaspoon vanilla extract
The Pastry Cream:
- 2 cups milk
- 1⁄2 vanilla bean, split and scraped, keep pod
- 6 large egg yolks
- 2⁄3 cup sugar
- 2 tablespoons flour
- 2 tablespoons cornstarch
- 4 tablespoons unsalted butter, room temperature
The Chocolate Glaze:
- 1⁄3 cup heavy cream
- 3 1⁄2 ounces bittersweet chocolate, finely chopped
- 4 teaspoons unsalted butter, cut into 4 pieces, at room temperature
- 7 tablespoons chocolate syrup
The Chocolate Sauce:
- 4 1⁄2 ounces bittersweet chocolate, finely chopped
- 1 cup water
- 1⁄2 cup creme fraiche or 1/2 cup heavy cream
- 1⁄3 cup sugar
Equipment Needed
- Two 9-inch cake pans
- Parchment paper
- Mixing bowls
- Whisk
- Electric mixer
- Spatula
- Wire rack
- Saucepan
- Cling film
- Bread knife or cake leveler
- Offset spatula
Instructions
-
Prepare the oven and pans: Center a rack in the oven and preheat to 350°F (175°C). Butter two 9-inch cake pans and line the bottoms with parchment paper. This ensures the cakes release cleanly.
-
Sift dry ingredients: In a medium bowl, sift together the cake flour, baking powder, and salt. This helps to aerate the flour and ensures even distribution of the leavening agents.
-
Whisk wet ingredients (part 1): In a separate bowl, whisk together the egg whites and the milk (or buttermilk). Set aside.
-
Infuse sugar with vanilla: In another bowl, whisk together the vanilla seeds (from the split vanilla bean) and sugar until blended and fragrant. This step intensifies the vanilla flavor throughout the cake.
-
Cream butter and sugar: Add the butter to the vanilla-sugar mixture and beat at medium speed with an electric mixer for three minutes, or until the butter and sugar are light and fluffy. This is a crucial step for creating a tender cake.
-
Incorporate vanilla extract: Incorporate the vanilla extract.
-
Alternate adding dry and wet ingredients: Gradually add 1/3 of the flour mixture to the butter mixture and beat until just combined. Then, beat in 1/2 of the milk/egg mixture, followed by 1/2 of the remaining flour mixture.
-
Finish batter: Add the rest of the milk/egg mixture, then add the rest of the flour mixture. Beat for about 2 more minutes until all the ingredients are fully incorporated and the batter is well aerated. Be careful not to overmix.
-
Divide and bake: Divide the batter evenly between the two prepared pans, and smooth the tops with a spatula. Bake for 30-35 minutes, or until the cake is springy to the touch and a toothpick inserted into the center comes out clean.
-
Cool the cakes: Cool the cakes in the pans for about 5 minutes, then invert them onto a wire rack and allow them to cool completely.
-
Prepare the pastry cream: In a saucepan, bring the milk, vanilla seeds, and vanilla pod to a simmer over medium heat.
-
Whisk dry ingredients for cream: Meanwhile, in a separate bowl, combine the sugar, flour, and cornstarch. Whisk until smooth to remove any lumps.
-
Add egg yolks: Add the egg yolks to the sugar mixture and whisk until smooth and lump-free. This mixture will act as the thickening agent for the pastry cream.
-
Temper the eggs: Remove the vanilla pod from the milk. Slowly temper the egg mixture with the hot milk by pouring the milk little by little into the egg mixture, whisking constantly to prevent the eggs from scrambling.
-
Cook the pastry cream: Once the egg mixture is tempered, add the mixture back into the saucepan and cook over medium-low heat, whisking constantly, until the mixture comes to a boil.
-
Boil and finish: Boil for 1 minute, continuing to whisk. Remove from the heat and stir in the butter until melted and smooth.
-
Chill the pastry cream: Strain the pastry cream into a bowl or container to remove any lumps. Cover with cling film, pressing the film directly against the surface of the cream to prevent a skin from forming. Chill thoroughly in the refrigerator for at least 2 hours, or preferably overnight.
-
Make the chocolate sauce: Combine the bittersweet chocolate, water, creme fraiche (or heavy cream), and sugar in a heavy-bottomed saucepan. Bring to a boil over medium heat, stirring constantly with a wooden spoon.
-
Thicken the sauce: Reduce heat to low and stir until the sauce thickens enough to coat the back of a wooden spoon (10-15 minutes). Set aside.
-
Prepare the chocolate glaze: Bring the heavy cream to a boil in a small saucepan.
-
Melt the chocolate: Remove from heat and slowly add the chopped chocolate, stirring gently with a wooden spoon until the chocolate is melted and smooth.
-
Incorporate butter and chocolate sauce: Continue stirring, adding the butter piece by piece until fully incorporated and the glaze is glossy. Once the butter is incorporated, add the chocolate sauce and stir to combine.
-
Keep glaze warm (optional): The glaze will cool enough to spread, but it’s best to keep it warm for pouring over the pie for a smoother finish.
-
Assemble the pie: Using a bread knife or cake leveler, level the tops of the cooled cakes to ensure a flat surface.
-
Fill with pastry cream: Place one cake layer right side up on a serving plate or cake stand. Cover with a generous layer of pastry cream (about 1/4″-1/3″ thick is ideal).
-
Top with second layer: Place the other cake layer upside down on top of the pastry cream. Gently press the cake down a bit until the pastry cream just peaks out from the sides.
-
Glaze the pie: Slowly pour the chocolate glaze over the center of the top of the cake. If needed, use an offset spatula to guide the glaze toward the edge. Stop pouring once the glaze reaches the edge of the cake. Allow a bit of the glaze to drip down the sides for a beautiful, rustic look.
-
Chill and serve: Store the assembled Boston Cream Pie in the refrigerator. Serve cold or at room temperature.
Expert Tips & Tricks
- For an even more intense vanilla flavor, infuse the milk for the pastry cream with the vanilla bean overnight in the refrigerator.
- If your pastry cream seems too thin after cooking, whisk in a small amount of cornstarch mixed with cold water until it reaches your desired consistency.
- To prevent the cake layers from drying out, brush them with a simple syrup (equal parts sugar and water, simmered until dissolved) before assembling the pie.
- If you don’t have creme fraiche for the chocolate sauce, you can substitute sour cream, but be sure to use full-fat sour cream for the best flavor and texture.
- For a boozy twist, add a tablespoon or two of rum or bourbon to the pastry cream or chocolate sauce.
Serving & Storage Suggestions
Boston Cream Pie is best served chilled or at room temperature. For an elegant presentation, dust the top with a light coating of cocoa powder or garnish with fresh berries. Leftovers should be stored in an airtight container in the refrigerator for up to 3 days. The cake layers may become slightly softer over time, but the flavor will remain delicious. Freezing is not recommended as it can alter the texture of the pastry cream and cake.
Nutritional Information
| Nutrient | Amount per Serving | % Daily Value |
|---|---|---|
| Calories | 548 kcal | N/A |
| Total Fat | 25g | 37% |
| Saturated Fat | 15g | 72% |
| Cholesterol | 170mg | 56% |
| Sodium | 287mg | 11% |
| Total Carbohydrate | 75g | 24% |
| Dietary Fiber | 1g | 3% |
| Sugars | 47g | N/A |
| Protein | 8g | 15% |
Note: Nutritional information is an estimate and may vary based on specific ingredients and portion sizes.
Variations & Substitutions
- Gluten-Free: Substitute the cake flour with a gluten-free blend of your choice. You may need to experiment with the liquid ratio to achieve the right consistency.
- Dairy-Free: Use non-dairy milk (such as almond or oat milk) for the cake and pastry cream. Substitute the butter with a dairy-free alternative and use dairy-free chocolate for the glaze and sauce.
- Lemon Infused: Add lemon zest to the cake batter and a tablespoon of lemon juice to the pastry cream for a bright, citrusy twist.
- Chocolate Cake: For a richer flavor, use a chocolate cake recipe instead of the vanilla cake.
FAQs (Frequently Asked Questions)
Q: Can I make the pastry cream ahead of time?
A: Absolutely! In fact, it’s recommended to make the pastry cream at least a few hours in advance, or even the day before, to allow it to chill completely and develop its flavor.
Q: Why is it called a “pie” if it’s made with cake?
A: The name “Boston Cream Pie” is a historical quirk. The dessert was created at a time when cakes and pies were often baked in the same pans, and the term “pie” was used more broadly.
Q: Can I use store-bought cake mix instead of making the cake from scratch?
A: While you can, using a homemade cake recipe will result in a significantly better flavor and texture. But in a pinch, a store-bought cake mix can be used.
Q: How do I prevent the cake layers from sticking to the pan?
A: Buttering the pans thoroughly and lining them with parchment paper is the best way to prevent sticking. Make sure the parchment paper covers the entire bottom of the pan.
Q: What if my chocolate glaze is too thick?
A: If your chocolate glaze is too thick, you can thin it out by adding a tablespoon of milk or heavy cream at a time, stirring until it reaches your desired consistency.
Final Thoughts
This Boston Cream Pie recipe is a labor of love, but the result is well worth the effort. The combination of tender cake, creamy custard, and rich chocolate glaze is a timeless classic that’s sure to impress your family and friends. Don’t be intimidated by the multiple components – each step is relatively simple, and the end product is a showstopper. So, gather your ingredients, put on some music, and get ready to create a little slice of Bostonian heaven! And don’t be afraid to put your own spin on it, and please share your creations and experiences.