
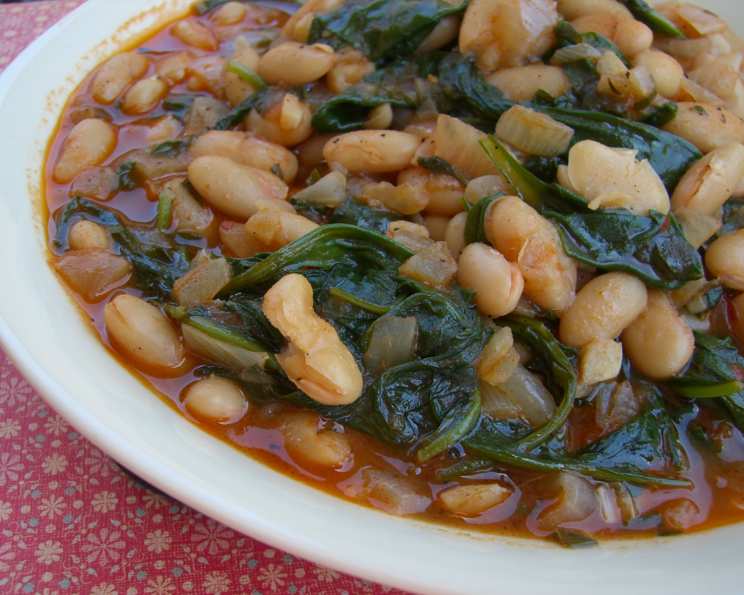
Braised Cannellini Beans With Onions and Arugula: A Rustic Delight
The aroma of garlic sizzling in olive oil always transports me back to my grandmother’s kitchen in Tuscany. I remember watching her, mesmerized, as she transformed simple ingredients into culinary magic. One dish that stands out is her braised beans, a humble yet deeply satisfying creation. While her version used dried borlotti beans simmered for hours, this recipe captures the same rustic spirit with the convenience of canned cannellini beans, making it a perfect weeknight meal. The addition of peppery arugula adds a modern twist, creating a delightful balance of flavors and textures.
Recipe Overview
- Prep Time: 10 minutes
- Cook Time: 35 minutes
- Total Time: 45 minutes
- Servings: 4
- Yield: 4 servings
- Dietary Type: Vegan
Ingredients
- 1⁄4 cup extra virgin olive oil
- 2 garlic cloves, chopped
- 1 dried red chili peppers or 1/4 teaspoon chili flakes
- 1 medium purple onion, minced
- 1⁄2 teaspoon fresh ground black pepper
- 1 tablespoon minced Italian parsley
- 1 tablespoon tomato paste
- 1 teaspoon sea salt
- 1 bunch arugula, washed, dried, and stemmed
- 1 (15 ounce) can cannellini beans, drained, rinsed thoroughly, and drained again
Equipment Needed
- 1-quart pot with lid
- Cutting board
- Knife
- Colander
Instructions
-
Heat the olive oil in a 1-quart pot over a medium-high flame. The oil should shimmer slightly, indicating it’s hot enough.
-
Add the chopped garlic and cook for 30 seconds, stirring constantly. The garlic should become aromatic and just lightly golden. Watch it carefully; burnt garlic will taste acrid and ruin the dish. Lower the heat slightly if needed to prevent burning.
-
Stir in the dried red chili pepper (or chili flakes) and cook for 15 more seconds, allowing the chili to infuse the oil with its subtle heat. For a milder flavor, remove the chili pepper seeds before adding.
-
Add the minced purple onion and cook, stirring occasionally, for about 2 minutes, or until the onion becomes translucent and soft. Mincing the onion ensures it cooks evenly and melts into the sauce.
-
Stir in the fresh ground black pepper and minced Italian parsley and cook for 1 more minute, allowing the flavors to meld together. The parsley will wilt slightly, releasing its aroma.
-
Gently fold in the rinsed and drained cannellini beans, being careful not to mash them. Rinsing the beans removes excess starch and sodium, resulting in a cleaner flavor.
-
Stir in the tomato paste, ensuring it’s evenly distributed among the beans. Tomato paste adds richness and depth of flavor to the braising liquid.
-
Add enough cool water (or chicken broth, if you prefer a richer flavor) to cover the beans by 1/4 inch. This is usually about 1 and 1/2 cups, depending on the width of your pot. Avoid adding too much liquid, as you want the beans to braise, not boil.
-
Season with the sea salt and bring the mixture to a gentle boil, uncovered.
-
Cover the pot, lower the heat to medium-low, and cook for 5 minutes. This initial simmering allows the flavors to start developing.
-
Uncover the pot, stir in the arugula, and cover again. The arugula will wilt quickly from the heat.
-
Cook for another 15 minutes, allowing the arugula to fully incorporate into the braising liquid and the beans to become tender. The liquid should reduce slightly, creating a light sauce.
-
Adjust the seasoning if needed. Taste and add more salt or pepper to your preference.
-
Serve hot, garnished with a drizzle of extra virgin olive oil and a sprinkle of fresh parsley, if desired.
Expert Tips & Tricks
- Don’t overcook the garlic: Burnt garlic will impart a bitter taste to the entire dish. Keep a close eye on it and lower the heat if needed.
- Use high-quality olive oil: The flavor of the olive oil is a key component of this dish, so use the best you can afford.
- Rinse the beans thoroughly: Rinsing canned beans removes excess starch and sodium, resulting in a cleaner flavor and less bloating.
- Adjust the amount of chili: If you prefer a spicier dish, use more chili flakes or a hotter variety of dried chili pepper. For a milder flavor, remove the seeds from the chili pepper before adding.
- Make it ahead: The braised beans can be made ahead of time and reheated. The flavors will actually meld together and improve over time.
- Add a splash of vinegar: For a brighter flavor, add a splash of red wine vinegar or balsamic vinegar at the end of cooking.
Serving & Storage Suggestions
This dish is delicious served hot as a side dish or as a light vegetarian main course. It pairs well with crusty bread for soaking up the flavorful sauce. You can also serve it over pasta or polenta.
Leftovers can be stored in an airtight container in the refrigerator for up to 3 days. To reheat, gently warm on the stovetop over medium-low heat, adding a splash of water or broth if needed to prevent sticking.
Freezing is not recommended, as the arugula can become mushy upon thawing.
Nutritional Information
| Nutrient | Amount per Serving | % Daily Value |
|---|---|---|
| Calories | 280 kcal | 14% |
| Total Fat | 15g | 23% |
| Saturated Fat | 2g | 10% |
| Cholesterol | 0mg | 0% |
| Sodium | 800mg | 33% |
| Total Carbohydrate | 25g | 8% |
| Dietary Fiber | 8g | 32% |
| Sugars | 4g | N/A |
| Protein | 10g | 20% |
Note: Nutritional information is an estimate and may vary based on specific ingredients and preparation methods.
Variations & Substitutions
- Spicy Version: Add a pinch of red pepper flakes or a chopped jalapeño pepper along with the garlic for extra heat.
- Hearty Stew: Add diced carrots, celery, and potatoes to the pot along with the onion for a heartier stew.
- Herb Variations: Substitute fresh basil, oregano, or thyme for the parsley, or use a combination of herbs.
- Different Beans: While cannellini beans are traditional, you can also use other types of beans, such as Great Northern beans or navy beans.
- Add Greens: Substitute spinach, kale, or chard for the arugula. Add them in the last few minutes of cooking until wilted.
FAQs (Frequently Asked Questions)
Q: Can I use dried beans instead of canned beans?
A: Yes, you can use dried cannellini beans. Soak them overnight, then cook them until tender before adding them to the recipe. Adjust the cooking time accordingly.
Q: Can I make this recipe ahead of time?
A: Absolutely! The flavors actually meld together and improve over time. Store the braised beans in the refrigerator for up to 3 days and reheat before serving.
Q: What if I don’t have arugula?
A: You can substitute spinach, kale, or chard for the arugula. Add them in the last few minutes of cooking until wilted.
Q: Can I freeze this dish?
A: Freezing is not recommended, as the arugula can become mushy upon thawing. However, you can freeze the beans without the arugula and add fresh arugula when reheating.
Q: What should I serve this with?
A: This dish is delicious served on its own with crusty bread, or as a side dish to grilled chicken or fish. You can also serve it over pasta or polenta.
Final Thoughts
This recipe for braised cannellini beans with onions and arugula is a celebration of simple, fresh ingredients transformed into a comforting and flavorful dish. It’s a testament to the power of rustic cooking, where humble ingredients shine. I encourage you to try this recipe and adapt it to your own tastes. Experiment with different herbs, spices, and vegetables to create your own unique version. And most importantly, enjoy the process of cooking and sharing this delicious meal with loved ones. Don’t hesitate to leave a comment with your own variations or feedback!