
Brownies in a Jar: A Delicious Gift from the Heart
The first time I made brownies in a jar, it wasn’t for a gift; it was out of pure desperation. I was a broke college student, and my best friend’s birthday was looming. I wanted to give her something personal and homemade, but my budget was practically zero. Browsing online, I stumbled upon the “brownies in a jar” concept and knew it was perfect. The memory of carefully layering the ingredients, tying a ribbon around the jar, and the joy on my friend’s face when she received her gift is something I’ll always cherish. It’s more than just a dessert; it’s a token of love and care, easily shared.
Recipe Overview
- Prep Time: 20 minutes
- Cook Time: 30 minutes
- Total Time: 50 minutes
- Servings: Varies based on slice size, approximately 12-24
- Yields: 1 Quart Jar of Mix
- Dietary Type: Vegetarian (can be made vegan with substitutions)
Ingredients
- 2 1⁄4 cups white sugar
- 2/3 cup cocoa
- 1/2 cup pecans, chopped
- 1 1⁄4 cups all-purpose flour
- 1 teaspoon baking powder
- 1 teaspoon salt
- 3/4 cup butter, to be added by recipient (or vegan butter alternative)
- 4 eggs, to be added by recipient (or flax eggs for vegan version)
Equipment Needed
- 1 Quart Mason Jar (clean and dry)
- Measuring Cups and Spoons
- Mixing Bowls
- 9×13 inch Baking Pan
- Oven
- Mixing Spoons or Electric Mixer
- Ribbon or Twine (optional, for decoration)
Instructions
-
Prepare the Jar: Ensure your quart jar is completely clean and dry. Any moisture can affect the dry ingredients.
-
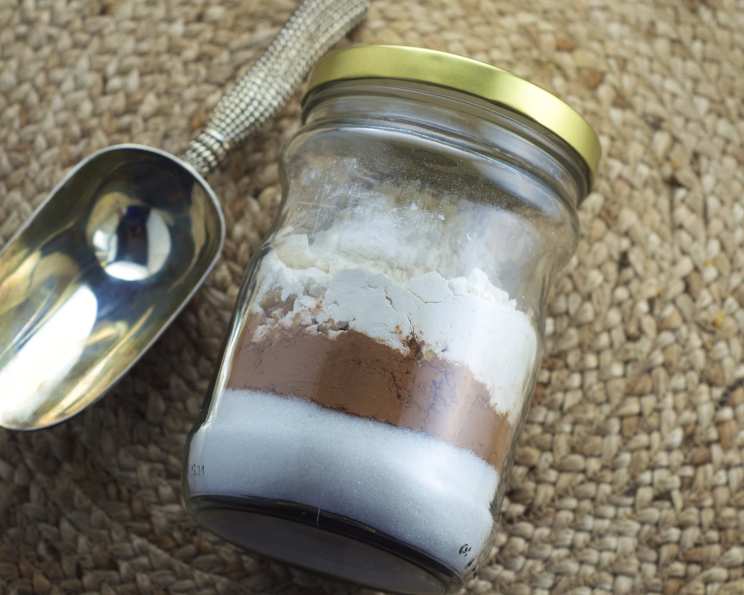
Layer the Sugar: Pour the white sugar into the jar. Using the back of a spoon or a measuring cup, press down firmly to create a compact layer. This helps prevent the ingredients from mixing prematurely.
-
Add the Cocoa: Next, add the cocoa powder on top of the sugar. Again, press down firmly to create an even layer.
-
Incorporate the Pecans: Gently pour the chopped pecans into the jar, ensuring they are evenly distributed over the cocoa layer.
-
Combine Dry Ingredients: In a separate mixing bowl, thoroughly combine the flour, baking powder, and salt. This step ensures that the leavening agent is evenly distributed throughout the flour, resulting in a more consistent brownie texture.
-
Add Flour Mixture to Jar: Carefully pour the flour mixture into the jar, on top of the pecan layer. Seal the jar tightly.
-
Attach Baking Instructions: Create a tag or label with the following instructions to attach to the jar:
“Empty mix into large bowl. Stir to blend thoroughly. Add 3/4 cup melted butter (or margarine) and 4 beaten eggs (or flax egg substitute). Mix until completely blended. Spread batter onto lightly greased 9×13 pan. Bake at 350°F (175°C) for 30 minutes or until done. Cool in pan and cut into 2-inch squares.“ -
Instructions for Recipient: The recipient needs to preheat their oven to 350°F (175°C). Then, they need to melt 3/4 cup of butter (or a butter alternative) and beat 4 eggs (or prepare a vegan egg substitute, such as flax eggs).
-
Combine Wet and Dry: In a large bowl, the recipient should empty the brownie mix from the jar. They should then stir to blend thoroughly to break up any clumps.
-
Create the Batter: Add the melted butter and beaten eggs to the dry ingredients. Mix until completely blended, ensuring there are no streaks of dry flour. Be careful not to overmix, as this can result in tough brownies.
-
Bake the Brownies: Spread the batter evenly into a lightly greased 9×13 inch baking pan. Bake at 350°F (175°C) for 30 minutes, or until a toothpick inserted into the center comes out with moist crumbs attached. Baking times may vary depending on the oven. Start checking for doneness at 25 minutes.
-
Cool and Cut: Allow the brownies to cool completely in the pan before cutting them into 2-inch squares. This will prevent them from crumbling and ensure clean cuts.
Expert Tips & Tricks
- Packing the Layers: The key to a visually appealing jar is tightly packing each layer. This prevents the ingredients from mixing and creates distinct bands of color and texture.
- Even Chopping: Ensure the pecans are chopped into uniform pieces for even distribution and a better overall texture in the final brownies.
- High-Quality Cocoa: Using a good quality cocoa powder will significantly enhance the flavor of the brownies. Consider Dutch-processed cocoa for a richer, less acidic flavor.
- Vegan Conversion: Easily make this vegan by substituting the butter with a vegan butter alternative and using flax eggs (1 tablespoon of ground flaxseed mixed with 3 tablespoons of water per egg).
- Custom Instructions: Include a note about oven variations. Every oven is different, so the recipient might need to adjust the baking time slightly.
Serving & Storage Suggestions
Serve the brownies at room temperature, cut into squares. They are delicious on their own, but also pair well with a scoop of vanilla ice cream or a dusting of powdered sugar. For a more decadent treat, drizzle with chocolate sauce or caramel.
Store leftover brownies in an airtight container at room temperature for up to 3 days, in the refrigerator for up to a week, or freeze them for up to 2 months. To reheat, simply warm in the microwave for a few seconds or let them thaw at room temperature.
Nutritional Information
Note: Nutritional information is an estimate and may vary based on specific ingredients and portion sizes.
| Nutrient | Amount per Serving | % Daily Value |
|---|---|---|
| Calories | 250 kcal | 13% |
| Total Fat | 12g | 18% |
| Saturated Fat | 6g | 30% |
| Cholesterol | 50mg | 17% |
| Sodium | 150mg | 7% |
| Total Carbohydrate | 35g | 12% |
| Dietary Fiber | 1g | 4% |
| Sugars | 25g | N/A |
| Protein | 3g | 6% |
Variations & Substitutions
- Chocolate Chips: Add a layer of chocolate chips (milk, dark, or white) for an extra chocolatey kick.
- Nuts: Experiment with different nuts, such as walnuts, almonds, or macadamia nuts.
- Espresso Powder: Add a teaspoon of espresso powder to the flour mixture to enhance the chocolate flavor.
- Spices: Add a pinch of cinnamon, nutmeg, or chili powder to the flour mixture for a warm, spicy twist.
- Extracts: Add a teaspoon of vanilla extract, almond extract, or peppermint extract to the wet ingredients for added flavor.
- Gluten-Free: Substitute the all-purpose flour with a gluten-free all-purpose blend.
- Brown Sugar: Use light or dark brown sugar instead of white sugar for a richer, molasses-like flavor.
FAQs (Frequently Asked Questions)
Q: Can I use a different size jar?
A: While a quart jar is ideal for the given ingredient quantities, you could use smaller jars, but you’ll need to adjust the ingredient amounts accordingly and create multiple jars. Make sure to include the updated baking instructions based on the total amount of brownie mix.
Q: How long will the mix last in the jar?
A: If stored in a cool, dry place, the dry mix should last for up to 6 months. However, for optimal freshness, it’s best to use it within 3 months.
Q: Can I omit the nuts?
A: Absolutely! If the recipient has a nut allergy or simply doesn’t like nuts, you can easily omit them or substitute with another ingredient like chocolate chips or dried fruit.
Q: Can I use this mix in muffin tins instead of a baking pan?
A: Yes, you can bake these as brownies muffins. Grease a muffin tin well or use muffin liners and fill each cup about 2/3 full. Reduce the baking time to around 20-25 minutes, or until a toothpick inserted into the center comes out with moist crumbs.
Q: What if the brownies are too dry?
A: Ensure the recipient doesn’t overbake the brownies. If they still turn out dry, advise them to add an extra tablespoon or two of melted butter or a splash of milk to the batter next time.
Final Thoughts
Brownies in a jar are more than just a convenient baking mix; they’re a heartfelt gesture that shows you care. The act of carefully layering the ingredients and attaching the instructions transforms a simple gift into a personalized experience. So, gather your ingredients, grab a jar, and spread some brownie love! Don’t be afraid to experiment with variations and substitutions to make it truly your own. And who knows, maybe you’ll create a brownie in a jar tradition that lasts for years to come.