
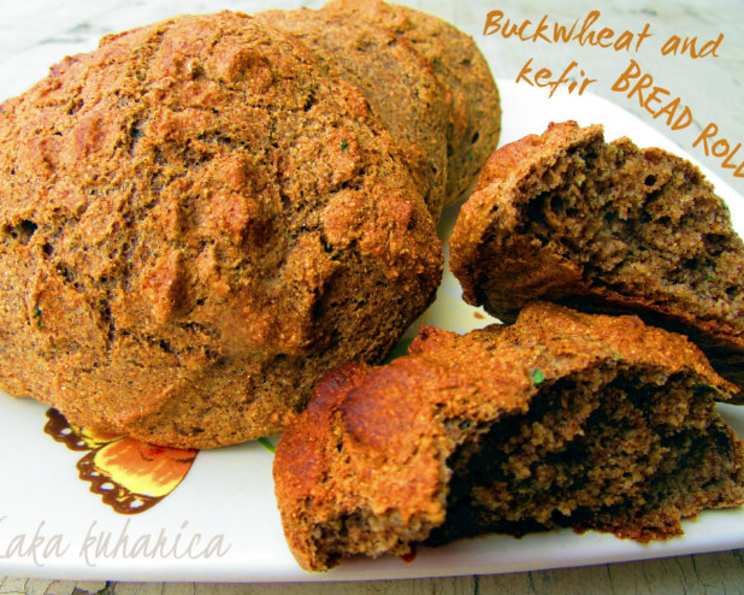
Buckwheat and Kefir Bread Rolls: A Rustic Delight
The aroma of freshly baked bread has always transported me back to my grandmother’s kitchen. She wasn’t one for fancy techniques, but her loaves were legendary – hearty, wholesome, and bursting with flavor. I remember her telling me, “The best bread is made with what you have.” These buckwheat and kefir rolls embody that philosophy, a testament to transforming simple ingredients into something truly special. The slightly tangy aroma of kefir mingled with the earthy notes of buckwheat flour… it’s a scent that instantly evokes warmth and comfort.
Recipe Overview
- Prep Time: 15 minutes
- Cook Time: 5-10 minutes
- Total Time: 25 minutes
- Yields: Approximately 10 rolls
- Dietary Type: Not specified (Contains Egg)
Ingredients
- 1 egg
- 400 ml kefir
- 100 ml milk
- 1 tablespoon olive oil
- 1 cup buckwheat flour
- ½ cup spelt flour
- ½ cup cornflour
- 1 teaspoon baking soda
- 1 teaspoon sea salt
- 1 teaspoon chili powder
- Fresh herbs, of your choice, chopped (such as basil, oregano, thyme, cilantro)
Equipment Needed
- Mixing bowls
- Whisk
- Measuring cups and spoons
- Baking sheet
- Parchment paper
- Oven
Instructions
-
Begin by combining the wet ingredients. In a mixing bowl, whisk together the egg, kefir, milk, and olive oil for about 2-3 minutes. Ensure all the ingredients are thoroughly incorporated. The mixture should appear smooth and slightly frothy.
-
In a separate, larger mixing bowl, prepare the dry ingredients. Mix together the buckwheat flour, spelt flour, and cornflour. Add the baking soda, sea salt, chili powder, and the chopped fresh herbs. Ensure all the dry ingredients are evenly distributed by whisking them together.
-
Gradually add the dry ingredients to the wet ingredients. Pour the flour mixture into the egg and kefir mixture. Stir until all the ingredients are well combined. Avoid overmixing; a few lumps are perfectly acceptable. The dough will be quite wet, more like a batter than a traditional bread dough.
-
Allow the dough to rest. Cover the bowl and let the dough rest for 10 minutes at room temperature. This resting period allows the flours to fully absorb the liquid and the baking soda to begin its work, resulting in a lighter, more tender roll.
-
Preheat the oven and baking sheet. While the dough is resting, heat a baking sheet in the oven at 250°C (approximately 482°F). This high initial temperature is crucial for creating a crisp crust and a good rise.
-
Prepare the baking sheet. Once the baking sheet is hot, carefully remove it from the oven. Immediately cover it with parchment paper to prevent the rolls from sticking.
-
Shape and bake the rolls. Using a wet spoon (dipping the spoon in water between scoops helps prevent sticking), place small, round knobs of dough onto the prepared baking sheet. Leave some space between each roll to allow for expansion.
-
Bake the rolls. Bake in the preheated oven at 220°C (approximately 428°F) for 5-10 minutes, or until the rolls are golden brown and slightly firm to the touch. Baking times can vary depending on your oven, so keep a close eye on them.
-
Cool and soften. Once baked, remove the rolls from the oven. Immediately cover them with a clean dish towel and allow them to cool slightly. Covering them helps to soften the crust, creating a more enjoyable texture.
Expert Tips & Tricks
- Don’t overmix the dough: Overmixing develops the gluten too much, leading to tough rolls.
- Use a wet spoon: This prevents the dough from sticking to the spoon when shaping the rolls.
- Adjust the herbs: Feel free to experiment with different herb combinations to suit your taste. Rosemary, sage, or dill would also be delicious additions.
- High initial heat: The initial high temperature is essential for a good rise and crust. Don’t skip this step.
- For crispier rolls: Omit the towel covering step, allowing the rolls to cool uncovered for a crispier crust.
- Adjust baking time: Since oven temperatures can vary, adjust baking time accordingly. The rolls should be golden brown and sound hollow when tapped on the bottom.
Serving & Storage Suggestions
Serve these buckwheat and kefir rolls warm, straight from the oven. They are delicious on their own, with a pat of butter, or alongside soups, stews, and salads. They also make excellent sandwich rolls.
To store leftover rolls, place them in an airtight container at room temperature for up to 2 days. For longer storage, refrigerate them for up to 5 days or freeze them for up to 2 months. To reheat, wrap the rolls in foil and bake them in a preheated oven at 175°C (350°F) for 5-10 minutes, or until warmed through. You can also reheat them in a microwave, but they may become slightly softer.
Nutritional Information
| Nutrient | Amount per Serving | % Daily Value (Approximate) |
|---|---|---|
| Calories | 87 kcal | 4% |
| Total Fat | 2.8 g | 4% |
| Saturated Fat | 0.7 g | 3% |
| Cholesterol | 20 mg | 6% |
| Sodium | 376 mg | 15% |
| Total Carbohydrate | 13.6 g | 4% |
| Dietary Fiber | 1.7 g | 6% |
| Sugars | 0.4 g | 1% |
| Protein | 2.9 g | 5% |
Note: Nutritional information is an estimate and may vary based on specific ingredients and portion sizes.
Variations & Substitutions
- Gluten-Free: While this recipe contains spelt flour (which contains gluten), you can experiment with substituting it with another gluten-free flour like brown rice flour or a gluten-free blend. The texture might be slightly different, so adjust the liquid accordingly.
- Dairy-Free: If you are dairy-free, you can substitute the milk with a plant-based milk alternative such as almond milk, soy milk, or oat milk.
- Spice Level: Adjust the amount of chili powder to your preference. For a milder flavor, use less chili powder or omit it altogether. For a spicier kick, add more chili powder or a pinch of cayenne pepper.
- Herbs: Get creative with the herbs! Try adding dried herbs like Italian seasoning or herbes de Provence for a different flavor profile.
- Seeds: Add a tablespoon or two of seeds like poppy seeds, sesame seeds, or sunflower seeds to the dough for added texture and flavor.
FAQs (Frequently Asked Questions)
Q: Can I use plain yogurt instead of kefir?
A: Yes, you can substitute plain yogurt for kefir. The rolls might have a slightly less tangy flavor, but the texture should be similar.
Q: Can I make the dough ahead of time?
A: It’s best to bake the rolls soon after the dough is mixed and rested. However, you can prepare the dry and wet ingredients separately ahead of time and combine them just before baking.
Q: Why is the dough so wet?
A: This recipe is designed for a wet dough, which contributes to a light and airy texture. Don’t be tempted to add more flour, as this will result in tougher rolls.
Q: Can I freeze the baked rolls?
A: Yes, you can freeze the baked rolls. Allow them to cool completely before wrapping them tightly in plastic wrap and placing them in a freezer bag.
Q: What can I serve with these rolls?
A: These rolls are versatile and pair well with a variety of dishes, including soups, stews, salads, and dips. They also make a delicious addition to a cheese board or charcuterie platter.
Final Thoughts
I hope you’ll give these buckwheat and kefir rolls a try. They’re a simple yet satisfying bake, perfect for adding a touch of rustic charm to any meal. Don’t be afraid to experiment with different herbs and spices to create your own signature version. And most importantly, enjoy the process of baking and the delicious aroma that fills your kitchen. Share your creations and feedback – I’d love to hear how they turn out! These rolls are particularly delicious with a hearty bowl of lentil soup or a simple green salad.