
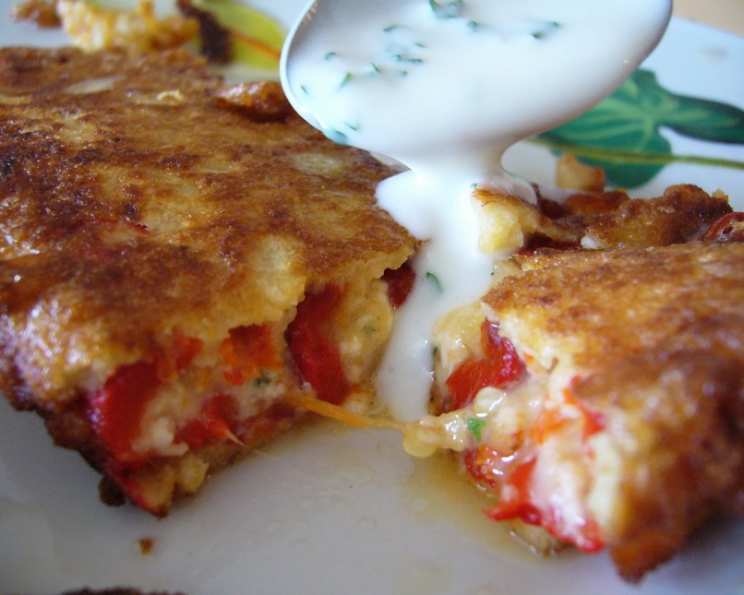
Chushki Burek: A Taste of Bulgarian Sunshine
I can almost smell the smoky char of grilled peppers just thinking about Chushki Burek. My grandmother, Baba Elena, would make this every summer when the garden was overflowing with ripe red and green bell peppers. We’d sit outside under the grapevines, the air thick with the scent of roasted vegetables and salty cheese, devouring these crispy, cheesy delights straight from the pan. It wasn’t just a meal; it was a celebration of family, sunshine, and the simple joys of Bulgarian summer.
Recipe Overview
- Prep Time: 45 minutes
- Cook Time: 30 minutes
- Total Time: 1 hour 15 minutes
- Servings: 4
- Yield: 8 stuffed peppers
- Dietary Type: Vegetarian
Ingredients
For the Peppers:
- 8 bell peppers (red or green)
- 500 g white feta cheese (from cow or sheep)
- 100 g yellow cheese (Kashkaval is traditional)
- 5 eggs
- 300 g breadcrumbs
- 3-4 garlic cloves, smashed with a pinch of salt
- 1 tomato
- 1 tablespoon thyme
- 2 teaspoons parsley, chopped
- ¼ teaspoon black pepper (powder)
- 150 g oil or olive oil, for frying
For the Sour Sauce:
- 500 g Bulgarian yogurt or sour plain yogurt
- 2 garlic cloves, smashed with 1 pinch of salt
- 2 teaspoons dill, chopped
- 2 teaspoons parsley, chopped
- 1 tablespoon olive oil
- 1 teaspoon white vinegar
- ½ teaspoon salt
Equipment Needed
- Grill or gas stovetop
- Large bowl
- Small bowls for breadcrumbs and eggs
- Frying pan
- Slotted spoon or spatula
Instructions
-
Prepare the Sour Sauce: In a medium bowl, combine the Bulgarian yogurt or sour plain yogurt, smashed garlic with salt, dill, parsley, olive oil, white vinegar, and salt. Mix well until all ingredients are evenly incorporated. Cover the bowl and refrigerate the sauce to allow the flavors to meld while you prepare the peppers.
-
Roast the Peppers: The best way to prepare the peppers is to barbecue them over an open flame until the skins are blackened. If you don’t have a grill, you can fry them in a dry pan over medium-high heat, turning frequently, until the skins are charred. Be careful not to burn the peppers completely; you want the skin to blacken and blister so it’s easy to peel off.
-
Peel and Clean the Peppers: Once the peppers are cool enough to handle, gently peel off the blackened skin. Remove the stems and seeds from inside the peppers, being careful not to tear them. Rinse the peppers lightly to remove any remaining bits of skin or seeds.
-
Prepare the Cheese Filling: In a large bowl, grind or crumble the white feta cheese, yellow cheese, and tomato. Mix them together thoroughly. If the mixture seems too thick, you can add up to 100ml of the liquid drained from the feta cheese (if it’s packed in brine) to loosen it up.
-
Season the Filling: Mix 1 of the eggs into the cheese mixture. Then, add the thyme, parsley, and black pepper. Stir until all the spices are evenly distributed throughout the cheese filling.
-
Fill the Peppers: Carefully fill each pepper with the prepared cheese mixture, ensuring that the entire cavity is filled but not overstuffed.
-
Prepare for Frying: In two separate bowls, place the breadcrumbs in one and the remaining 4 eggs (mixed with a pinch of salt and a pinch of baking powder) in the other. Whisk the eggs well to ensure they are smooth and slightly frothy.
-
Fry the Stuffed Peppers: Heat the oil (or olive oil) in a large frying pan to 180°C (350°F). Working one at a time, dip each filled pepper first into the bowl with the eggs, then into the bowl with the breadcrumbs, then back into the eggs again. This double coating ensures a crispy, golden-brown crust. Carefully place the coated peppers into the hot oil and fry until they are golden brown on all sides. This should take about 3-4 minutes per side.
-
Serve: Remove the fried peppers from the pan using a slotted spoon or spatula and place them on a plate lined with paper towels to drain excess oil. Serve the Chushki Burek hot, accompanied by the chilled sour sauce.
Expert Tips & Tricks
- Roasting Peppers: The key to easily peeling peppers is to roast them until the skin is completely blackened and blistered. Place the hot peppers in a bowl covered with plastic wrap for about 10 minutes. The steam will help loosen the skin.
- Cheese Variation: While traditional recipes use cow or sheep milk feta, you can use a blend of cheeses to your preference. Try adding a little ricotta or mozzarella for a creamier texture.
- Breadcrumb Texture: For extra crispy breadcrumbs, try using panko breadcrumbs. You can also toast regular breadcrumbs lightly in a dry pan before using them to deepen their flavor.
- Frying Oil Temperature: Maintaining the correct oil temperature is crucial for achieving crispy peppers without making them greasy. If the oil is not hot enough, the peppers will absorb too much oil. Use a thermometer to monitor the temperature, or test the oil by dropping a small piece of breadcrumb into it – it should sizzle immediately and turn golden brown within seconds.
Serving & Storage Suggestions
Serve Chushki Burek hot, garnished with a sprig of fresh parsley or dill. The chilled sour sauce provides a refreshing contrast to the rich, fried peppers.
Leftover Chushki Burek can be stored in an airtight container in the refrigerator for up to 3 days. They can be reheated in a 350°F (175°C) oven for about 10-15 minutes, or until heated through. Reheating in the oven will help to retain some of the crispiness. Microwaving is not recommended as it can make the peppers soggy. While freezing is not recommended, you can freeze them after frying (before serving) for up to 2 months in a tightly sealed container. When ready to serve, defrost completely and reheat as described above.
Nutritional Information
| Nutrient | Amount per Serving | % Daily Value |
|---|---|---|
| Calories | 1139.6 kcal | N/A |
| Calories from Fat | 703 g | 62% |
| Total Fat | 78.2 g | 120% |
| Saturated Fat | 27 g | 135% |
| Cholesterol | 375.6 mg | 125% |
| Sodium | 2371.3 mg | 98% |
| Total Carbohydrate | 73.3 g | 24% |
| Dietary Fiber | 8 g | 31% |
| Sugars | 16.8 g | 67% |
| Protein | 38.3 g | 76% |
Note: Nutritional information is an estimate and can vary based on specific ingredients and cooking methods.
Variations & Substitutions
- Spicy Kick: Add a pinch of red pepper flakes to the cheese filling for a touch of heat. You can also use a spicy cheese variety.
- Herby Delight: Experiment with different herbs in the filling. Mint, basil, or oregano would all be delicious additions.
- Vegan Option: Replace the feta and yellow cheese with a vegan alternative. Use a flax egg or plant-based egg substitute for binding.
- Gluten-Free: Use gluten-free breadcrumbs for a gluten-free version.
- Baked Instead of Fried: To reduce the amount of oil, you can bake the stuffed peppers instead of frying them. Place the breaded peppers on a baking sheet lined with parchment paper and bake at 375°F (190°C) for about 20-25 minutes, or until golden brown and heated through.
FAQs (Frequently Asked Questions)
Q: Can I prepare the peppers ahead of time?
A: Yes, you can roast, peel, and fill the peppers a day in advance. Store them in the refrigerator until ready to fry.
Q: Can I use different types of peppers?
A: While bell peppers are traditional, you can experiment with other varieties, such as Anaheim peppers or poblano peppers, for a different flavor and level of heat. Just make sure they are large enough to be filled.
Q: What if I don’t have Bulgarian yogurt for the sauce?
A: Plain Greek yogurt makes an excellent substitute for Bulgarian yogurt. It has a similar tanginess and thick texture.
Q: The cheese mixture is too dry. What can I do?
A: Add a little more of the liquid drained from the feta cheese or a tablespoon of milk or cream to moisten the mixture. Be careful not to add too much liquid, or the filling will be too runny.
Q: Can I add meat to the filling?
A: While Chushki Burek is traditionally vegetarian, you can add cooked ground meat (beef, pork, or lamb) to the cheese filling for a heartier meal.
Final Thoughts
Chushki Burek is more than just a recipe; it’s a taste of Bulgarian tradition and a celebration of simple, fresh ingredients. I encourage you to try this recipe and experience the flavors of summer. Whether you stick to the classic recipe or experiment with variations, I hope this dish brings joy to your table. Don’t hesitate to share your creations and feedback – I’d love to hear about your Chushki Burek adventures! This dish pairs beautifully with a crisp white wine or a refreshing Shopska salad. Enjoy!