
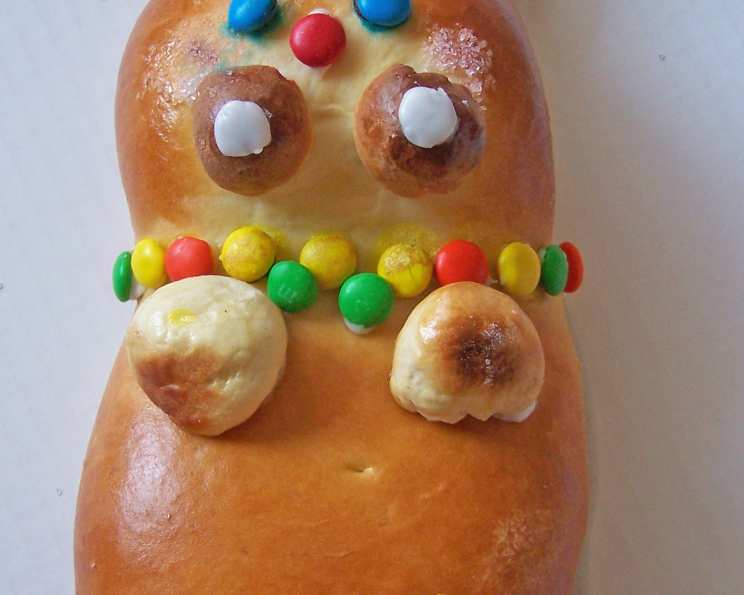
Bunny Bread: A Sweet Springtime Treat
The aroma of baking bread always evokes a rush of childhood memories, but this Bunny Bread recipe holds a special place in my heart. I remember my grandmother, her hands dusted with flour, patiently shaping the dough with me. The best part was carefully placing the M&M candies on the freshly iced bread, creating the bunny’s eyes and nose – a sweet reward for our collaborative baking effort. Every Easter, this Bunny Bread was the centerpiece of our family brunch, a testament to love, tradition, and deliciousness.
Recipe Overview
- Prep Time: 45 minutes
- Cook Time: 30 minutes
- Total Time: 1 hour 15 minutes
- Servings: 12
- Yield: 1 large bread loaf
- Dietary Type: Not specified
Ingredients
Bread:
- 1/2 cup buttermilk, warmed
- 1/2 cup butter, room temperature
- 1/2 cup warm water (body temperature)
- 2 eggs, beaten
- 1/2 cup sugar
- 1 teaspoon salt
- 1 tablespoon fast-rising active dry yeast
- 5 cups all-purpose flour
Filling:
- 1/3 cup butter, room temperature
- 1/3 cup sugar
- 1/2 cup raisins
- 1/2 cup chocolate chips
- 1 teaspoon cinnamon
Egg Wash:
- 1 egg, lightly mixed with water
Equipment Needed
- Stand mixer (optional, but recommended)
- Large mixing bowl
- Measuring cups and spoons
- Greased cookie sheet
- Silicone baking mat or lightly floured surface
- Pastry brush
Instructions
-
Prepare the Dough: In the bowl of your stand mixer (or a large mixing bowl if mixing by hand), combine the warmed buttermilk, room temperature butter, and warm water. Ensure the water is not too hot, or it could kill the yeast.
-
Add the Remaining Wet Ingredients: Add the beaten eggs and sugar to the mixture. Stir until combined.
-
Incorporate Dry Ingredients: Add the salt, yeast, and all-purpose flour. If using a stand mixer, use the dough hook attachment and mix on low speed until the dough comes together. If mixing by hand, stir with a wooden spoon or your hands until a shaggy dough forms.
-
Knead the Dough: If using a stand mixer, knead the dough on medium speed for about 8-10 minutes, or until it becomes smooth and elastic. If kneading by hand, turn the dough out onto a lightly floured surface and knead for 10-12 minutes, or until it is smooth and elastic. If the dough is too sticky, gradually add more flour, one tablespoon at a time, until it is easier to handle.
-
First Rise: Place the dough in a lightly oiled bowl, turning to coat. Cover with plastic wrap or a clean kitchen towel and let rise in a warm place for about 1 hour, or until doubled in size.
-
Prepare the Filling: While the dough is rising, prepare the filling. In a small bowl, combine the room temperature butter and sugar. Mix well until smooth and creamy. In a separate bowl, mix the raisins, chocolate chips, and cinnamon.
-
Shape the Bunny: Once the dough has doubled, gently punch it down to release the air.
-
Create Bunny Parts: Pinch off four pieces of dough about the size of a golf ball to form the ears and feet. Take two additional pieces, about half the size of a golf ball, for the hands. Finally, pinch off two smaller pieces, about a quarter the size of a golf ball, for the cheeks.
-
Stuff the Small Dough Pieces: Flatten each of the small pieces into a small disc. Place a tiny amount of the butter mixture and one chocolate chip and one raisin on each disc. Bring up the sides to enclose the filling and roll each piece into a ball (except for the ears). Shape the ear pieces into bunny ears. Set all pieces aside.
-
Roll Out the Remaining Dough: On a very lightly floured surface (a silicone baking mat works great), roll the remaining dough into an 18×8 inch rectangle.
-
Spread the Filling: Spread the butter/sugar mixture evenly over the surface of the dough rectangle.
-
Sprinkle the Raisin Mixture: Sprinkle the raisin/chip/cinnamon mixture evenly over the buttered dough.
-
Roll and Shape the Loaf: Bring up the long sides of the rectangle and roll it into a wide roll, tucking the head edge down and the bottom up. Tighten the neck area to shape the head, making it smaller than the body.
-
Place on Baking Sheet: Place the shaped loaf on a greased cookie sheet.
-
Attach the Bunny Parts: Pinch the ears onto the head, arranging them as desired. Place the cheeks together on the lower part of the head, touching each other. Use some of the egg wash to adhere them. Place the hands on the chest, adhering with egg wash. Place the feet at the bottom, adhering with egg wash. You can use peanuts or other decorations for the toes if desired.
-
Egg Wash and Second Rise: Brush the entire exposed surface of the bunny with the egg wash. Let the bread rise in a warm place for 30 minutes.
-
Preheat and Bake: Preheat your oven to 350 degrees F (175 degrees C).
-
Bake: Bake the bunny bread for 30 minutes, or until golden brown.
-
Cool: Let the bunny bread cool on the baking sheet for a few minutes before transferring it to a wire rack to cool completely. If any of the bunny parts come off during baking, you can adhere them back on with decorating icing after the bread has cooled.
Expert Tips & Tricks
- Yeast Activation: Ensure your yeast is active by proofing it in warm water (around 110-115°F) with a teaspoon of sugar. If it doesn’t bubble after 5-10 minutes, it’s likely dead and you’ll need to use fresh yeast.
- Dough Consistency: Don’t be afraid to adjust the amount of flour slightly to achieve a smooth, elastic dough that is slightly tacky but not overly sticky.
- Preventing Over-Browning: If the top of the bread starts to brown too quickly, tent it with aluminum foil during the last 10-15 minutes of baking.
- Adding Decorations: While the original recipe only mentions M&Ms, feel free to use other candies, sprinkles, or even edible glitter to decorate your bunny.
Serving & Storage Suggestions
Serve the Bunny Bread warm or at room temperature. It is delicious on its own or served with a pat of butter. Leftovers can be stored in an airtight container at room temperature for up to 2 days, in the refrigerator for up to 5 days, or frozen for up to 2 months. To reheat, wrap the bread in foil and warm it in a preheated oven at 350°F (175°C) for about 10-15 minutes.
Nutritional Information
| Nutrient | Amount per Serving | % Daily Value |
|---|---|---|
| Calories | 433.8 kcal | N/A |
| Total Fat | 16.8 g | 25% |
| Saturated Fat | 9.9 g | 49% |
| Cholesterol | 87.2 mg | 29% |
| Sodium | 316 mg | 13% |
| Total Carbohydrate | 64 g | 21% |
| Dietary Fiber | 2.4 g | 9% |
| Sugars | 22 g | N/A |
| Protein | 8.3 g | N/A |
Note: Nutritional information is an estimate and may vary based on ingredient substitutions and preparation methods.
Variations & Substitutions
- Vegan Bunny Bread: Substitute the buttermilk with plant-based milk (such as almond or soy milk) and the butter with vegan butter. Use a flax egg (1 tablespoon ground flaxseed mixed with 3 tablespoons water) in place of the chicken eggs.
- Gluten-Free Bunny Bread: Use a gluten-free all-purpose flour blend and follow the package instructions for any modifications needed. You may need to add a binder such as xanthan gum to improve the texture.
- Different Fillings: Get creative with the filling! Try adding dried cranberries, chopped nuts, or even a cream cheese filling.
FAQs (Frequently Asked Questions)
Q: Can I make the dough ahead of time?
A: Yes, you can prepare the dough the day before and store it in the refrigerator. Let it come to room temperature for about 30 minutes before shaping.
Q: My dough isn’t rising. What could be the problem?
A: Ensure your yeast is fresh and that the water used to activate it isn’t too hot or too cold. Also, a cold room can inhibit rising, so try placing the dough in a warmer spot.
Q: Can I use a different type of flour?
A: While all-purpose flour is recommended, you can experiment with bread flour for a chewier texture. However, other flours may require adjustments to the liquid content.
Q: How do I prevent the bunny parts from falling off during baking?
A: Make sure to adhere the bunny parts securely with egg wash before the second rise. You can also reinforce them with toothpicks during baking and remove them after cooling, if necessary.
Q: Can I freeze the baked Bunny Bread?
A: Yes, wrap the cooled bread tightly in plastic wrap and then in aluminum foil. Freeze for up to 2 months. Thaw completely before serving.
Final Thoughts
This Bunny Bread recipe is more than just a baked good; it’s a symbol of springtime joy and a delightful activity to share with loved ones. Don’t be afraid to get creative with the decorations and fillings to make it your own. I encourage you to try this recipe and create your own cherished memories around this delicious treat. Share your creations with me – I’d love to see your unique Bunny Bread masterpieces! And for a perfectly festive pairing, serve your warm slices with a cup of rich, creamy hot chocolate. Happy baking!