
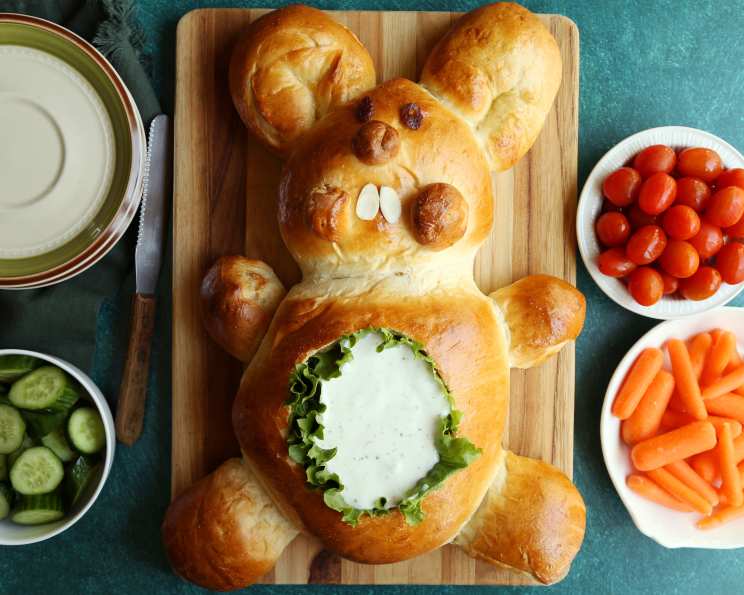
Bunny Bread W/Dip in Tummy!
I remember Easter Sundays as a child; the thrill of the egg hunt, the pastel colors everywhere, and the undeniable centerpiece on the table: a giant, golden-brown bunny made of bread. This wasn’t just any bread; it was a vessel for creamy, savory dips, a true edible masterpiece. The delight on everyone’s faces as they plucked veggie sticks and crackers to plunge into the bunny’s “tummy” is a memory I cherish, and one I’m excited to recreate! This whimsical centerpiece is surprisingly easy to make, and sure to be a hit at any Easter gathering.
Recipe Overview
- Prep Time: 45 minutes
- Cook Time: 25-30 minutes
- Total Time: 1 hour 15 minutes
- Servings: 12
- Yield: 1 Bunny Bread
- Dietary Type: Vegetarian (depending on dip selection)
Ingredients
- 2 loaves (1 lb each) frozen bread dough, thawed
- 2 raisins
- 2 sliced almonds, can sub 1 white jelly bean cut in half
- 1 egg, lightly beaten
- lettuce leaf
- ranch dip or spinach dip
- Assorted fresh vegetables (carrots, celery, cucumber, bell peppers, etc.)
- Crackers
Equipment Needed
- Baking sheet
- Greased surface
- Sharp knife or pizza cutter
- Wire rack
- 16×13″ tray (or similar serving platter)
- Toothpicks (optional, for securing facial features)
Instructions
-
Begin by taking one loaf of the thawed bread dough. Cut off approximately one-fourth of this loaf. This smaller portion will form the bunny’s head. Shape the cut piece into a pear-like shape to resemble a head.
-
Now, take the remaining portion of the first loaf of dough and flatten it into a 7×6″ oval. This will be the bunny’s body. Place this oval on a greased baking sheet.
-
Position the pear-shaped head above the oval-shaped body on the baking sheet, connecting the head to the body.
-
Using a sharp knife or pizza cutter, make narrow cuts, about 3/4″ deep, on each side of the head to create the bunny’s whiskers. These delicate cuts add a touch of realism to your bread bunny.
-
Take the second loaf of frozen bread dough and cut it into four equal portions.
-
Shape two of these portions into long ropes, approximately 16″ in length. Fold each rope in half to form the bunny’s ears.
-
Carefully arrange the ears on the baking sheet with the open ends of the folded dough touching the head of the bunny.
-
Cut a third portion of the dough in half. Shape these halves into 3 1/2″ ovals to create the bunny’s back paws.
-
On the top edge of each oval-shaped back paw, make two 1″ slits to create the toes. This adds detail and makes the paws more distinct.
-
Position the paws on each side of the body at the bottom edge.
-
Divide the remaining fourth portion of dough into three pieces. Shape two of these pieces into 2 1/2″ balls for the front paws. Shape the last piece into two 1″ balls for the cheeks and one 1/2″ ball for the nose.
-
Place the larger ball-shaped paws on each side of the body at the top edge. Position the smaller balls on the face to create the cheeks and nose.
-
Add the raisins for the eyes and the sliced almond (or halved white jelly bean) for the teeth. Important Note: If using a jelly bean, add it just before serving to prevent it from melting and becoming grainy. You can secure the cheeks and nose with small pieces of toothpick to hold them in place while baking, if desired.
-
Gently brush the entire dough creation with the lightly beaten egg. This will give the baked bunny a beautiful golden-brown sheen.
-
Cover the baking sheet with a clean kitchen towel and let the dough rise for about 30-35 minutes, or until doubled in size. This is a crucial step for a light and airy bunny bread.
-
Preheat your oven to 350ºF (175ºC).
-
Bake the bunny bread at 350ºF (175ºC) for 25-30 minutes, or until it is golden brown. Keep an eye on it towards the end to prevent burning. If the top starts to brown too quickly, tent it loosely with foil.
-
Once baked, remove the bunny bread from the oven and transfer it to a wire rack to cool completely.
-
While the bunny bread cools, line a 16×13″ tray (or similar serving platter) with lettuce leaves. This creates an attractive and edible base for your centerpiece.
-
Once the bread is completely cooled, carefully cut a 5×4″ oval in the center of the bunny’s body. This will create the “tummy” for the dip.
-
Hollow out the bread inside the oval, leaving a shell. Cut the removed bread into cubes for dipping.
-
Line the hollowed-out hole in the bunny’s belly with more lettuce leaves. This creates a barrier between the bread and the dip, preventing the bread from becoming soggy.
-
Fill the lettuce-lined hole in the bunny’s belly with your choice of ranch dip or spinach dip.
-
Finally, surround the entire bunny with the bread cubes, assorted fresh vegetables, and crackers for dipping.
Expert Tips & Tricks
- Dough Handling: Thawing the bread dough properly is key. Let it thaw slowly in the refrigerator overnight for best results. This allows the dough to relax and rise more evenly.
- Egg Wash: The egg wash is important for achieving a beautiful golden-brown color. Be sure to brush the entire surface of the dough evenly.
- Facial Features: Don’t be afraid to get creative with the bunny’s facial features! You can use other types of nuts, seeds, or even edible candies to personalize your bunny.
- Dip Options: The possibilities are endless when it comes to the dip! Consider a layered Mexican dip, a hummus, or even a sweet fruit dip for a unique twist.
- Preventing Soggy Bread: To prevent the bread cubes from becoming soggy, consider toasting them lightly before serving.
Serving & Storage Suggestions
Serve the Bunny Bread W/Dip in Tummy! immediately after assembly for the best presentation and flavor. This centerpiece is ideal for Easter brunch, a springtime party, or a whimsical snack for kids.
Leftover dip should be stored in an airtight container in the refrigerator for up to 3 days. Leftover bread cubes can be stored in an airtight container at room temperature for 1-2 days, or frozen for longer storage. However, the assembled bunny bread is best enjoyed fresh, as the bread will start to dry out after a few hours.
Nutritional Information
| Nutrient | Amount per Serving | % Daily Value |
|---|---|---|
| Calories | 250 kcal | 13% |
| Total Fat | 10g | 15% |
| Saturated Fat | 3g | 15% |
| Cholesterol | 20mg | 7% |
| Sodium | 300mg | 13% |
| Carbohydrates | 30g | 10% |
| Fiber | 2g | 8% |
| Sugar | 5g | 5% |
| Protein | 5g | 10% |
Note: Nutritional information is an estimate and may vary based on specific ingredients and portion sizes.
Variations & Substitutions
- Gluten-Free: Use gluten-free bread dough to make this recipe suitable for those with gluten sensitivities.
- Vegan: Choose a vegan bread dough and a plant-based dip (such as hummus or vegan ranch) to create a completely vegan version.
- Sweet Bunny: Replace the savory dip with a fruit dip made from yogurt and honey, and surround the bunny with fresh fruit for a sweet treat.
- Herbaceous Bunny: Add fresh herbs like rosemary or thyme to the bread dough for a more savory and aromatic flavor.
- Seasonal Veggies: Adapt the vegetables to reflect the season. In the summer, use cherry tomatoes, cucumbers, and bell peppers. In the fall, try roasted butternut squash or sweet potato.
FAQs (Frequently Asked Questions)
Q: Can I make the bread dough from scratch?
A: Absolutely! If you prefer, you can use your favorite homemade bread dough recipe instead of frozen dough. Just make sure you have enough dough for the bunny shape.
Q: Can I prepare the bunny bread in advance?
A: You can bake the bunny bread a day in advance and store it at room temperature, wrapped in plastic wrap. However, it’s best to assemble the dip and vegetables just before serving to prevent the bread from becoming soggy.
Q: What if my bunny bread browns too quickly?
A: If the top of the bunny bread starts to brown too quickly in the oven, tent it loosely with aluminum foil to prevent burning.
Q: Can I use a different type of dip?
A: Of course! Feel free to use any dip you like, such as guacamole, French onion dip, or even a sweet fruit dip.
Q: How do I keep the vegetables fresh?
A: To keep the vegetables fresh and crisp, store them in the refrigerator until just before serving. You can also prepare them ahead of time by chopping them and storing them in a container with a damp paper towel.
Final Thoughts
I truly believe that this Bunny Bread W/Dip in Tummy! is more than just a recipe; it’s a way to create a memorable and joyful experience. The simple act of shaping dough into a whimsical bunny, filling its belly with delicious dip, and surrounding it with colorful vegetables is sure to bring smiles to faces of all ages. So, gather your ingredients, unleash your creativity, and prepare to be amazed by the delightful centerpiece you’ve created. Don’t forget to share your creations with me—I can’t wait to see your adorable bunny breads! Happy Baking!