
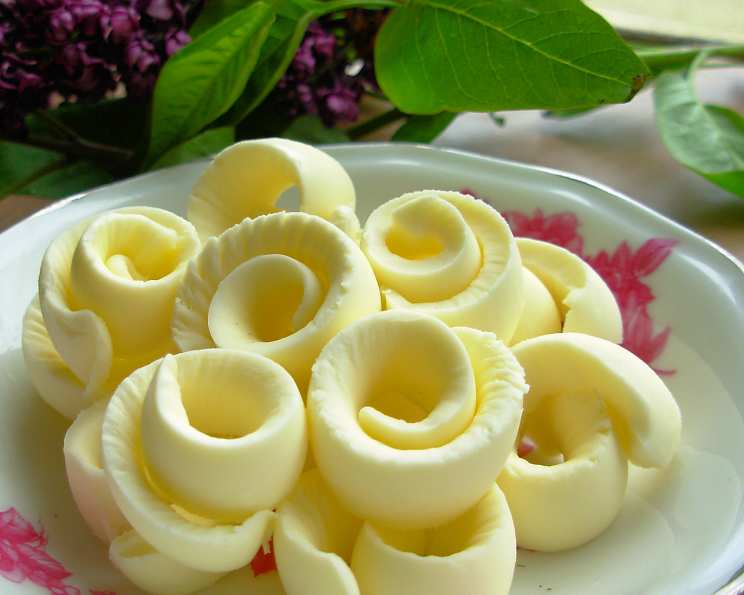
Butter Curls: A Touch of Elegance for Every Table
My grandmother, a woman whose hands seemed to possess a magic all their own, always had a way of transforming the simplest meals into celebrations. I remember being mesmerized as she delicately coaxed ribbon after ribbon from a stick of butter, each curl a testament to her patience and artistry. These weren’t just butter; they were edible jewels, adorning everything from morning toast to holiday roasts, adding a touch of whimsy and delight. I always thought it was an impossible feat, but little did I know, it’s quite simple with a little practice.
Recipe Overview
- Prep Time: 5 minutes
- Servings: 18
- Dietary Type: Vegetarian
Ingredients
- ½ cup butter, unsalted preferred
- ½ cup hot water
Equipment Needed
- Butter curler or spoon
- Small bowl
- Refrigerator
Instructions
- Begin with your butter. The consistency is crucial. You want it to be firm, but not rock solid. Let the butter sit at room temperature for a few minutes to soften slightly. It needs to be soft enough to peel, but cold enough to hold its shape. Think of it as the Goldilocks of butter consistencies.
- Now, prepare your hot water. The temperature is important. You want it very hot, but not boiling. The heat will help the butter curler (or spoon) glide smoothly across the butter, creating those beautiful curls.
- If you’re using a butter curler, submerge it in the hot water for a few seconds to heat it up. If you’re using a spoon, do the same. A soup spoon or even a teaspoon can work well.
- Remove the heated butter curler or spoon from the water and wipe it dry with a clean towel. You don’t want excess water interfering with the curl formation.
- Place the stick of butter on a cutting board or plate. Hold the heated butter curler at a slight angle against the butter. Apply firm, even pressure and pull the curler across the surface of the butter to create a curl. It’s a bit like peeling a vegetable, but with more finesse.
- If the butter is too cold, the curl will break or crumble. If this happens, the butter is too cold. Allow the stick to warm moderately for better carving of the curl. Reheat the butter curler or spoon in the hot water and try again.
- If the butter is too warm, the curl will be soft and mushy. If this happens, place the butter back in the refrigerator for a few minutes to firm up.
- Repeat the process, reheating the butter curler or spoon as needed, until you have a collection of beautiful butter curls.
- To maintain the shape of your curls, gently place them in a bowl of ice water as you create them. This will help them firm up and hold their form.
- After you’ve created all of your curls, refrigerate them in the ice water until just prior to serving. This keeps them cold and prevents them from melting or losing their shape.
Expert Tips & Tricks
- The butter temperature is key! Experiment to find the sweet spot where the butter is soft enough to curl, but firm enough to hold its shape.
- For extra-fancy curls, try using a fluted butter curler.
- If you don’t have a butter curler, a vegetable peeler can also work in a pinch, although the curls will be flatter.
- Don’t be afraid to practice! The more you make butter curls, the better you’ll get.
Serving & Storage Suggestions
Butter curls are best served chilled. Arrange them artfully on top of toast, pancakes, waffles, roasted vegetables, grilled meats, or seafood. They add a touch of elegance to any dish. They are particularly beautiful served on a buffet table or at a holiday gathering.
Store any leftover butter curls in the refrigerator, submerged in ice water, for up to 2-3 days. The water helps prevent them from drying out or absorbing odors from the refrigerator. You can also freeze the butter curls for longer storage. Place them on a parchment-lined baking sheet and freeze until solid, then transfer them to a freezer-safe bag or container. Frozen butter curls can be stored for up to 2 months. Thaw them in the refrigerator before serving.
Nutritional Information
| Nutrient | Amount per Serving | % Daily Value |
|---|---|---|
| Calories | 45 kcal | 2% |
| Calories from Fat | 45 g | 102% |
| Total Fat | 5.1 g | 7% |
| Saturated Fat | 3.2 g | 16% |
| Cholesterol | 13.6 mg | 4% |
| Sodium | 36.5 mg | 1% |
| Total Carbohydrate | 0 g | 0% |
| Dietary Fiber | 0 g | 0% |
| Sugars | 0 g | 0% |
| Protein | 0.1 g | 0% |
Note: Nutritional information is an estimate and may vary based on specific ingredients and preparation methods.
Variations & Substitutions
- Flavored Butter Curls: Add herbs, spices, or citrus zest to your butter before making the curls for a burst of flavor. Try adding chopped chives, dill, parsley, lemon zest, or garlic powder.
- Vegan Butter Curls: Use a high-quality vegan butter alternative to make vegan butter curls. Look for a brand that is firm and holds its shape well. Miyoko’s Kitchen Cultured Vegan Butter is a great option.
- Brown Butter Curls: Brown the butter before making the curls for a nutty, rich flavor. Be careful not to burn the butter. Let it cool slightly before attempting to make curls.
FAQs (Frequently Asked Questions)
Q: Why is my butter crumbling when I try to make curls?
A: Your butter is likely too cold. Allow it to soften at room temperature for a few more minutes before trying again.
Q: How can I prevent the butter curls from melting at room temperature?
A: Keep the butter curls chilled in ice water until just before serving. This will help them hold their shape and prevent them from melting.
Q: Can I use salted butter instead of unsalted butter?
A: Yes, you can use salted butter, but the flavor will be slightly different. Adjust the salt in your recipe accordingly.
Q: What if I don’t have a butter curler?
A: You can use a spoon or a vegetable peeler to create butter curls. The shape may not be as perfect, but they will still be delicious.
Q: How long can I store butter curls in the freezer?
A: Butter curls can be stored in the freezer for up to 2 months. Make sure to wrap them tightly to prevent freezer burn.
Final Thoughts
Creating butter curls is a simple yet impactful way to elevate your culinary creations. Don’t be discouraged if your first attempts aren’t perfect. With a little practice, you’ll be able to create beautiful, elegant butter curls that will impress your guests and add a touch of whimsy to your table. So go ahead, grab a stick of butter, and let your inner artist shine! Consider pairing your butter curls with freshly baked scones or a hearty slice of homemade bread for the ultimate indulgence. And please, share your creations! We’d love to see your beautiful butter curls.