
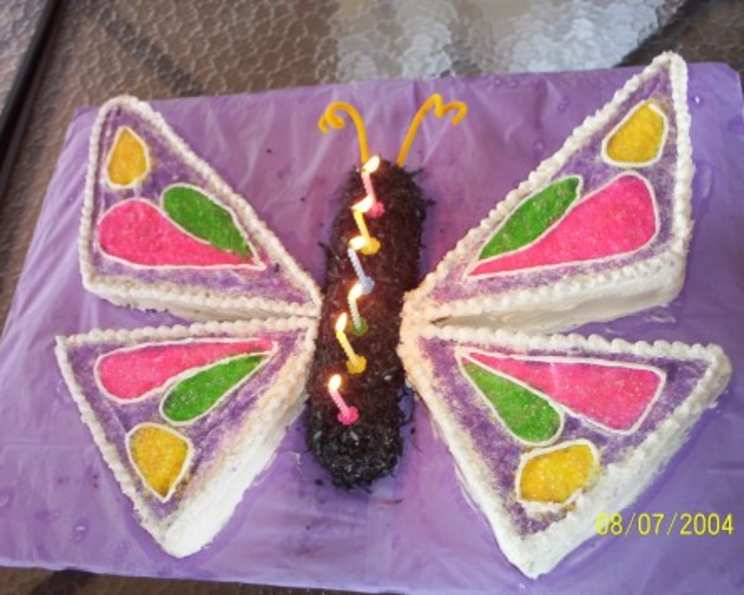
Butterfly Cake: A Whimsical Delight
My earliest memory of a butterfly cake involves a slightly lopsided creation, a generous coating of pastel-colored sprinkles, and the uncontainable joy of my fifth birthday party. My mother, never one to shy away from a baking challenge, had painstakingly crafted this masterpiece, transforming our humble kitchen into a confectionery wonderland. The slightly burnt edges and the frosting that was maybe a tad too sweet only added to its charm – it was perfect because it was made with love, and that’s the essence of what makes a butterfly cake so special. It’s more than just a dessert; it’s a symbol of celebration and a blank canvas for creativity.
Recipe Overview
- Prep Time: 1 hour
- Cook Time: 20-25 minutes
- Total Time: 2 hours 35 minutes
- Servings: 16-20
- Yield: 1 Butterfly Cake
- Dietary Type: Not specified
Ingredients
-
Cake:
- ½ cup shortening
- 1 ½ cups sugar
- 2 eggs
- 2 ½ cups cake flour
- 1 tablespoon baking powder
- ½ teaspoon salt
- 1 cup milk
- 1 teaspoon vanilla extract
-
Frosting & Decoration:
- 1 cup shortening
- ½ cup butter or ½ cup margarine, softened
- 4 ½ cups confectioners’ sugar, divided
- ⅛ teaspoon salt
- 1 teaspoon vanilla extract
- 1 teaspoon almond extract
- 3-5 tablespoons milk
- Your desired color of paste food coloring
- Colored sprinkles
- Decorating bag
- Ziploc bag
- Pastry dough tip – #98 shell and #5 round
- Black licorice (optional)
Equipment Needed
- 13-in. x 9-in. x 2-in. baking pan
- Mixing bowls
- Electric mixer
- Waxed paper
- 20-in. x 15-in. serving board
- Toothpick
- String
- Warm spatula
- 2-in. plastic cup (optional)
- Pastry bag
- Shell tip (#98)
- Round tip (#5)
Instructions
-
Prepare the Cake Batter: Preheat your oven to 350°F (175°C). In a large mixing bowl, cream together the ½ cup of shortening and 1 ½ cups of sugar until the mixture is light and fluffy. This step is crucial for creating a tender cake, so don’t rush it.
-
Incorporate the Eggs: Add the 2 eggs one at a time, beating well after each addition. This ensures that the eggs are fully emulsified into the batter, contributing to the cake’s structure.
-
Combine Dry Ingredients: In a separate bowl, whisk together the 2 ½ cups of cake flour, 1 tablespoon of baking powder, and ½ teaspoon of salt. Cake flour has a lower protein content than all-purpose flour, resulting in a more delicate crumb.
-
Alternate Wet and Dry Ingredients: Gradually add the dry ingredients to the creamed mixture, alternating with the 1 cup of milk. Begin and end with the dry ingredients to prevent the batter from separating. Beat in the 1 teaspoon of vanilla extract.
-
Prepare the Pan: Line the 13-in. x 9-in. x 2-in. baking pan with waxed paper. This will make it easier to remove the cake after baking.
-
Bake the Cake: Pour the batter into the prepared pan and spread evenly. Bake at 350°F (175°C) for 20-25 minutes, or until a toothpick inserted into the center comes out clean. Keep a close eye on the cake during the last few minutes of baking to prevent it from over-browning.
-
Cool the Cake: Let the cake cool completely in the pan before frosting. This is important to prevent the frosting from melting.
-
Prepare the Frosting: For the frosting, in a mixing bowl, cream together the 1 cup of shortening and ½ cup of softened butter (or margarine) until light and fluffy. The butter adds richness and flavor to the frosting, while the shortening provides stability.
-
Gradually Add Sugar: Gradually beat in 2 cups of confectioners’ sugar. Add the ⅛ teaspoon of salt, 1 teaspoon of vanilla extract, and 1 teaspoon of almond extract. The almond extract enhances the overall flavor of the frosting.
-
Adjust Consistency: Beat in the remaining 2 ½ cups of confectioners’ sugar. If necessary, add milk, a tablespoon at a time (3-5 tablespoons total), until the frosting reaches the desired consistency. It should be smooth and spreadable.
-
Divide the Frosting: Remove 2 cups of the frosting and set it aside. This will be used for the white accents and decorations.
-
Tint the Remaining Frosting: Tint the remaining frosting with your desired color of paste food coloring. Paste food coloring is preferred over liquid as it provides a more concentrated color without thinning the frosting.
-
Cut the Cake: To make the butterfly shape, cut a 1-in. wide strip of cake from the 9-in. side. This strip will form the body of the butterfly.
-
Mark Cutting Lines: Place a toothpick in the center of the remaining cake. Using string, divide the cake into four triangles by holding the string at opposite corners. Depress the string slightly into the cake to mark the cutting line. Repeat for the remaining corners.
-
Cut the Triangles: Cut the cake along the marked cutting lines to create four triangles.
-
Assemble the Butterfly: Place the 1-in. strip of cake in the center of a 20-in. x 15-in. serving board to form the butterfly’s body. Place two smaller triangles next to the body for the bottom wings, and two larger triangles for the top wings.
-
Frost the Body: Frost the top and sides of the body with your desired color of frosting.
-
Frost the Wings: Frost the sides and tops of the wings with your desired color of frosting. Smooth the frosting with a warm spatula for a professional finish.
-
Decorate the Edges: Decorate the edges of the cake with the reserved white frosting, using a pastry bag and shell tip (#98). This creates a beautiful scalloped border.
-
Create Wing Patterns: Mark circles on the wings using the top of a 2-in. plastic cup as a template. Alternatively, you can draw freehand designs with a toothpick.
-
Add Sprinkles: Sprinkle jimmies or sprinkles within the marked circles. Outline the circles with white frosting, using a round tip (#5).
-
Create Antennae (Optional): Cut the black licorice into four small pieces. Push the ends into the top of the body to create antennae. If you dislike black licorice, consider using pipe cleaners or other edible alternatives.
-
Add Candles: Place candles on the body for a celebratory touch.
Expert Tips & Tricks
- For an extra moist cake, brush the cooled cake layers with a simple syrup (equal parts sugar and water, simmered until dissolved) before frosting.
- If your frosting is too thick, add milk a teaspoon at a time until you reach the desired consistency. If it’s too thin, add more confectioners’ sugar.
- To prevent the cake from sticking to the pan, grease and flour the pan in addition to lining it with waxed paper.
- For a more vibrant frosting color, use gel food coloring.
- To easily smooth frosting, dip your spatula in hot water and wipe it dry before each stroke.
- If you don’t have pastry tips, you can improvise by using a Ziploc bag with a small corner snipped off. For a round tip, cut a tiny hole; for a star tip, make a small V-shaped cut.
Serving & Storage Suggestions
Serve the butterfly cake at room temperature for the best flavor and texture. The cake can be stored in an airtight container at room temperature for up to 2-3 days, or in the refrigerator for up to 5 days. If storing in the refrigerator, allow the cake to come to room temperature before serving. For longer storage, the cake can be frozen for up to 2 months. Wrap the cake tightly in plastic wrap and then in foil before freezing. Thaw the cake overnight in the refrigerator before serving.
Nutritional Information
(Note: These are estimated values and can vary based on specific ingredient brands and quantities used.)
| Nutrient | Amount per Serving | % Daily Value |
|---|---|---|
| Calories | 525 kcal | N/A |
| Total Fat | 26g | 40% |
| Saturated Fat | 9g | 45% |
| Cholesterol | 44mg | 14% |
| Sodium | 218mg | 9% |
| Total Carbohydrate | 70g | 23% |
| Dietary Fiber | 0g | 1% |
| Sugars | 52g | N/A |
| Protein | 3g | 6% |
Variations & Substitutions
- Gluten-Free Butterfly Cake: Substitute the cake flour with a gluten-free all-purpose flour blend.
- Dairy-Free Butterfly Cake: Use a dairy-free butter substitute and non-dairy milk in both the cake and the frosting.
- Different Flavors: Experiment with different flavor extracts in the cake and frosting, such as lemon, orange, or peppermint.
- Cake Base: While this recipe uses a simple cake base, feel free to use your favorite cake recipe, such as vanilla, chocolate, or even a carrot cake for a creative twist. Just be sure to bake it in a 13×9 inch pan.
- Seasonal Variations: Decorate with seasonal sprinkles and colors for a festive touch. For example, use autumn-colored sprinkles for a fall birthday or red and green sprinkles for Christmas.
FAQs (Frequently Asked Questions)
Q: Can I make the cake ahead of time?
A: Yes, you can bake the cake layers a day or two in advance and store them tightly wrapped at room temperature or in the refrigerator. Frost and decorate the cake closer to serving time.
Q: Can I use pre-made frosting?
A: Yes, you can use store-bought frosting to save time. Just be sure to divide it and tint one portion as directed in the recipe.
Q: How do I prevent the cake from drying out?
A: Make sure not to overbake the cake. Also, store the cake in an airtight container to prevent it from drying out.
Q: What can I use instead of licorice for the antennae?
A: Pipe cleaners, pretzel sticks dipped in chocolate, or even small skewers can be used as alternatives to licorice for the antennae.
Q: Can I make this cake in a different size pan?
A: While a 13×9 inch pan is recommended for this recipe, you can adjust the baking time if you use a different size pan. Keep a close eye on the cake and test for doneness with a toothpick.
Final Thoughts
Now it’s your turn to create your own butterfly cake masterpiece! Don’t be afraid to get creative with the decorations and colors – the sky’s the limit. Whether it’s for a birthday, a special occasion, or just a fun baking project, this cake is sure to bring smiles to everyone’s faces. Share your creations and let us know what variations you tried! Pair this whimsical cake with a refreshing glass of iced tea or a scoop of vanilla ice cream for the perfect sweet treat. Happy Baking!