
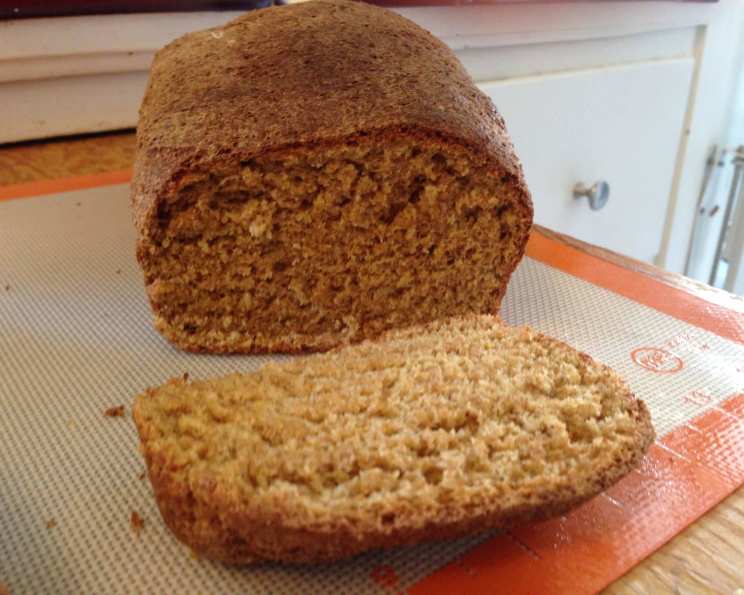
Butternut Squash Yeast Bread: A Taste of Autumn Comfort
There’s a particular memory etched in my mind: the aroma of baking bread mingling with the crisp scent of autumn leaves. My grandmother, a woman whose hands possessed a magical touch in the kitchen, would always bake a butternut squash bread as the days grew shorter. The golden hue of the loaf mirrored the changing colors of the trees outside, and each slice, slathered with butter, was a warm embrace against the season’s chill. That bread wasn’t just food; it was a symbol of home, family, and the simple joys of fall. This recipe is my attempt to recreate that comforting feeling, to share a slice of that memory with you.
Recipe Overview
- Prep Time: 30 minutes
- Cook Time: 30 minutes
- Total Time: 8 hours 30 minutes (includes autolysing and rising time)
- Yield: 2 Loaves
- Servings: 24
- Dietary Type: Vegetarian
Ingredients
- 1/2 cup buttermilk
- 1 tablespoon honey
- 1 tablespoon molasses
- 1 egg
- 1 teaspoon salt
- 2 tablespoons butter, melted
- 1 cup butternut squash, pureed
- 2 teaspoons cinnamon
- 1/4 teaspoon nutmeg
- 1/8 teaspoon clove
- 600 g whole wheat flour, fresh milled (about 4 cups)
- 4 tablespoons vital wheat gluten
- 2 teaspoons yeast
Equipment Needed
- Bread machine
- Mixing bowls
- Measuring cups and spoons
- Two loaf pans or baking sheet (for rolls)
- Cooling rack
Instructions
- Begin by adding the buttermilk, honey, molasses, and egg to the bread machine.
- In a separate container, combine the butternut squash puree with the cinnamon, nutmeg, and cloves. This aromatic mixture will deeply enhance the bread’s flavor profile.
- Add the butternut squash mixture to the bread machine, layering it on top of the wet ingredients.
- Now, add all of the whole wheat flour (except for about one cup) to the bread machine bowl. Start the bread machine on the “dough only” setting. Let it begin mixing, observing to ensure all ingredients are incorporating.
- Allow the bread machine to mix the dough for approximately ten minutes, then turn it off.
- Autolysing Step (for fresh milled grain): This step is crucial if you’re using freshly milled whole wheat flour. Remove the dough from the bread machine bowl and place it in a separate bowl, then refrigerate for 8-24 hours. This allows the whole grain to break down, improving digestibility and flavor. If you’re using store-bought whole wheat flour, you can skip this step.
- After the autolysing period, return the dough to the bread machine. Add the remaining one cup of whole wheat flour and the yeast. Restart the bread machine on the “dough” cycle.
- Once the dough cycle is complete, remove the dough from the bread machine pan. Shape it into two loaves, or alternatively, divide it into 24 rolls.
- Place the shaped loaves or rolls onto greased loaf pans or a baking sheet. Allow them to rise for 30 minutes in a warm place.
- After the second rise, bake the bread in a preheated oven at 350°F (175°C) for 30 minutes.
- Once baked, remove the loaves or rolls from the oven and let them cool on a wire rack before slicing and serving.
Expert Tips & Tricks
- Enhance the Squash Flavor: Roasting the butternut squash before pureeing it intensifies its natural sweetness and nutty flavor. Simply halve the squash, remove the seeds, and roast cut-side down at 400°F (200°C) until tender, about 45-60 minutes.
- Kneading by Hand: If you don’t have a bread machine, you can easily adapt this recipe for hand kneading. Knead the dough on a lightly floured surface for 8-10 minutes, or until it becomes smooth and elastic.
- Adjusting for Humidity: The amount of flour needed can vary depending on the humidity in your kitchen. Add flour gradually until the dough is slightly sticky but manageable.
- Overnight Proofing: For an even deeper flavor, let the shaped loaves rise in the refrigerator overnight. Bring them to room temperature for about 30 minutes before baking.
- Egg Wash (Optional): For a glossy crust, brush the loaves with an egg wash (1 egg beaten with 1 tablespoon of water) before baking.
Serving & Storage Suggestions
This butternut squash yeast bread is delicious served warm with a generous pat of butter or a drizzle of honey. It also makes excellent toast or sandwich bread.
To store, wrap the cooled loaves tightly in plastic wrap or place them in an airtight container. At room temperature, the bread will stay fresh for 2-3 days. For longer storage, freeze the loaves for up to 2-3 months. Thaw completely before slicing and serving. To refresh the bread, you can lightly toast it or warm it in the oven for a few minutes.
Nutritional Information
| Nutrient | Amount per Serving | % Daily Value |
|---|---|---|
| Calories | 107.7 kcal | – |
| Calories from Fat | 16 g | 16% |
| Total Fat | 1.9 g | 2% |
| Saturated Fat | 0.8 g | 4% |
| Cholesterol | 10.5 mg | 3% |
| Sodium | 115 mg | 4% |
| Total Carbohydrate | 20.5 g | 6% |
| Dietary Fiber | 3 g | 12% |
| Sugars | 1.7 g | 6% |
| Protein | 3.9 g | 7% |
Variations & Substitutions
- Spiced Up: Add a pinch of ground ginger or allspice to the squash mixture for a warmer, spicier flavor.
- Sweetened with Maple: Substitute the honey and molasses with maple syrup for a different depth of sweetness.
- Nutty Crunch: Incorporate 1/2 cup of chopped walnuts or pecans into the dough for added texture and flavor.
- Pumpkin Power: Replace the butternut squash puree with pumpkin puree for a classic fall twist.
- Dairy-Free Option: Use a plant-based milk alternative like almond milk or soy milk instead of buttermilk. Ensure your butter substitute is also dairy-free.
FAQs (Frequently Asked Questions)
Q: Can I use all-purpose flour instead of whole wheat flour?
A: While this recipe is designed for whole wheat flour, you can substitute it with all-purpose flour. However, the texture and flavor of the bread will be different. You may need to adjust the amount of liquid, as all-purpose flour absorbs less moisture than whole wheat.
Q: Why is the autolysing step important for fresh milled flour?
A: Freshly milled whole wheat flour contains bran that can inhibit gluten development. Autolysing allows the flour to fully hydrate, softening the bran and improving the bread’s texture and rise.
Q: Can I make this bread without a bread machine?
A: Absolutely! Follow the instructions for hand kneading outlined in the “Expert Tips & Tricks” section.
Q: How can I tell if the bread is done?
A: The bread is done when it is golden brown and sounds hollow when tapped on the bottom. You can also use a thermometer to check the internal temperature; it should be around 200-210°F (93-99°C).
Q: My bread is dense and doesn’t rise well. What could be the problem?
A: Several factors can contribute to dense bread, including using expired yeast, not kneading the dough enough, or not allowing it to rise sufficiently. Ensure your yeast is fresh, knead the dough properly, and provide a warm environment for rising.
Final Thoughts
I sincerely hope you’ll try this recipe for butternut squash yeast bread. It’s more than just a loaf; it’s a comforting experience, a taste of autumn warmth that you can share with your loved ones. Don’t hesitate to experiment with variations and find what works best for you. And please, share your creations and feedback – I’d love to hear about your baking adventures! This bread pairs beautifully with a hearty soup, a cheese board, or simply a cup of tea on a chilly evening. Happy baking!